|
In case you missed the previous posts about our Ugly Sweater DIY's, we went to Goodwill and purchased some cheap shirts to decorate. We also bought a bag of bows and garland from there as you can get those at a fraction of the cost you would retail! You can see that post here: agirlwhoneedstocraft.weebly.com/christmas-diy/the-last-minute-ugly-sweater Now, my husband's ugly sweater was Riverdale inspired. We're really big Jughead fans! (He even asked for his beanie and shirt he wears in the tv show, lol.) So, being that Jughead's shirt has a giant S on it, he took hot glue and attached a strand of garland in an S formation to the front of his shirt. 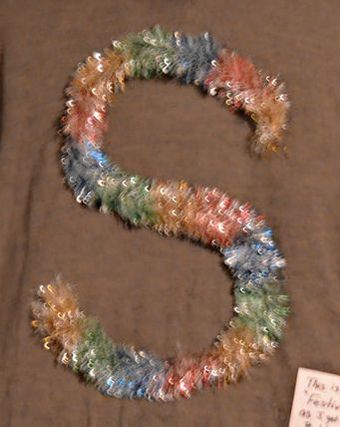 We were laughing about how simple it was and I went, "This is as festive as it gets Betty". To which my husband thought this was just HILARIOUS, and decided to add it to the front of the shirt. He used a sticky note and hot glued that as well. (Reminder that these quick DIY sweaters are not intended to go through a washing machine.) 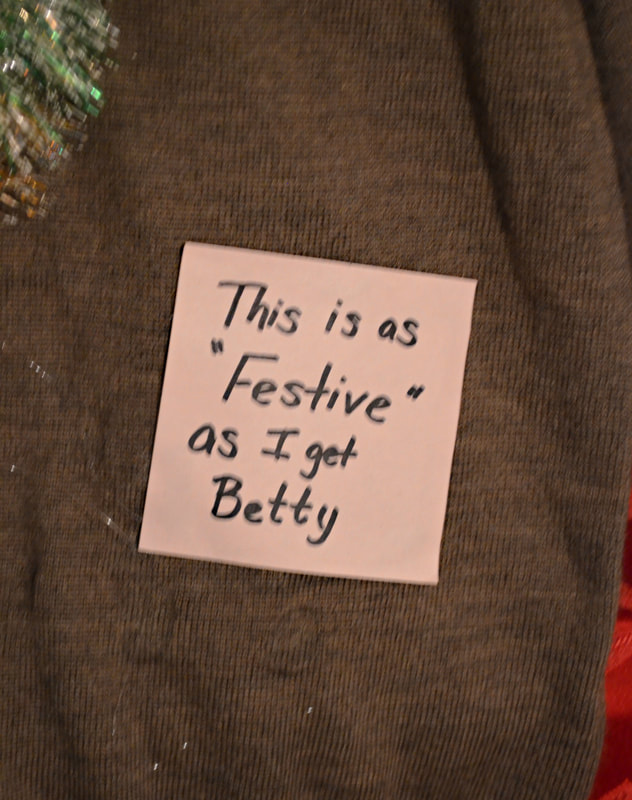 Now, in my post about how I made mine, I explained that my husband used Elmer's glue on his shirt and it was taking a very long time to dry. (This took two days to dry.) Well, he made the back of his shirt the Jughead spray-paint scene! 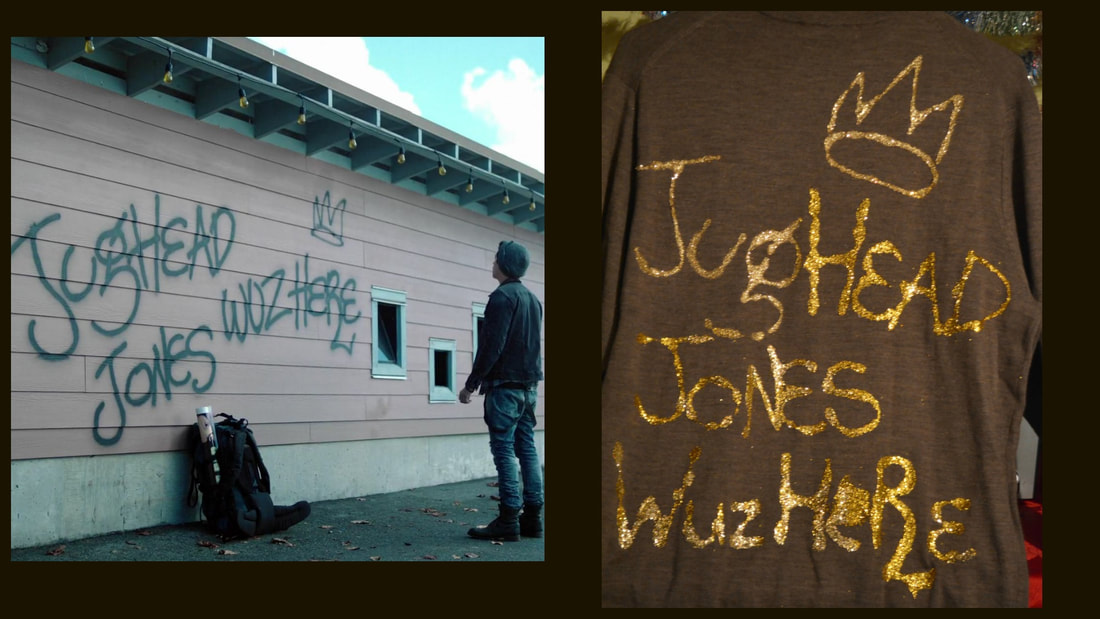 I thought this was adorable, honestly he did a great job of doing this freehand. The only thing is, once again, I would always recommend using Aleene's tacky glue on these sweaters. It dries faster and holds stronger then the Elmer's. I just thought I'd share the last of our Ugly Sweater posts and give you guys more ideas. Especially for those that prefer the minimalist approach. Not to mention for the Riverdale fans *wink*. If you're a Stranger Things fan you may be interested in mine which you can find here: https://agirlwhoneedstocraft.weebly.com/christmas-diy/ugly-sweater-DIY-part-2
0 Comments
If you saw part one of the ugly sweater posts then welcome back! If this is new to you, the concept is really simple. Go to Goodwill, purchase a cheap shirt and maybe some garland. Then go home and explode craft items all over it! Glitter and glue are especially really popular and easy to do. My husband and I have been making our own sweaters for a few years now. Last year he made a very inappropriate sweater with pole dancing gingerbread men - it was hilarious and perfect for an adult party. I made a reindeer drinking wine that said Merry Lit-Mas. I'm big on puns when it comes to ugly sweaters, lol. And this year was no difference. I went with a clever pun- "Feliz Naughty Dog" and then tried to find a way to incorporate a unique idea. This year I've been obsessed with a few tv shows: Stranger Things, Riverdale, and Vampire Diaries/Originals. And thus the idea for my sweater was born! ***THIS HAS A SPOILER FOR STRANGER THINGS SEASON TWO IF YOU HAVEN'T SEEN IT YET*** I started with a blank canvas (a $5 shirt from goodwill)  I said my pun was "Feliz Naughty Dog" so I made a sitting dog body outline with glue and glitter. I used Aleene's Clear Gel Tacky glue, because Elmer's has a higher chance of bleeding through your clothes and is less likely to hold the glitter in the long wrong. If you saw the last post I explained all of this and how it works for kids for a quick fix. Anways, I forgot to take photos of the glitter-glue outline. But you can see it in other photos later. Soo anyone guessed where I'm going with this? Stranger things has the Demogorgon and season two they added the demodogs! Which are essentially just demogorgons but with a more dog like body. Some people argue that they're just baby demogorgons and other's argue that they're more of a separate creature. Which is the direction I lean in, but only the writers know the truth. Now, that that information is out there, I took grey felt and made the open demogorgon mouth. You're going to cut five tear shaped cutouts. 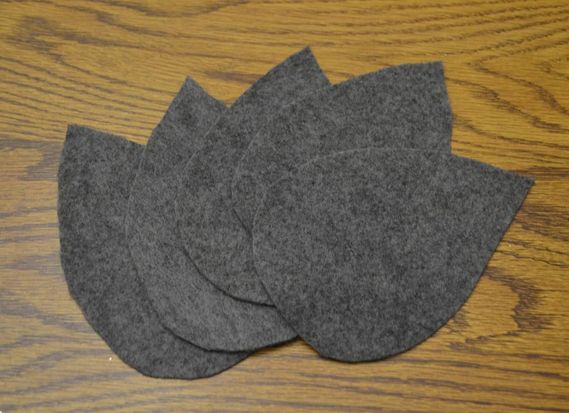 Then I took my trusty Hot Glue Gun and glued the petals down to make the open mouth shape. And hey, there you can see the outline of my dog body with glitter! 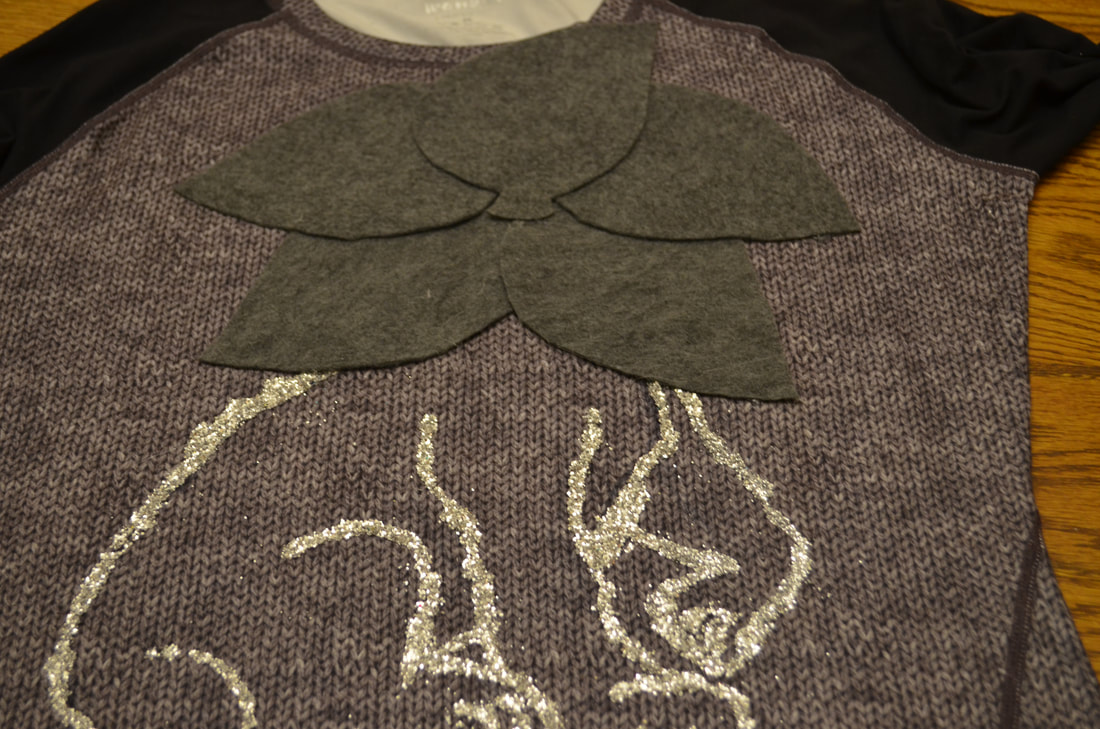 I mixed two of my paints together to create the inner mouth color. Once I was satisfied with the color I painted in the teardrop felt. I will mention that the paints I used were not "fabric paints" so the same thing as the glue, this is not going to survive a washing machine or even a hard hand washing. I'm not making these sweaters with a long term thought in mind, as these are simply for one or two days for ugly sweater parties. 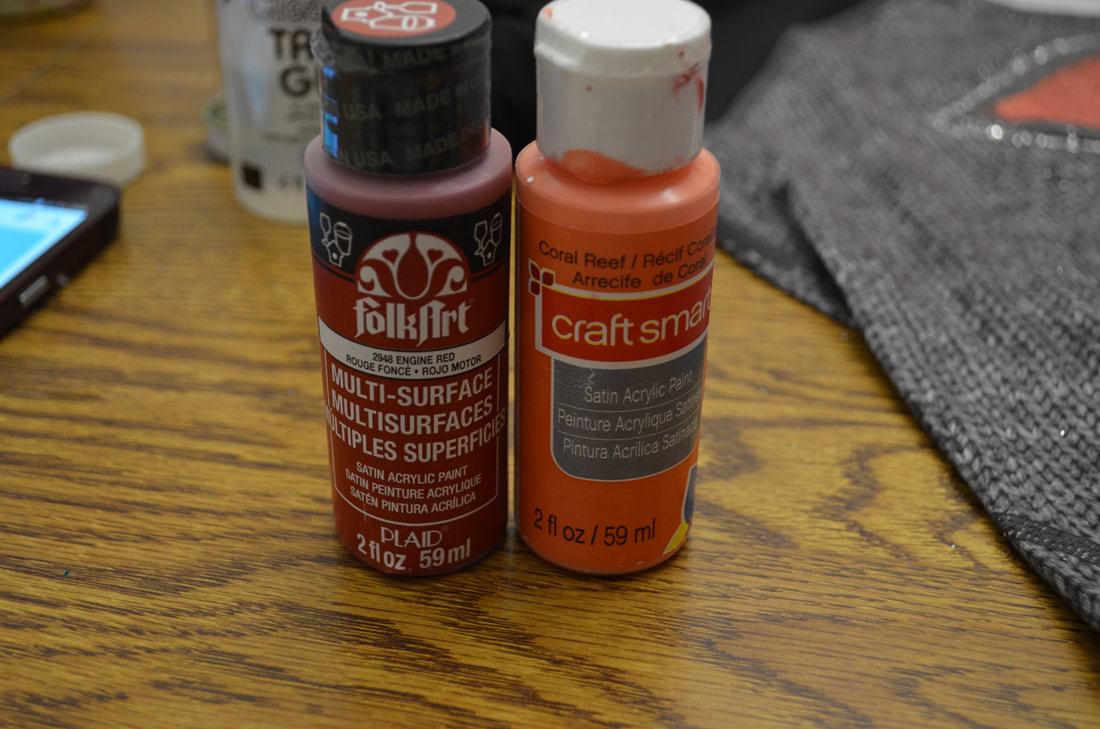 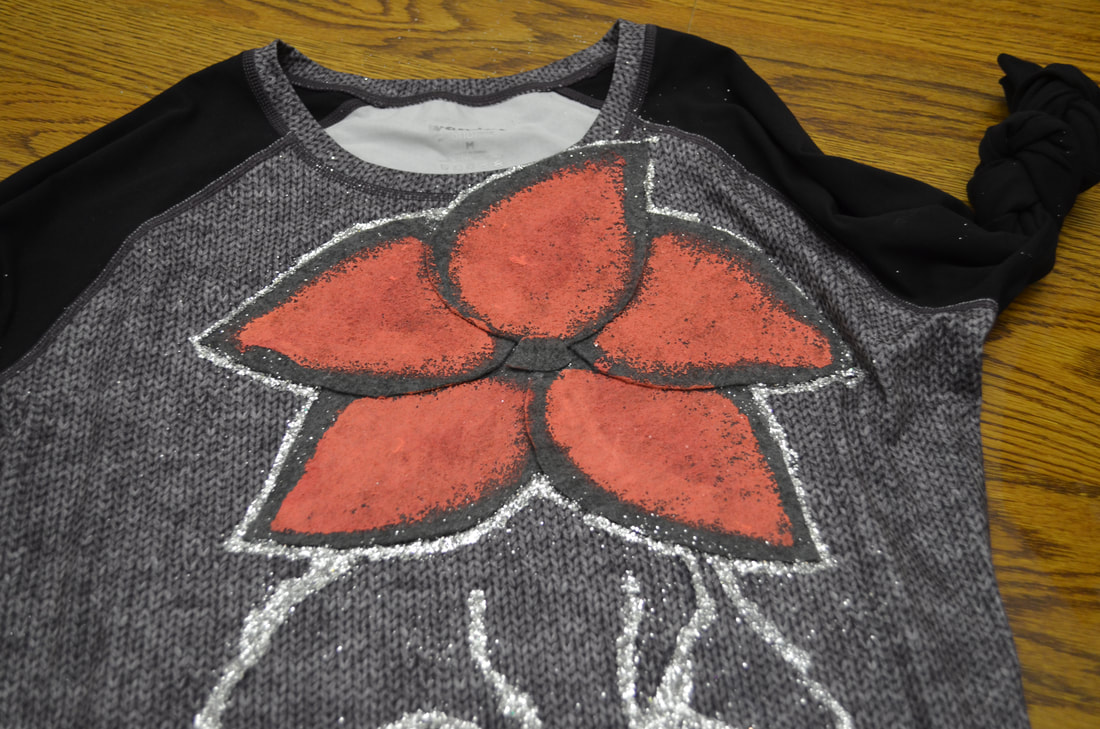 I also took the glitter and glue and outlined the mouth shape. That way it kept the overall look of this being the "dog" body. Once the inner mouth color was set I painted the black inner circle of the mouth, and took white and made little triangle teeth all over the petals. Demodogs also have distinct body lines and muscle marks so I took grey and black paint and made some lines to give the dog body some dimension over the knit design of the shirt. And I also couldn't make a stranger things sweater without adding the iconic light strands. I didn't place the letters under them because I felt like it would be TOO much and I was already going hard on this shirt! 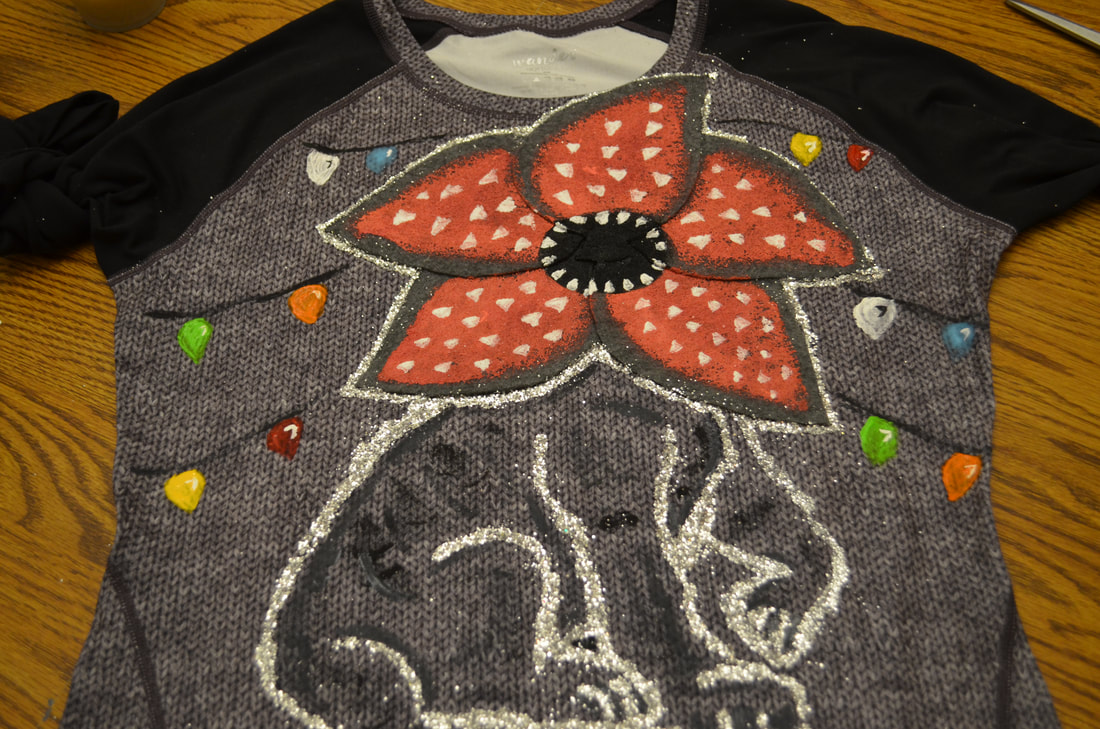 I added my pun in glitter and glue on the bottom of the shirt. 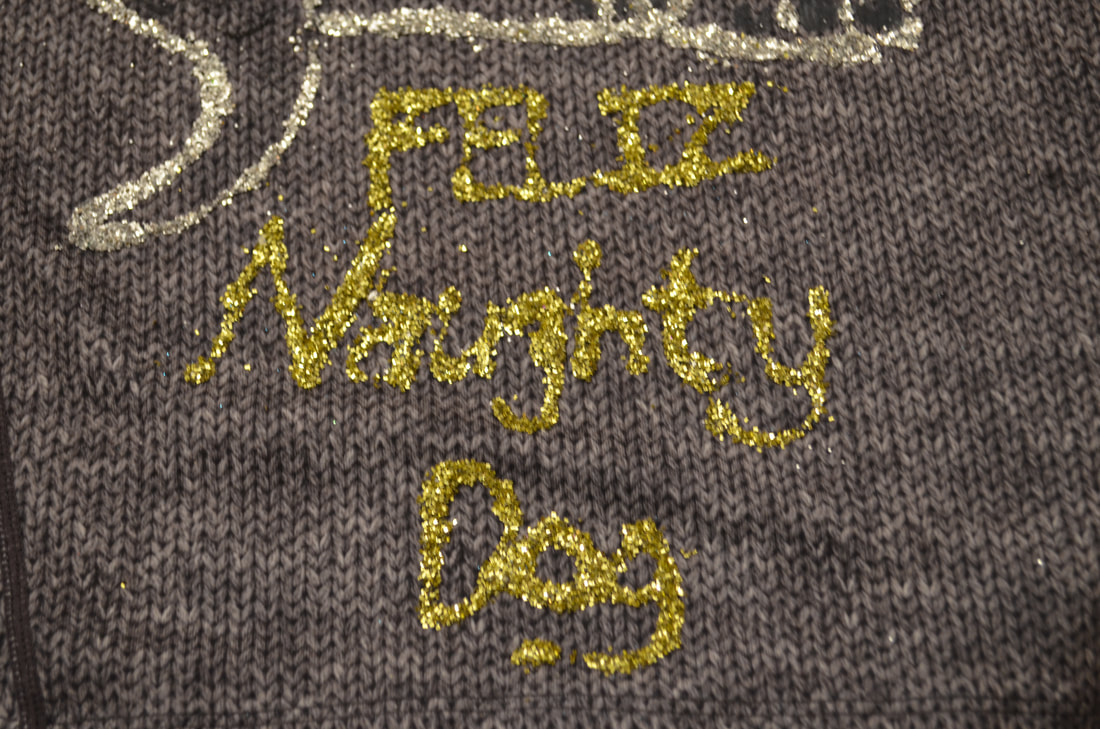 But I'm not done yet! I wanted to really add a touch of WOW to my "dog" so I added a collar with the name tag saying DART and the special yellow marks that DART had. Once again, I said spoiler alerts, ya'll were warned! And I took silver pipe-cleaners and hot glued little parts to the top of the light bulbs. 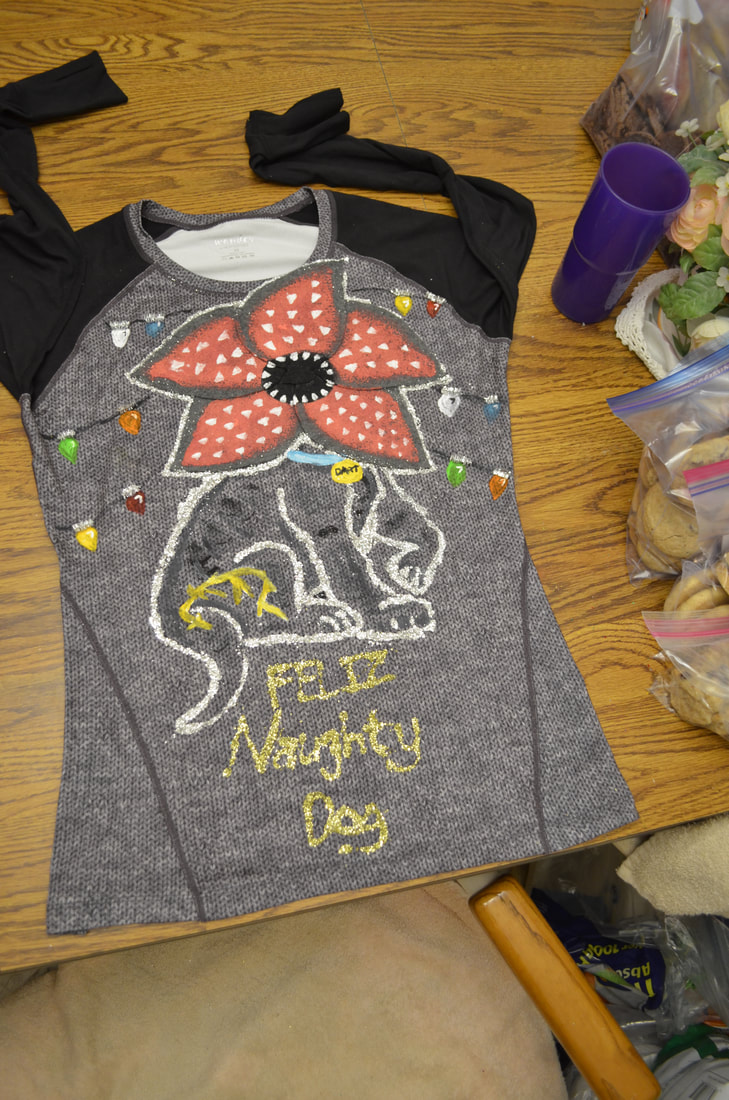 There you go! I hope I made a few nerds smile at my Stranger Things strategy AND I hope I gave ya'll some inspiration to make a fun ugly sweater for your holiday festivities. This really has become a fun activity I look forward to every year, my husband and I make an evening out if and I cherish the laughs and memories we make. I like to call this the, "MOMMY I NEED AN UGLY SWEATER FOR SCHOOL TOMORROW!" Because, of course you do. Why would you tell me in advance? A day is plenty of time to figure something out! And I don't know about ya'll but these "ugly" sweaters are selling for $20 bucks or more. Literally a few years back I bought one and it cost me $36. I was IN LOVE with the design, and have worn it multiple times over the years. But I just don't think something you're probably going to wear ONCE, or for a themed party, shouldn't cost you that much- especially if your kid just wants one for a 6 hour school day. No. So what do you do when you need that last minute Ugly Sweater? Good Will or Salvation Army is the perfect place to buy a cheap long sleeved shirt that you can guilt-free, craft all over. AND because my husband and I throw an ugly sweater event with our friends every year we too made sweaters using this technique. Starting with my Goodwill purchases. 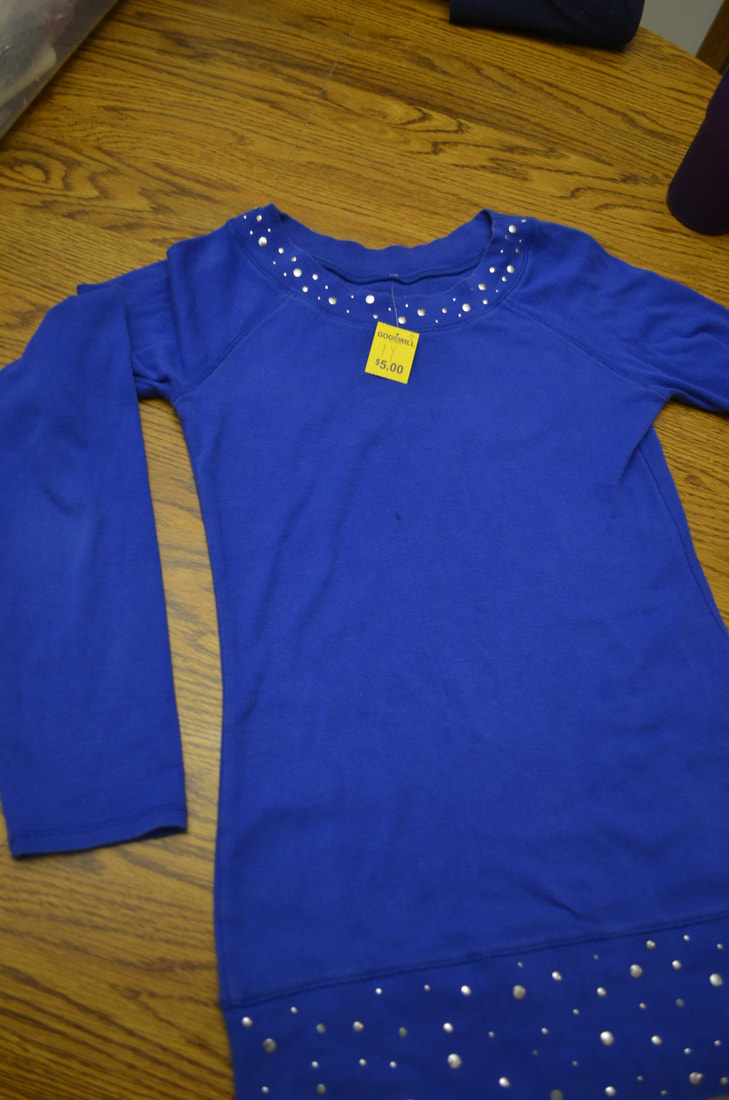 This is a Justice long sleeved shirt. Just a quick scroll through their website and you can see that the prices on their long sleeved shirts go from $22 - $29. I got this for five.  Now, my shirt was brand new (still had it's tags.) It's a $16 shirt and I go it for $5. 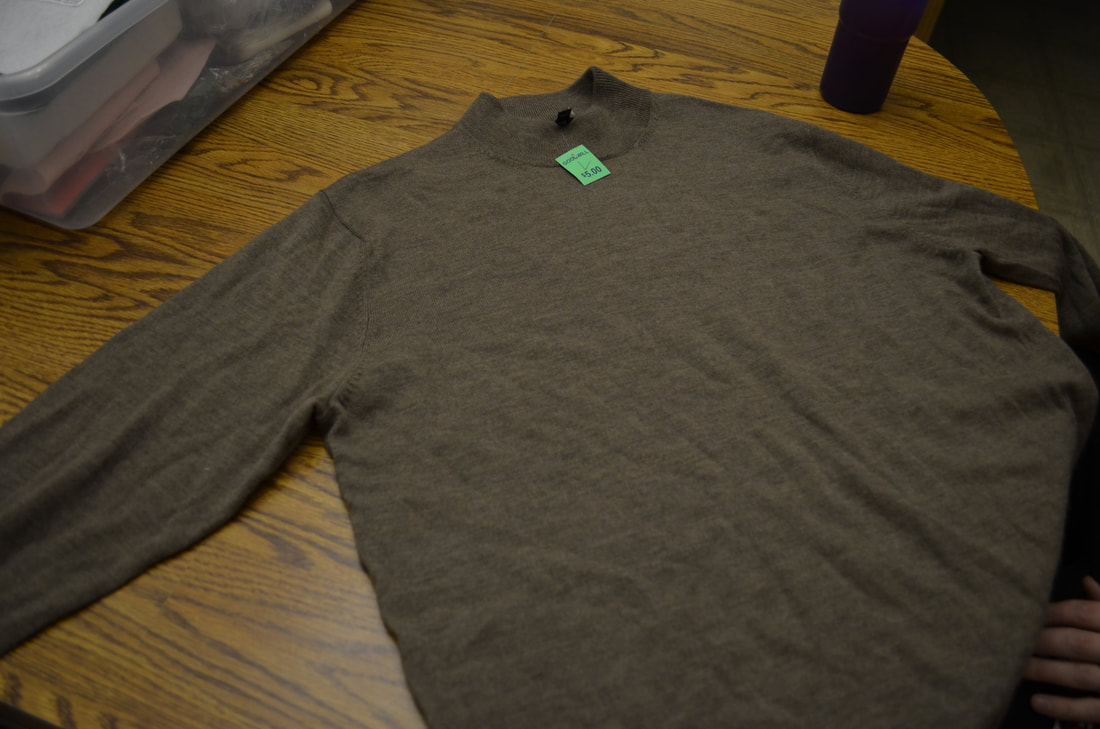 My husbands shirt was also a $5 sweater. For the price of all three of our shirts- it STILL cost us less then it would to have bought ONE new shirt for a child. BUT WAIT Goodwill has other products that make holiday festivities cheap and easy. I also was able to purchase garland and bows! 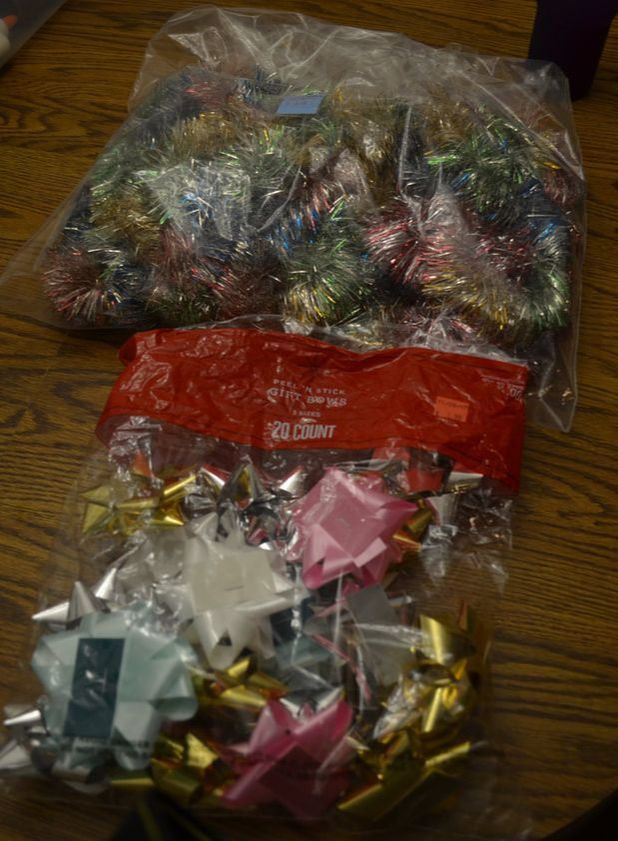 The bag of garland was $3 and the bag of bows were $1.99. So adding up my grand total for ugly sweater purchases at goodwill and I've spent: $20. That's for three people, SUCCESS already! The rest of the project is REALLY up to you. And this is where it gets to be SUCH a fun activity. My husband and I LOVE doing this. And I know JJ adored making her own sweater this year. You will need glue. I recommend having that trusty Hot Glue Gun ready and using tacky glue instead of Elmer's glue. HOWEVER, Elmer's glue will work in a pinch, especially for a 6 hr ugly sweater. The main reason I suggest the Aleene's Clear Gel Tacky, is because I find it bleeds through the fabric less, holds the glitter better, and dries on very nicely. In the past (as my husband is currently experiencing) I've had the Elmer's glue bleed through your shirt so bad that it's just sticky and wet and takes days to dry. I suppose this is also a good time to tell you that these are not shirts you can throw in the machine. There's a good chance that you're wearing this once and then tossing it, so you probably don't care, but I have to say it anyways. This is a no-sew project and these glues are not MADE for fabric so in the long run they would fall apart in the machine and you really don't want to mess with that. So starting with the kid's ugly sweater- we gave her the glue, pulled out the box of glitter and other various crafting items we had laying around (sequins, felt, fake snow, etc) and told her to do what she wanted. 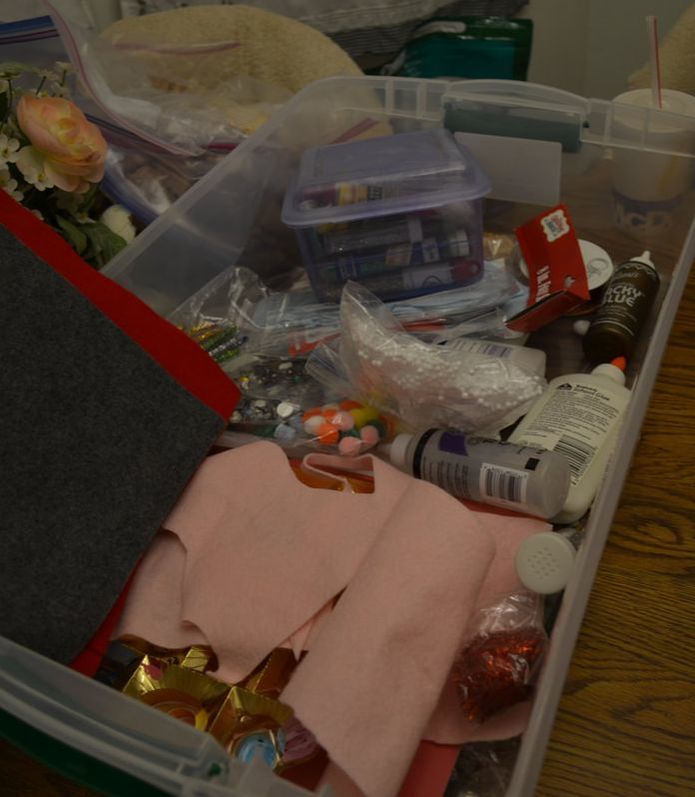 She started with making a Christmas tree outline with glue and then quickly sprinkled green glitter over the outline. Letting it sit for a few minutes I helped her gingerly pick the shirt up and tap off the excess glitter onto a plate. NOW, I know some people who are shocked by this, but you can then take that paper plate and fold it a taco, and pour the glitter back into the container! Save all the money you can! 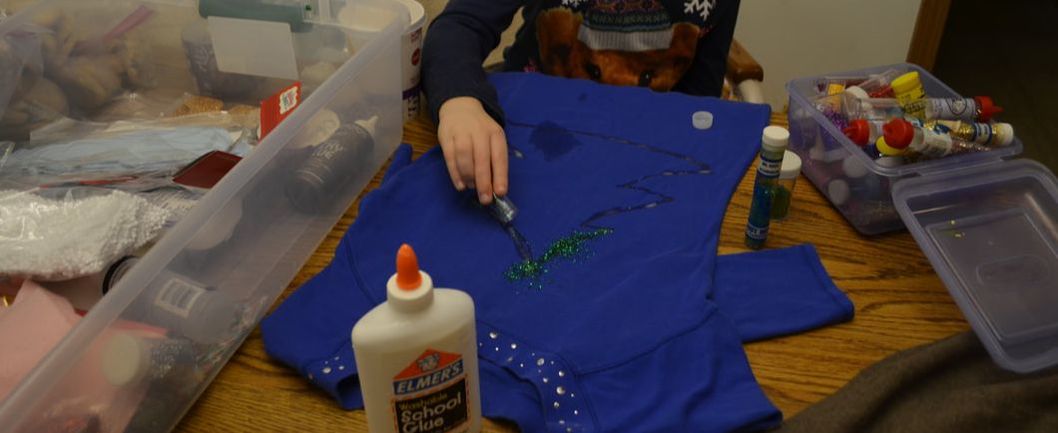 Once she had her tree put together she also did little dots of ornaments. NOW because this took her so long, she ended up just doing all the ornaments at once, instead of one at a time, and so when we poured the glitter from the shirt to the plate we now had multi colored glitter... I mean that has to come from somewhere, right? Lol. 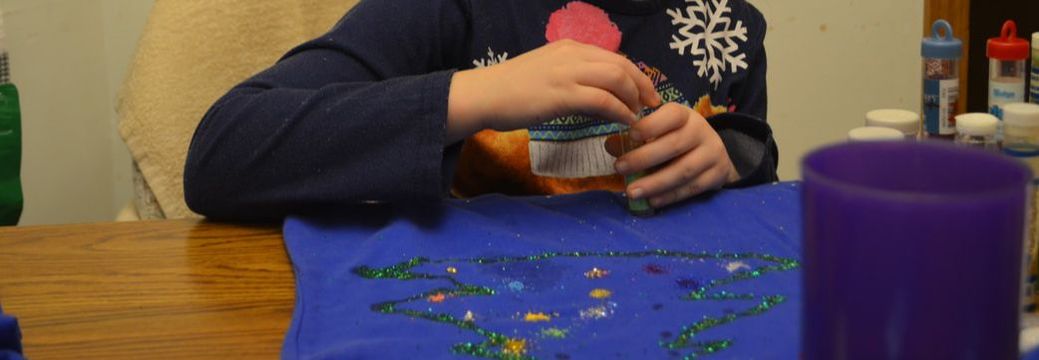 This is so simple for your kids, honestly all they need is a cheap shirt, some glue, and a few tubes of glitter. And with that they can make their own weird ugly sweaters for school. Age depending of course, I wouldn't leave them completely alone. ESPECIALLY if they're going to need the Hot Glue Gun. In our case, once JJ's original masterpiece was finished she wanted to add on extra parts. We took pipe cleaners and made garland and a star for the top of her tree. And we used felt to make the trunk of her tree. Now, I know from experience that the only way those are going to stick to a shirt is going to be if you use the Hot Glue Gun. **Cue parental involvement** She also wanted to add a bow to her shirt. Well, actually she wanted two at the upper part of her shirt... but ummm it had a very inappropriate look to it, so I talked her into one adorably placed one on her neckline. See parental involvement saves the day, lmao. 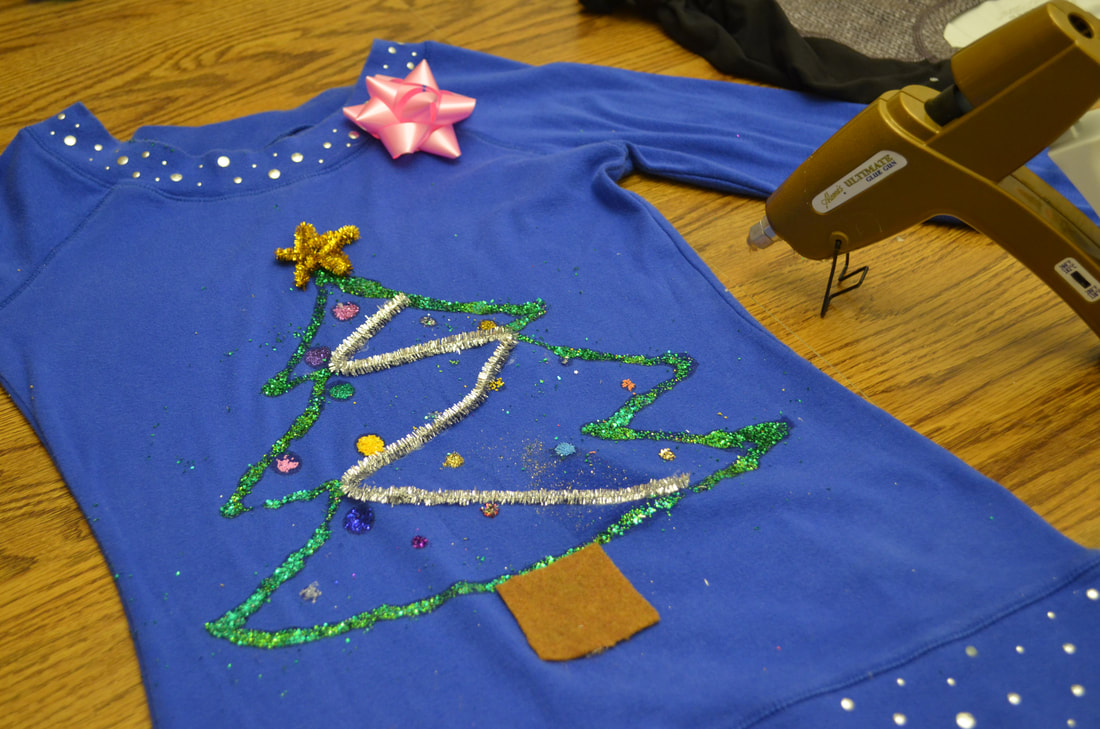 We also broke into the bag of garland and made a little belt line at the bottom of her shirt and little wraps around the wrists. The garland piece we had was pink so it went SOOO cute with the bow on her shirt. It really pulled together nicely! And it only took an hour out of our night for her to make a little sweater for school. See, 'school projects' can be done the night before *wink* 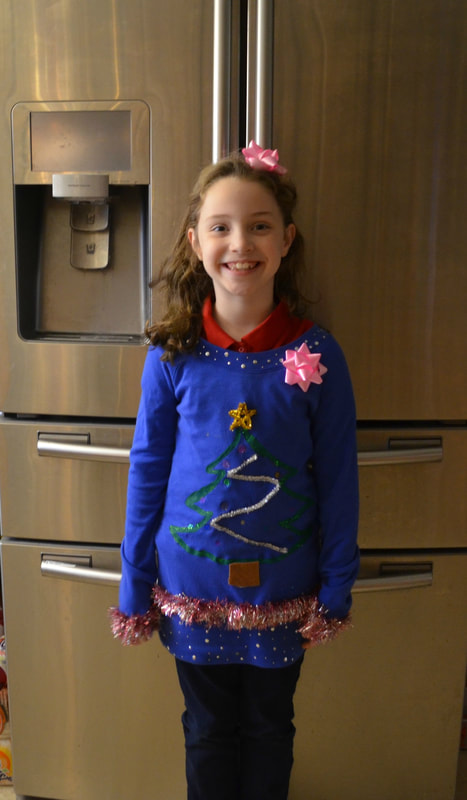 As you can see in step-by-step photos we did use Elmer's glue on JJ's shirt. Thankfully because of her shirt material it didn't bleed through, except for a few dots here and there. My husband's shirt material did not have the same luck, and it's been hanging up for two days drying...
But, back to JJ's sweater, we hung it up and let it dry over night and it was good to go for the School day the next day. A LOT of the glitter had come off by the time the day was over... This is because of the type of glue we used and she did take it off and crumple it up in her backpack... who knows how many times. So this is, again, why I suggest the Aleene's Gel glue and recommend this as a quick ugly sweater fix for all the mom's out there. I DO have a PART TWO planned where I show you what I did for my sweater and possibly my husband's... you know, if his ever dries ;) |
AuthorWrite something about yourself. No need to be fancy, just an overview. ArchivesCategories |
 RSS Feed
