|
Now, I am very new to using Polymer Clay. I am not an expert in any way and people with more experience with clay should absolutely feel free to let me know if they see anything they think I should do differently. I encourage conversations and sharing our techniques. How else do we learn? With that being said, let's jump into this. YOU WILL NEED:
I specifically mention the brand clay I used because each one cooks differently. I did a bunch of research before starting this project. (Even though there are instructions on the clay package, it doesn't hurt to look into it.) I preheated the oven while I started sculpting it. That is one thing I do know- make sure your oven is preheated to the proper heat before baking your clay. I broke off a wall of the clay and started twisting it and softening it so that I could easily mold it.   I broke a part off the clay and rolled it out using my hand. (ALSO should mention that I am using my trusty Silicon Sheet. The clay didn't stick to it and it kept the table clean.)  In this initial part of the project I am working on making seaweed. Once I had a roll I started sculpting it with my hand to make it looks "wavy". The way seaweed, specially animated seaweed, would look. I placed it up against the container this seaweed was going to be attached to. This way I knew how tall to make it.  Then I took the pointed end of my sculpting tool and used it to make lines in the seaweed. (Honestly, if these various tools have names I do not know them. The packaging only said clay tools.)  I made three strands of seaweed per cluster, and made a small section of clay to wrap around the base of the container they were being stuck to. Now, I know I'm going into a lot of detail for a basic clay tutorial. Well, this is also going to be part one of the next craft tutorial being published on this page. (So come back soon if you're interested in seeing that one!) To go with this project I also needed some smaller things made. A small square and two 'rocks' for some miniature snails to sit on. I'm going to discuss cooking these first. For one, I painted the small square before cooking in hopes that the gold paint would really stick to it. The 'rocks' I painted afterward they were already cooled from the oven. To bake these, like I said, the oven was already preheated to 275 degrees. I took two aluminum pans to bake the clay in. The universal thing I've seen other clay crafters say is that you have to be careful not to burn your polymer. I placed parchment paper on the inside of the pan before placing the items in it. I cooked the smaller items first for a very small amount of time. The consensus is that 6mm tick clay should be baked at 30 minutes. But these were much smaller so I actually baked them for 12 minutes. Before baking the clay in the oven I placed the second aluminum pan on top of the other and used the bulldog clips to hold them together. These are all tips I've heard to keep your clay from being over baked.    When I did bake the seaweed clusters, I wanted them to keep their "L" bend. So I took aluminum foil and rolled it up and then wrapped those in parchment paper. This way the bend in the base of the seaweed would have something to rest on and keep it's shape. I also didn't want it to bake and "fall" so I placed bunches of aluminum foil and parchment paper under the leaves.  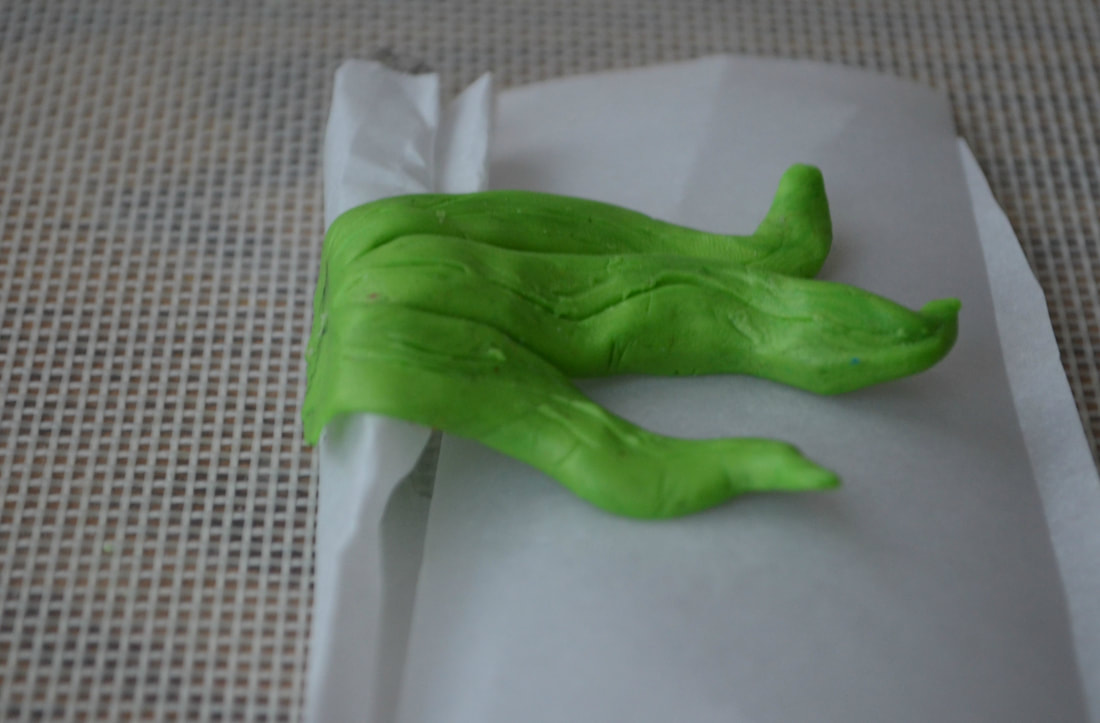 Once again these were placed in the aluminum pans with the bulldog clips, the oven set to 275, but these I did bake for the 30 minutes. 
0 Comments
I will be the first to say that this isn't a new idea. In fact lots of people have covered this topic. And yet, you know how often I have had to look for a how to like this? So, I figure it can't hurt to have one more tutorial on the internet. Sorry this isn't as interesting as my usual DIY's but I'm sure it will help someone out there. YOU WILL NEED:
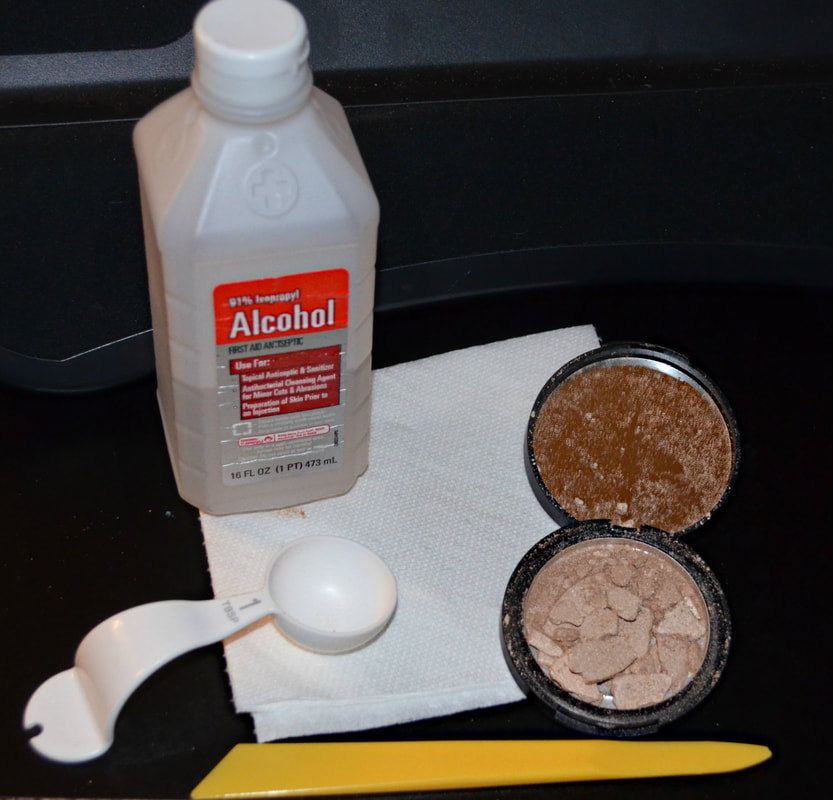 As you can see in the picture above my highlighter was broken. More annoyingly I bought it, opened it, and saw that! It's the first time I've ever bought makeup and it was straight up broken. But I figured why take it back? More than likely this either happened in shipping or while it was being stocked, so there's a good chance the rest of them were broken as well. Instead I just fixed it myself. In the supply list I mentioned that a knife was optional. (And I actually used a sculpting tool). If you want to, use your knife to chop up the broken makeup into finer pieces. This does seem to help more: the alcohol is soaked up better and in general it's just a smoother transaction. BUT I can understand if your makeup broke in large sections that you might not want to chop it all up. 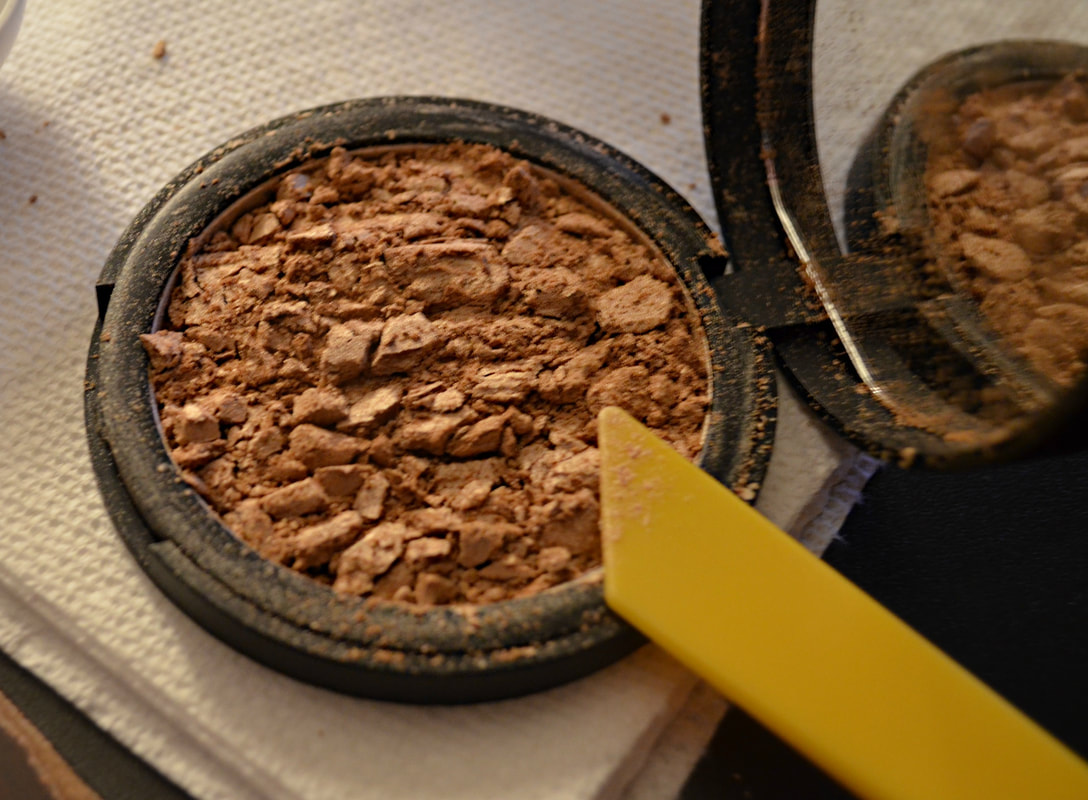 Once you've either skipped that step, or chopped the makeup real fine, you're going to get out your alcohol. I already had some in my cabinet for other projects and mine is the 91% alcohol. Which I will talk about because I want you to know the pros and cons.
But as I said, I already had the 91% in my cabinet, and I wasn't about to run to the store when it wasn't necessary. I was always told to use 1.5 tablespoons of alcohol for fixing makeup. I wasn't sure I was going to need that much so I added it a little at a time. I did end up using about that much, but I'm still glad I added it gradually. 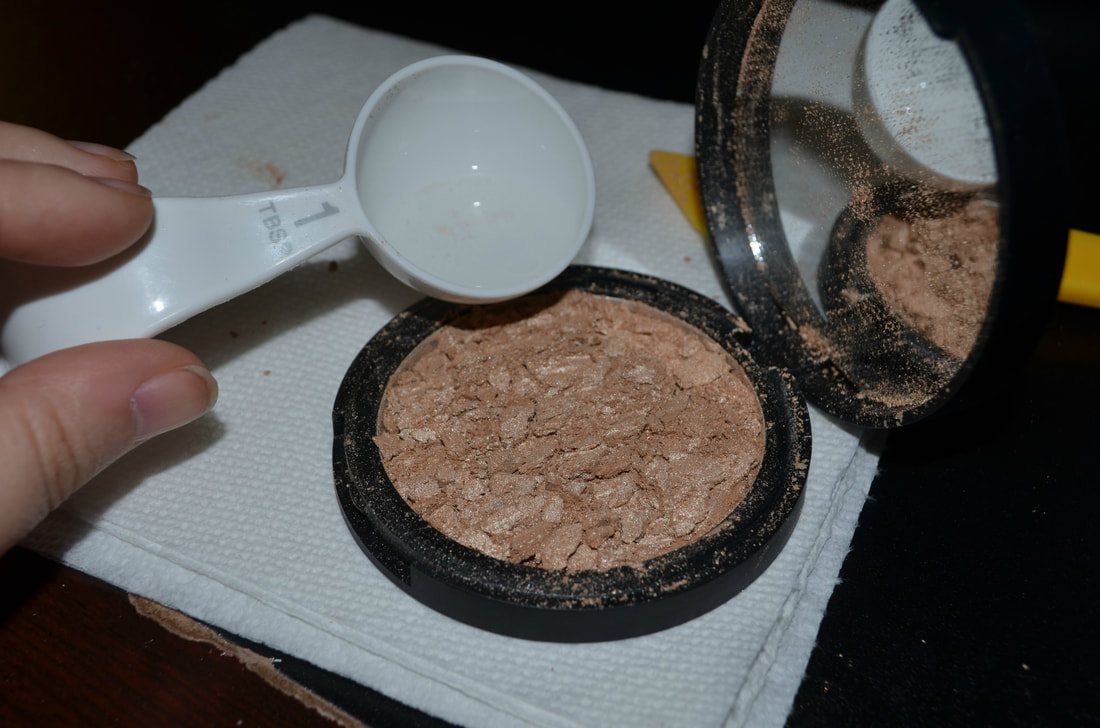 When the alcohol had actually saturated everything and the makeup was dissolving, I used my tool again to help spread the contents out to that it filled the inside of the compact. Technically what you're supposed to do next is let it sit for x-amount of time and THEN dab it with your paper towel. I however felt that there was in fact too much alcohol in the container and dabbed it a little early. But then I set it aside of 15 minutes and really used my paper towel to apply pressure to the makeup. This helps soak up any remaining liquid and helps make sure the makeup is properly back into place and will become powder once more. 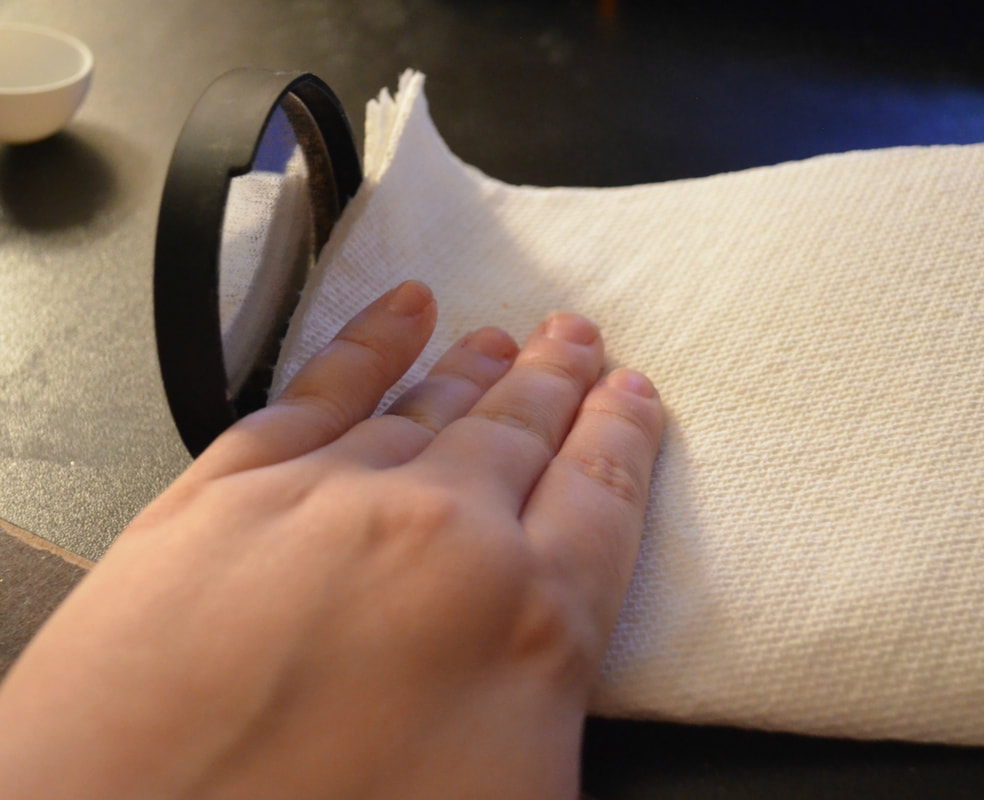 When this was done I used my finger to smooth the makeup (otherwise it had this silly paper towel print). And I used a q-tip to clean up around the edges of the compact. I left the makeup to sit out overnight just to be sure it was dry and now it's good as new. I've used it several times since fixing it and the only thing I will say is that occasionally when I open it I can smell the alcohol. BUT it's fleeting and my face doesn't smell like it after applying makeup so it's really nothing to worry about. 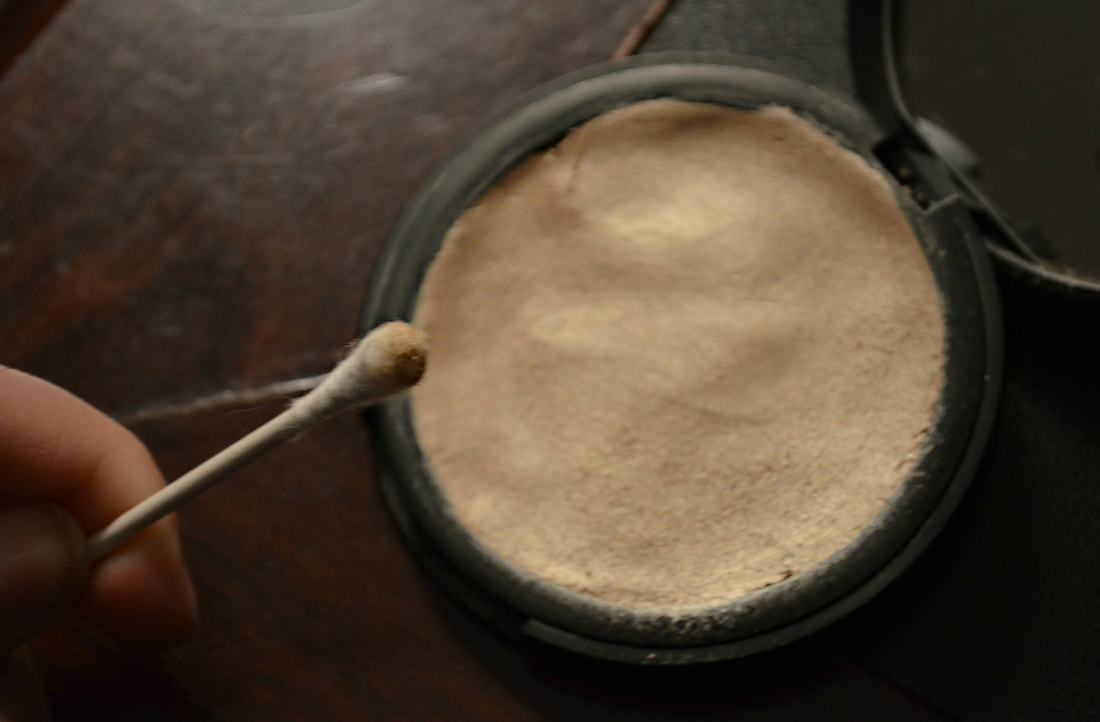 Once again I know this is out of the usual for my DIY's but I hope it is helpful to someone out there! And stay with me because the usual crafty DIY's are coming!
I don't know how many schools do this, but Jenna's school does a 'spirit week' of sorts. They have all kinds of themed days such as crazy hat day, team spirit day, etc. This year they had a Crazy Hair Day! (Although this could also work for anyone whose little one wants to do a Trolls costume for Halloween.) Now, JJ is far more outgoing then I was and she is all in for participating. Being the crafty guardian, all heads turned towards me. I suggested the Trolls since they've become a big deal again. So here we go, my tutorial for a Troll Hair. YOU WILL NEED:
 The trick to this is the water bottle. You will want to place the water bottle on the top of your child's head (or whoever you're doing this for) and pull their hair up over the bottle. This is where the hair brush comes into play. I didn't end up needing it, and with how curly her hair is I'm glad I didn't need to brush her hair up and over the bottle. IF the person's hair isn't long enough simply cut the very bottom of the bottle off. I will note that you should be careful doing this, plastic hurts if it's not properly smoothed. Jenna's hair was a little too short, so I did have to cut an inch off the bottom of the bottle. Once I did that, it was the perfect height to pull her hair up and over the top of the bottle. You're going to use your ponytail holder to attach the hair to the bottle. The hair tie will go around the neck of your water bottle and leave a cute little poof of hair at the top.  You can see that little poof in the picture above. You can also see that she has some small strands of hair that aren't long enough to go all the way up to the top of the water bottle. This is why those bobby pins are suggested. Using those bobby pins you can pull those hairs up and really hold them into place.  Now that you got that hair pinned / tied up you're going to want to hit that hair with some major hair spray! I have thick straight hair and it doesn't believe in staying put, curling, etc. It's a mess, lol. Jenna has thick CURLY hair, and it doesn't believe in behaving either. So I use MEGA HOLD hair spray. I LOVE Aussie, it's the first hair spray that did anything to keep my hair in place, and it smells AMAZING!  I'll be perfectly honest, I applied multiple coats of hairspray. The hole in the ozone? Yeah, it's over my sister's head. (I'm sorry guys.) Once the coats of mega spray have been applied I used the colored hair spray to give her that "Troll" colored appearance. I like to use the colored hair spray you can buy at Party City. I use it on St Patty's Day, but I find that if you just apply a standard color-wheel-color to normal hair, it doesn't really pop. You should first do a coat of white spray. Just a little something I find works best. If you have really light hair or blonde hair, you may be fine, but remember these are cheap dyes and colors and if you want them to look like the cap color you'll really want that first layer of white. (I forgot to mention that I covered her in a towel to make sure the color didn't stain her clothing.)  Give the coat of white hairspray a few minutes to dry and then apply the coat of whatever color you picked. Jenna wanted to have purple Troll hair, so that's what we went with. NOW, I sent someone else to pick up the hair spray. I didn't realize until the next morning (at 6 am) that they had only bought one can of the colored spray. I HIGHLY recommend having at least two cans of the colored spray. Since I only had one it's not a very vibrant purple. It looks kind of lavender in certain lighting, but she was still thrilled with it.  Once the purple hair spray has dried I hit her hair with another coat of Mega Hold. I'm dead serious that this wasn't going anywhere! Now, in the new trolls movie the main girl wears flowers in her hair. I was hoping I had some flower clips but I couldn't find any. Instead I used a flower crown we had from her Moana Party (check the party tab for Moana party crafts and DIY projects). Using those trusty Bobby Pins I attached the crown to her hair. This way it stayed in place the entire day- because she's a hyper kid.   Her hair held the entire day, except for a few strays that had managed to pop out of their bobby pins. I'll post a photo of that below to show you guys. We also made sure she was wearing a button up shirt so that we weren't attempting to pull a school shirt over this volcano of a hair-do, lol. This was relatively simple (I expected her hair to put up a bigger fight) and it only took about a half hour when all was said and done. Very worth it just from her smiles alone. AND for anyone wondering it came out in the shower no problem.  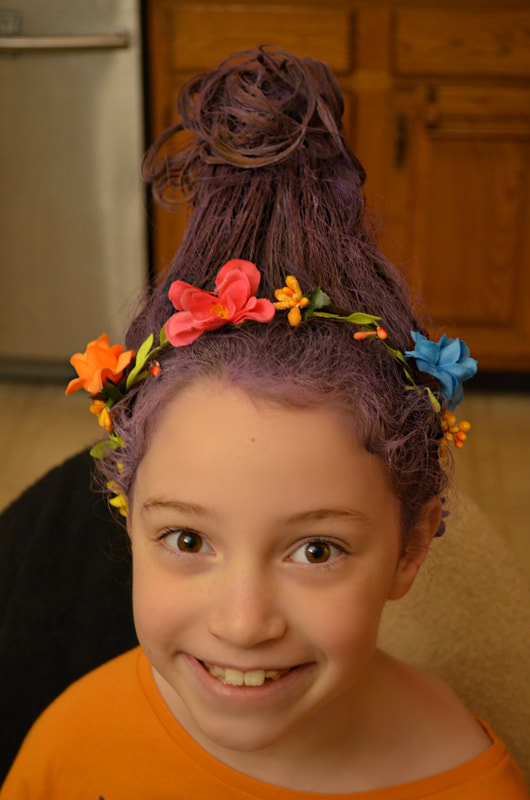 A few people know that I actually studied photography during college. I've always had a passion for photography and while I no longer want to pursue it for a career, it is very much a part of my daily life. Especially with this blog site! When it comes to photographing small items a Light-box would be very helpful. Now, you can get light-boxes for relatively cheap but the better quality ones tend to be $100 or more. I would love to get myself even a $40 one to see how it improves things! BUT I'm a newly wed chasing a writing dream and budgeting as best I can. Things like that are not in my current budget. You know what is? Nothing. SERIOUSLY, I made this for absolutely nothing. I had all the pieces already around my house! I'll try and place a value on certain items though, so you know what this could cost you. You will need:
To start with you'll need a cardboard box you're fine with sacrificing. Why didn't I have to spend any money on this? It's right after Christmas! I know this is going up late BUT easter's around the corner so keep an eye out for boxes! But, yea, I just went through the recycling and picked the box I thought would best meet my needs. 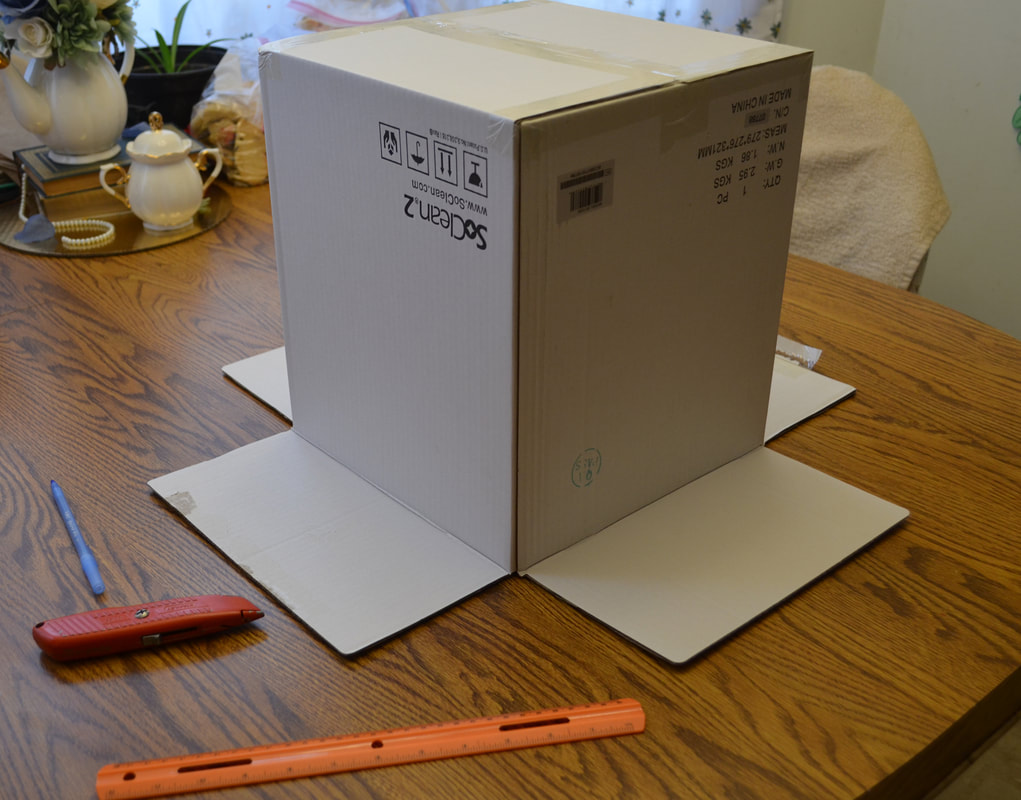 Now, you're going to decide how thick you want your borders. Remember that cardboard is relatively fragile and when you cut out the centers of the box sides, they are going to lose some of their strength and bend. I made mine relatively thin to give the most amount of space to the white tissue paper. The only spot where mine really started to bend was the top (I'll get to that).  It's hard to see but there's my drawn lines on the box. ^ This particular side only has three lines drawn. This is going to be the entrance where your items will be set to get photographed. So you're going to cut straight down and make this an open side.  You're going to start cutting out your sides. My husband actually came out and took over the cutting for me, which was adorably sweet of him.  When all your sides are cut out, hopefully all your sides will be flat. However, if you have some that bend, this is how I fixed it.   I look a bamboo skewer, something I had from a previous project, and hot glued it on the inside of the cardboard box where the frame is bending. This will work for any part of your frame that you feel is too thin or is bending. NOW, if you got that taken care of, or got lucky and didn't have any parts of it bend to begin with, your next step is to take your bare frame and get ready to glue tissue paper to the sides.   I found it easier to hot glue the outer boarder of the frame and then place it on the tissue paper. I then cut the excess off and folded and glued any remaining to the box. If you have an easier way to go about this then please do it that way! I only did a single layer of tissue paper on the outside. The nice thing is that I can add extra layers to this as I please. For now it's working for me, but I do think I might add another layer on the INSIDE of the box. I've seen various ones where people lined the entire inside without white and others where they only lined the outside of the box frame. In the supply list I told you you're going to need a sheet of white cardstock. Now, I actually used white poster board, and cut a rectangle piece that would fit the inside of the box. You want it to curve up and back out of the box as seen in the photo below.  Now, have I noticed a difference in photos? Yes and no. There are some items that I think I overall preferred without the light box but I was able to use it for chocolate melts and other items I have in upcoming posts. But below are two side my side photos where you can clearly see the difference between light-box versus no light-box.
This cost me nothing as I said, but if you were needing to purchase any of the items this is what I could come up with. The cardboard box would cost you: about $5 (https://www.staples.com/12-l-x-12-w-x-12-h-shipping-boxes-32-ect-brown-5-bundle/product_210898) The tissue paper would cost: $1 if you got to a dollar tree. (https://www.dollartree.com/Classic-White-Tissue-Paper/p11216/index.pro) The poster board is 80 cents at Michaels. (http://www.michaels.com/white-poster-board-by-creatology/10040622.html#q=poster+board&start=6) And if you want to use the Bamboo Skewer you can also get those at Michaels for $2.19 (http://www.michaels.com/bamboo-skewers-100ct/D019038S.html#q=bamboo+skewers&start=1) I'm posting these prices while assuming that you have a hot glue gun and a way to cut cardboard. I don't think I need to price check those for you.. BUT Michaels will also have those, lol. Anyways, I hope this was useful for someone out there and I look forward to seeing how you guys use your light boxes! |
Crafty Things?This is a page dedicated to DIY's and miscellaneous projects. Archives
April 2018
Categories |


 RSS Feed
