|
If you're a Beauty and the Beast fan you know how amazing the Bell Jar with the Enchanted Rose is. AND if you've ever thrown a party you know how frustrating it is to have favors left behind. So, I really wanted to do something amazing with our wedding favors! I wanted it to be a favor that people would love to take home, share pictures of online, and hopefully keep for a long time. What better favor then the bell jar? And NOW I'm going to show you how I did it! YOU WILL NEED:
*warning* This is a craft of love. It does take a lot of patience. I got the mini bell jars from Michaels. They are the Tim Holtz, Idea-ology Decorative Domes. Sometimes they are hard to find. Sometimes they didn't come in on trucks for weeks at a time. Other times I could walk in there on a truck day and clear them out of their entire shipment of these. I needed a lot. In fact, I needed SO many that when they weren't getting them in at ANY of our local stores, I went through clearance Christmas sections to find the off-brand ones you see set off to the side in the photo below. They're basically the same thing but those ones didn't work as nicely as the Tim Holtz brand. 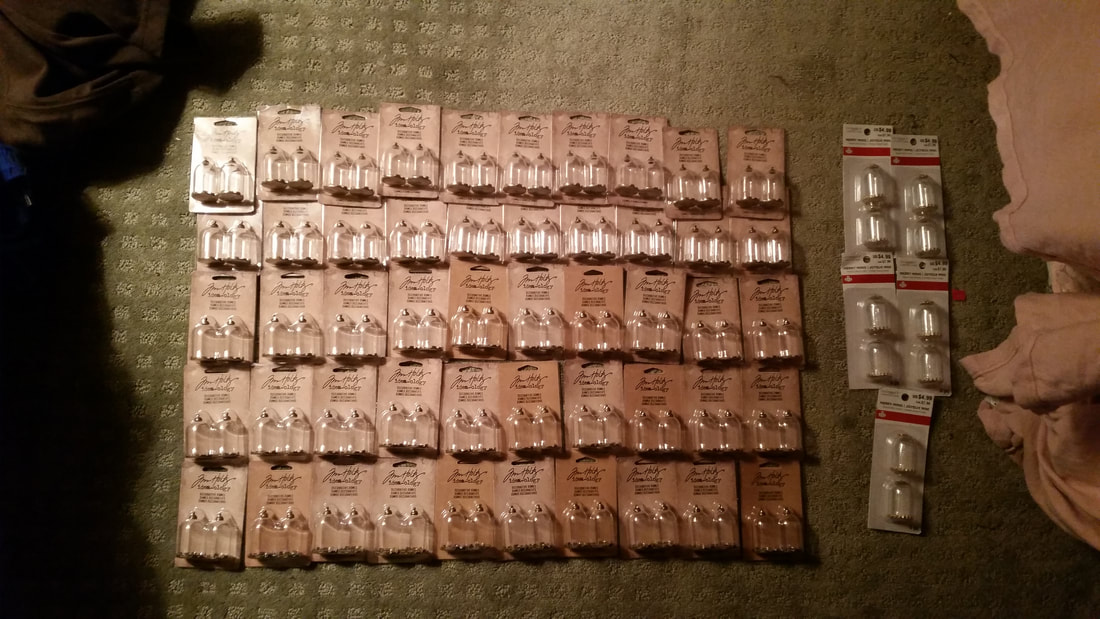 ALSO from Michaels are the mini roses. The original ones I bought were from the brand Celebrate It, and they can be found in the wedding section as rose picks. HOWEVER, I ran out of those and couldn't find them anymore. I searched everywhere and ended up buying the "Victoria Lynn Ribbon Rose Picks" which were almost exactly the same as the Celebrate It. I will note that I couldn't find them in store and had to order online. But my local Michaels is the smallest in the district, so I try to take that into account. Let's get started! You will want to take your roses and cut down the stem. Otherwise they are too tall and will not fit in the jar. In the picture below I show, what I found to be, the perfect cutting location. 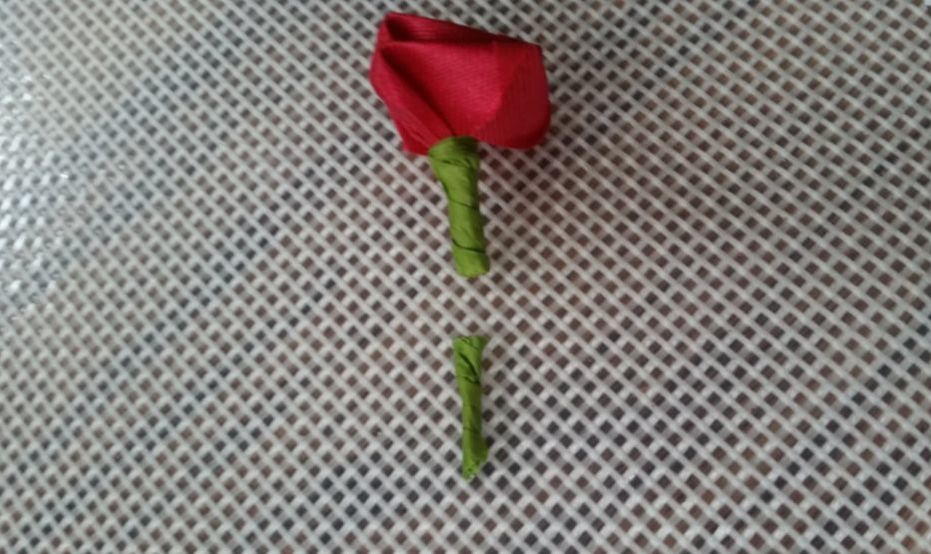 Now taking your hot glue gun you're going to want to make a little glob of glue on the bottom of your stem and then stick it down to the metal base. I tried to do this with the E6000, in hopes of making the glue harder to see, BUT it kept falling over and breaking off. The hot glue did the trick and I was able to pop these out as quickly as possible. 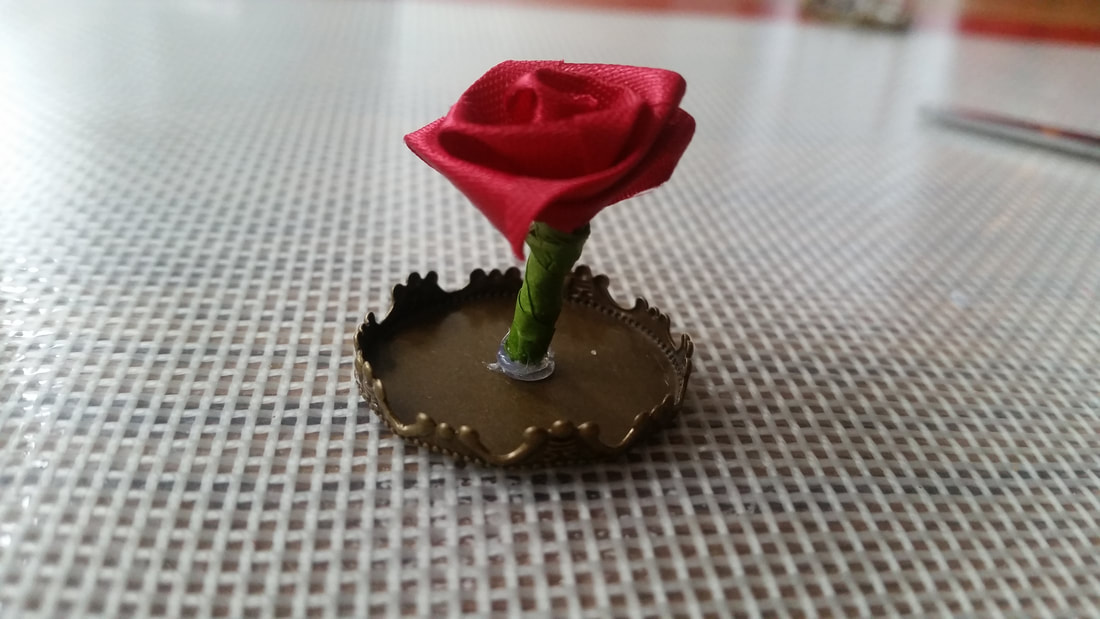 I took a few of the silk flower petals we had for our flower girls to toss, and cut MINI flower petals out of them. I then used tweezers to dab them against the hot glue gun and place them on the metal base. You don't need the tweezers but it helped me get them precisely where I wanted them. And I was able to use the tweezers to grab the excess strings of hot glue that inevitably appeared. 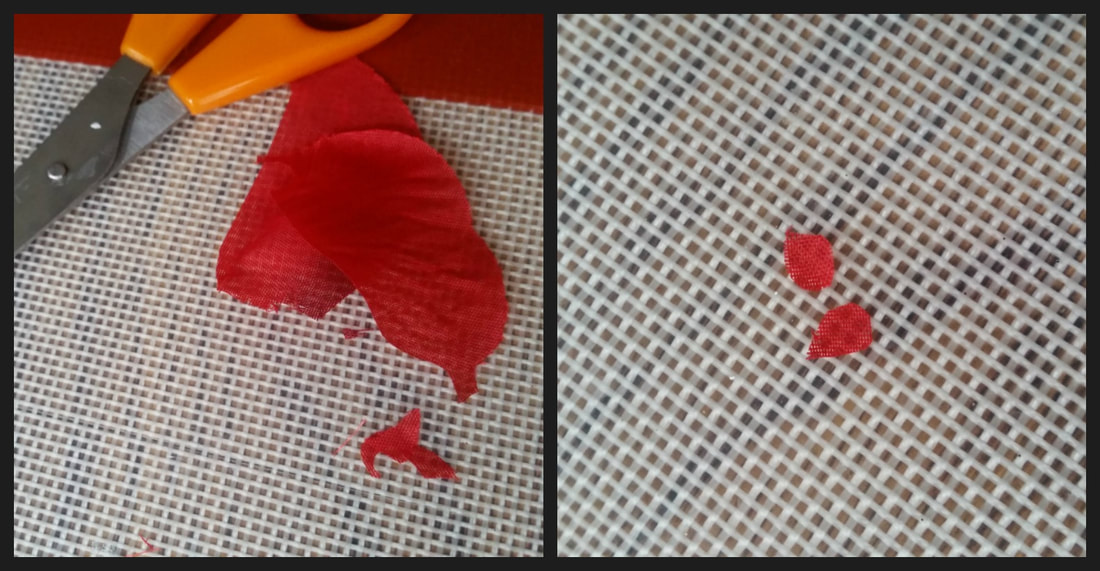 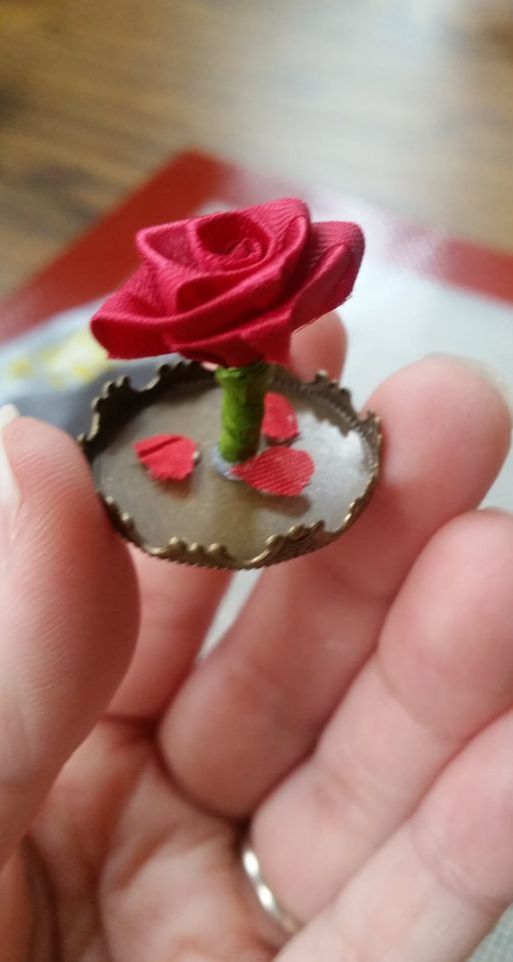 Once you have your rose and your fallen petals glued into place and everything seems to be sitting securely, take your E6000 and glue around the inner edge of the metal bottom. Setting the dome lid OVER the rose and onto the glue. If you put the glue on the glass dome itself, when you go to set it over the rose you are going to find yourself getting glue all over things which will look horrible once it dries. QUICK NOTE: the E6000 comes out of it's container quickly. It also dries quickly, but when it does it cloggs the applicator tip. I recommend gluing as many of the roses to their bases as you can before trying to glue the dome onto the base. It will just save you aggravation in the long run. 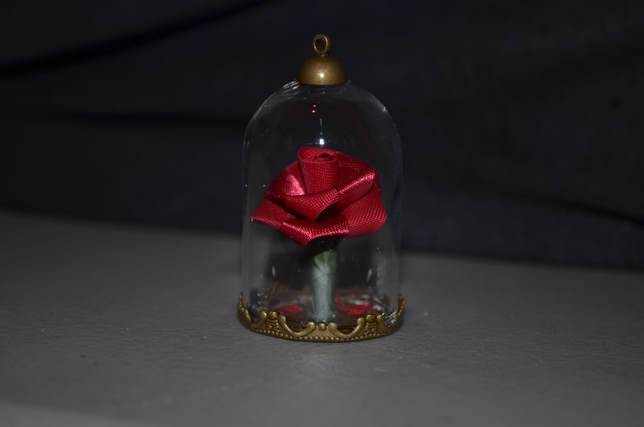 IF you have any that fall over, there's a simple way to fix it. Soak the base of the rose jars in nail polish remover. It will loosen the E6000 so that you can open it up and fix the roses. I had to do this with five out of the over 100 I did of these! Not too bad if I do say so. 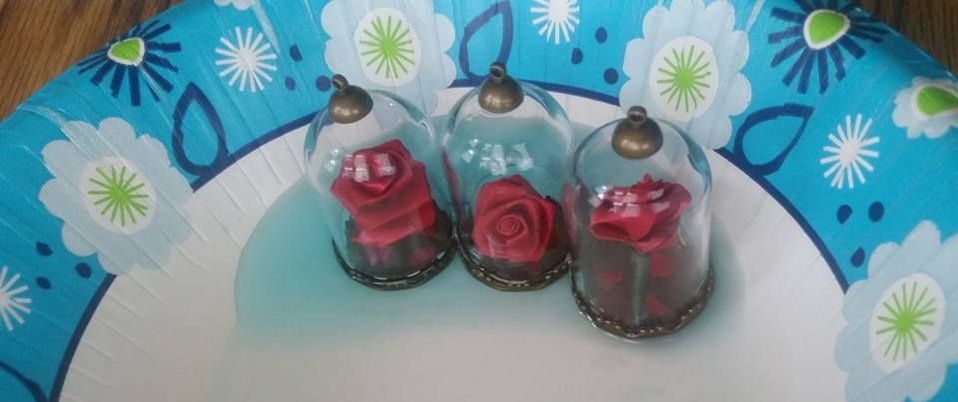 
0 Comments
The way our wedding reception was set up, the dining tables were spread between two rooms. The Main Room where the wedding party was seated, we placed the rose centerpieces. In the next room we did teapot centerpieces. Now, I forgot to get step by step photos explaining how I made them. BUT I do remember the process! So, I can still explain it in case you are interested in doing similar centerpieces. YOU WILL NEED: *Tea Pots *E6000 *Cake Circles *Books You're okay with Sacrificing *Silk Flowers *Decoupage and sponge brush *Styrofoam Cylinders *Darice Pearl Strands I went on Ebay and bought a "Lot of Books". It was the cheapest option I could find where all the books had an old antique look... without smelling like mold and dust. And as a book lover, this was difficult but I had to do it. You're going to take your decoupage and really cover the edges of the books. Open the pages and make sure the paste gets in there. The idea is to seal the books so that they don't open back up. I coated their pages with the decoupage and then wrapped them in saran wrap and made sure I had something heavy set on top of them. I let them sit for 24 hours before I unwrapped them. Once you're happy with the sealing of the pages, pick the ones you want stacked together and use your E6000 to glue them cover to cover. I wanted mine slightly off center so make sure you're gluing them where you want them to be. 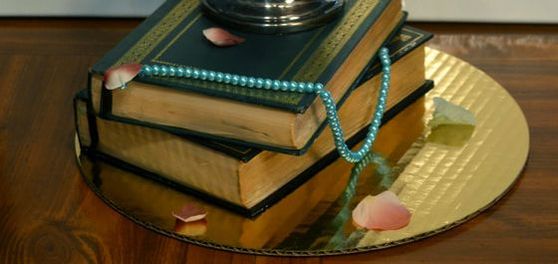 Now, once again, I HATE Styrofoam so my mother actually helped with these. She picked up some foam cylinders and made some mini floral designs. We then stuck these in the teapots. You may a have to cut down the cylinders, depending on the size of your teapots. I forgot to get pictures of these so this is the photo from the Michaels website (not trying to take credit for the photo, don't come for me Michaels, lol.) 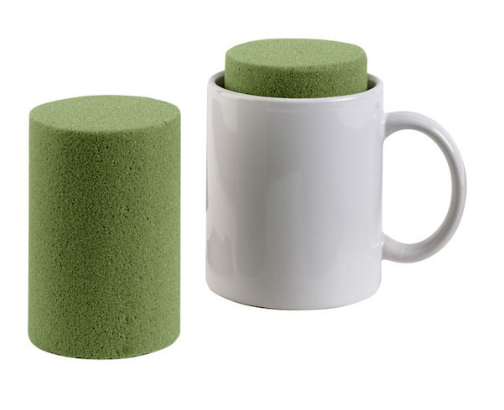 We used our E6000 to glue the books to the Cake Circles (you can see those in the first photo). And then you're also going to use the E6000 to glue the teapot to the cover of the books. As an added touch I took Darice Pearl Strands and glued them in various spots hanging off the book covers. I also took flower petals from the leftover flowers and glued a few down to make it look like the flowers had been dropping petals. 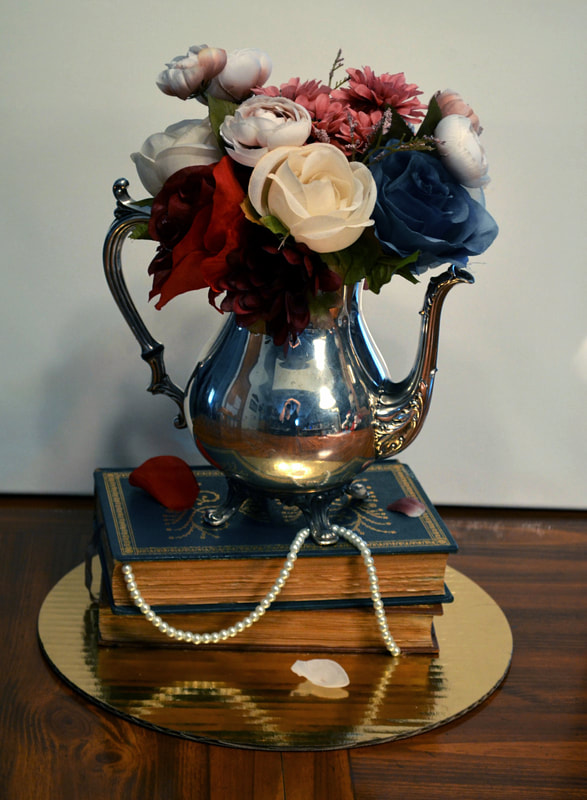 I found our teapots at good wills, salvation armies, home-goods, etc. Sometimes we added the teapot lid to the base, a sugar pot that matches the teapot, and one time a teacup. Which of course I painted a chipped line on one in honor of the Beauty and the Beast theme. This is super simple but basically involves a lot of glue and messing with it till you're happy with how they look. Here's a slide show with all the teapot centerpieces! In hind sight this is probably really silly but I wanted to personalize everything I could. We couldn't find flower girl baskets that we were particularly fond of. So I just found plain white ones for a really good price- I got a set of three for $15.84. (Now, a set of three sells for $39.99 at craft stores and a single one for $19.99. So honestly, we got them at a bargain!) I had three flower girls and I wanted their baskets to be special. So I took the basic white baskets and some mini roses (the ones I used for the bell jar favors) and jazzed up the baskets! 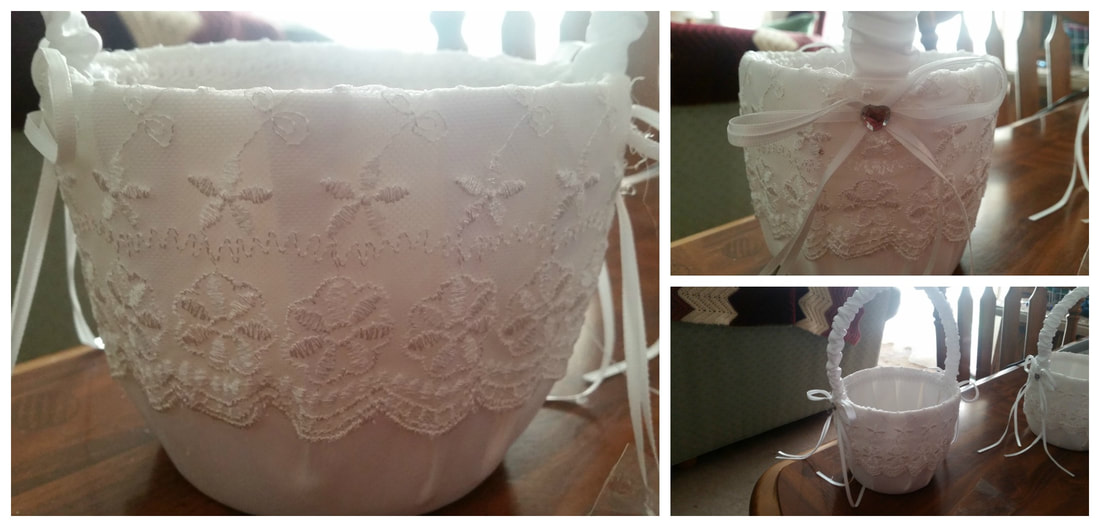 I took left over ribbon from the invites and glued them over the heart gems at the base of the handles. And then in the center where the heart would have been, I glued a little rose head. I also took a bunch of the mini roses and cut off their heads and glued them over the second row lace pattern. But ROSES just weren't enough for me in the Beauty and the Beast theme so I had each of the girls pick their favorite 'servant' of the beast's and I made little shrinky-dink charms of them with the girls names and attached those to their baskets so that they dangled off. A special personalized touch that made this especially awesome for the girls.  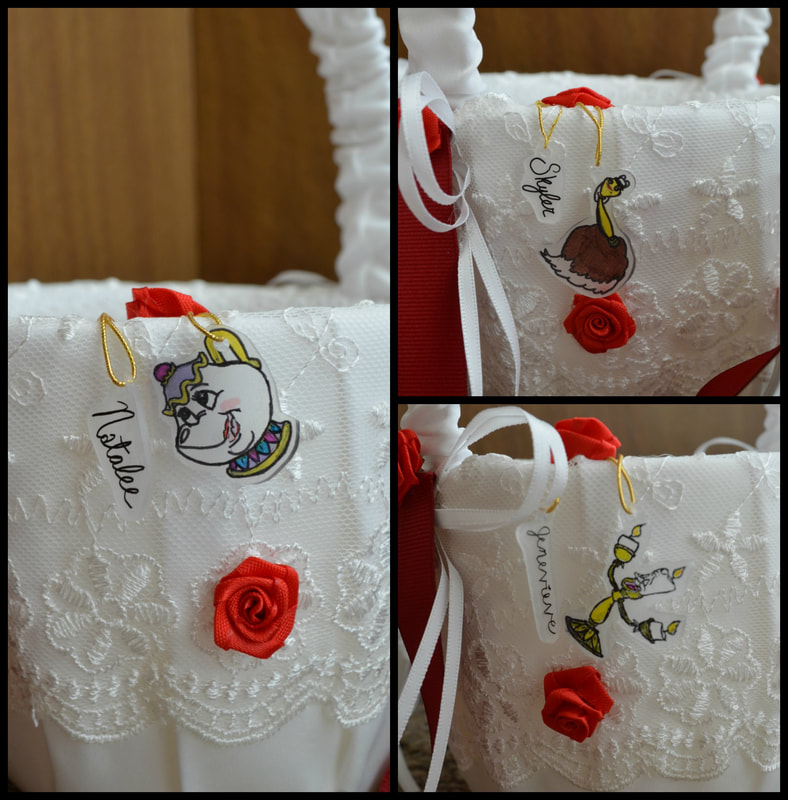 This wasn't as big of a project as the others, but hopefully it gave you ideas on how to personalize things for your little flower girls! We also had cocktail centerpieces, which is where I was able to incorporate clocks and candelabras! These are so simple to make, they took me like an hour to put together! YOU WILL NEED: *Candelabras and clocks *E6000 Glue *Hot Glue *Flower Wreath with Plastic Bottom *Cake Circles Take your cake circles and your E6000, you're going to glue your candelabras and your clocks to the center of the circle, like so. 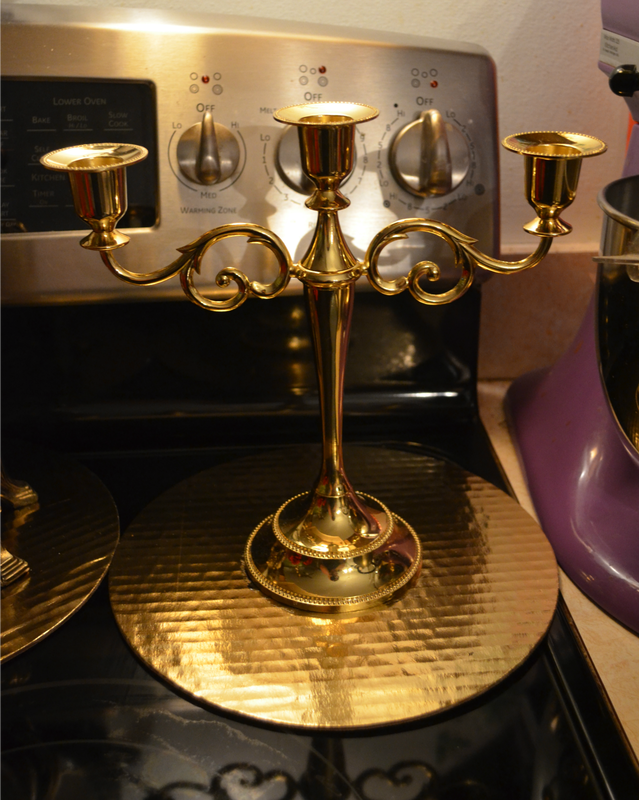 You're going to take your plastic flower wreath and hot glue it to the cake circle. I tried to use the E6000 and it just kept coming undone. The NICE thing about these flower wreaths with the plastic bottoms is that they literally slide RIGHT over top of the candelabras and MOST clocks. So just slide it over top and start gluing them. 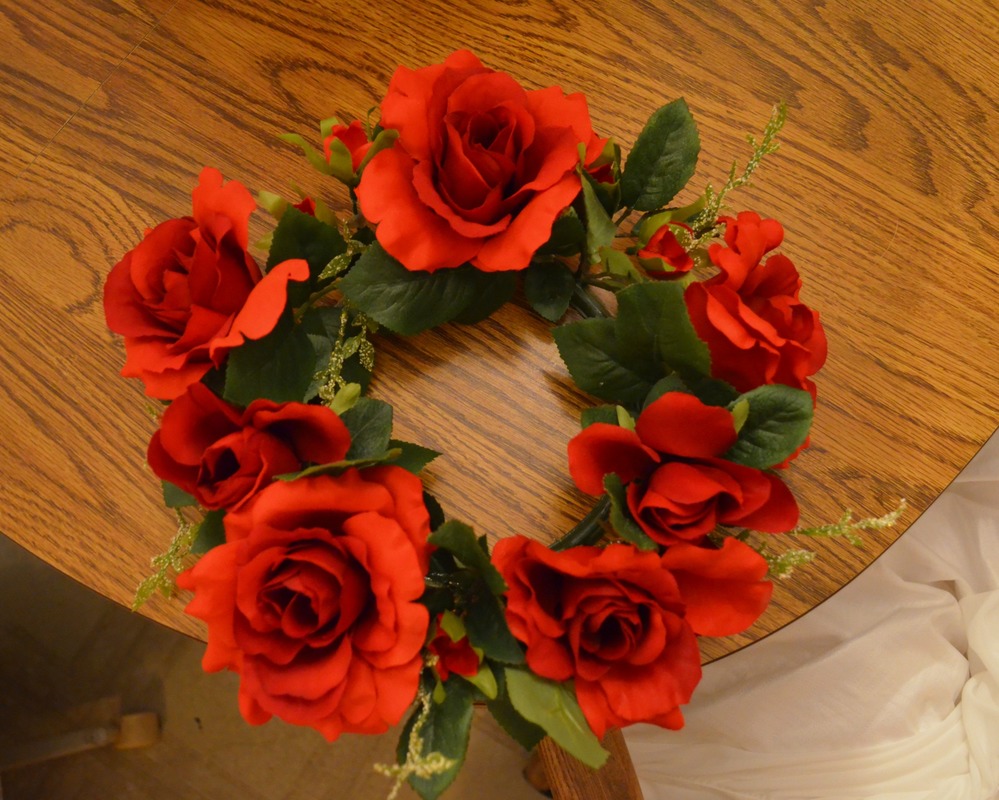 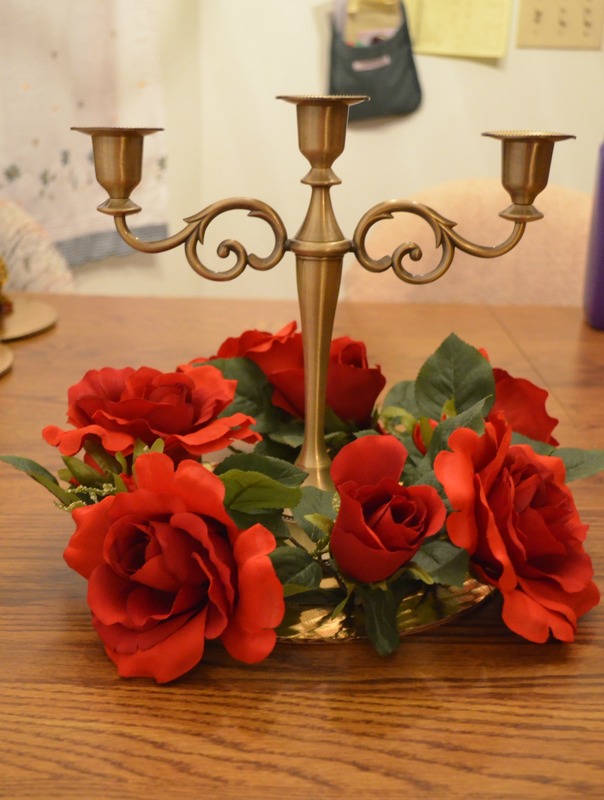 Now, like I said it will fit MOST clocks. The one I had OF COURSE it didn't fit over. EASY FIX! I took a pair of scissors and cut the flower circle where it didn't fit. I glued it down the best I could. But you'll see there's a blank spot. 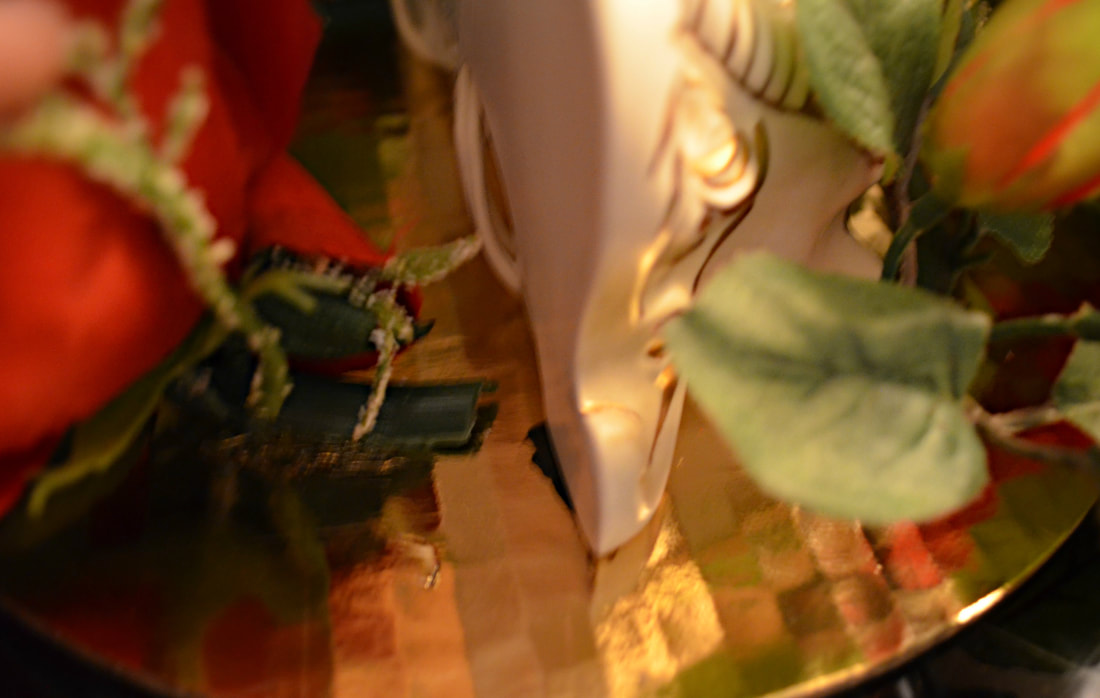 Now, since you have this open spot just simply take extra leaves and flower heads from other silk flowers and glue them down. 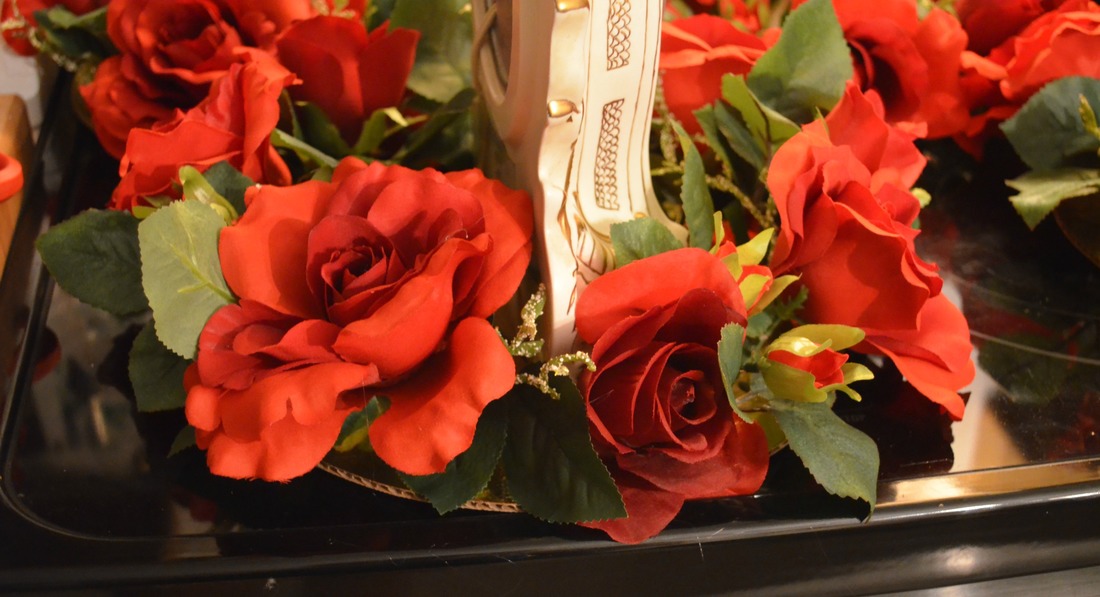 With the clocks there are the backs that have cords and gears and things showing that are not cute. 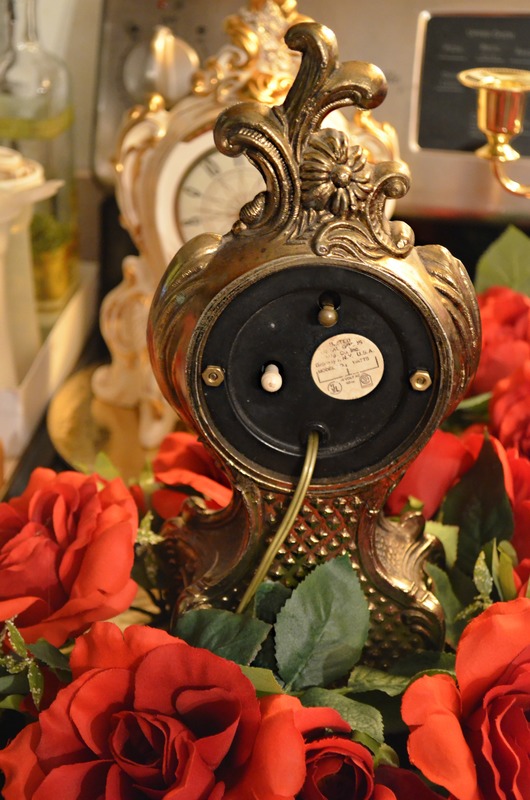 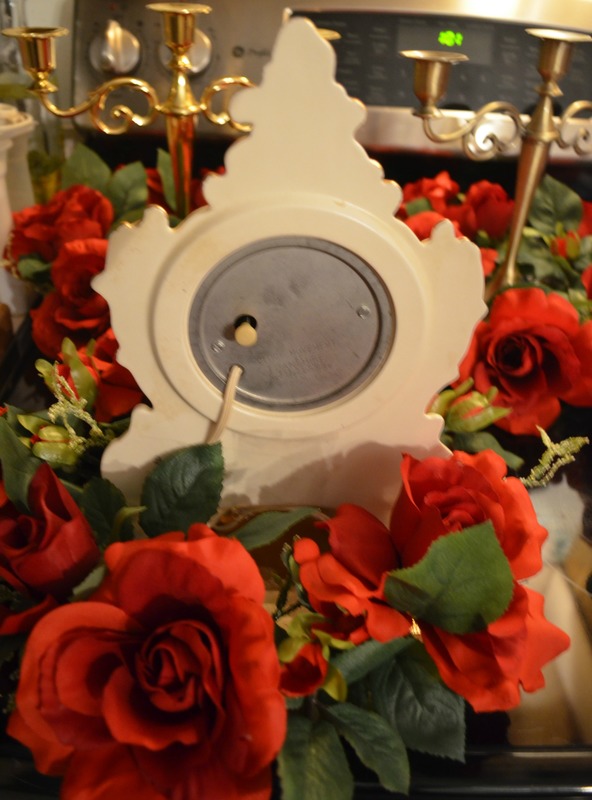 Once again, super simple fix! I took extra roses and leaves from other floral projects for the wedding and glued them onto the back with hot-glue and sticky tack. (I wanted to be able to remove them in case I want to keep the clocks separate after the wedding, lol.) And here's how that turned out. 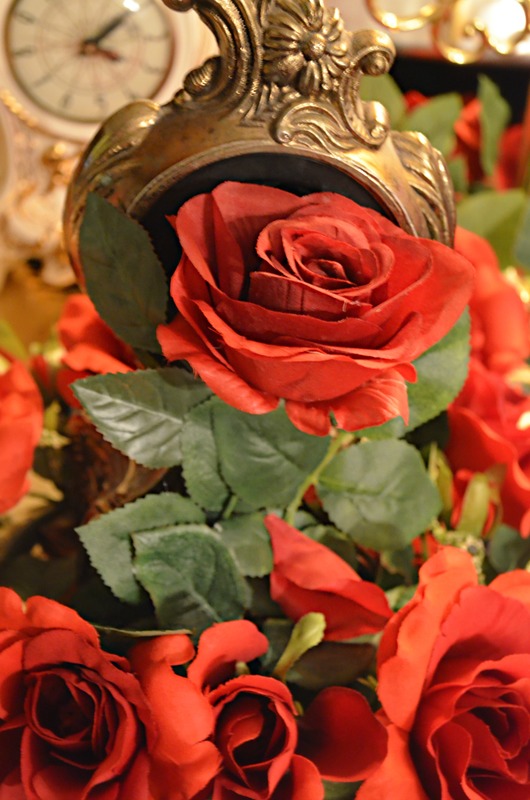 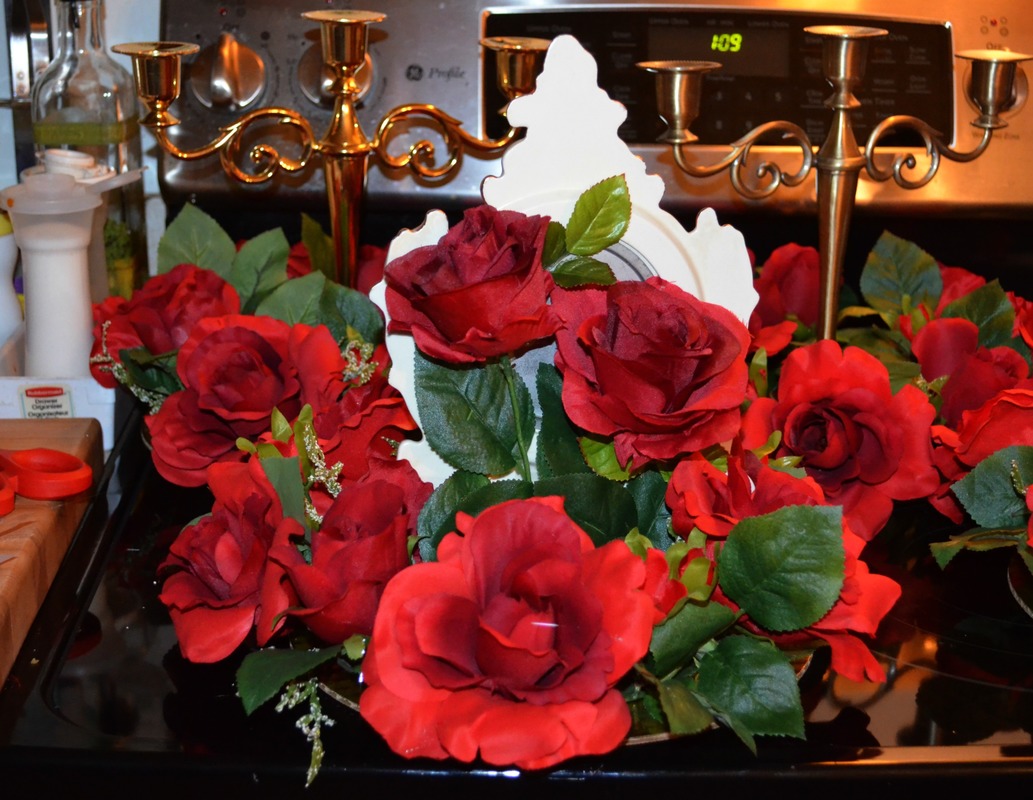 Like I said these were literally the EASIEST cocktail centerpieces ever. Took so little time for me to make these. And they were a hit! Continuing with bringing books into our theme, we had bookmarks for our escort cards. Now this was definitely a craft of love. It took so long and I do not recommend hand painting these, unless you are extremely motivated. My hands hated me for making hand-painted bookmarks. BUT the bookmarks themselves were really fun and I'm here to show you how I did them. YOU WILL NEED:
To start with I bought chipboard bookmarks from an awesome Etsy store. You may be able to find these at craft stores, but chipboard has come and gone in waves at most of the local stores near me. I do highly recommend this store: https://www.etsy.com/shop/PrairieDogPaperCo?ref=l2-shopheader-name . Once you have your bookmarks you'll need card-stock in your color of choice. THIS is where I suggest getting a patterned card-stock instead of attempting to decorate them by hand. At least if you're going to be making a large quantity of them. Before I applied the card-stock, I used a hole-punch to create the place for the bookmark tassels. 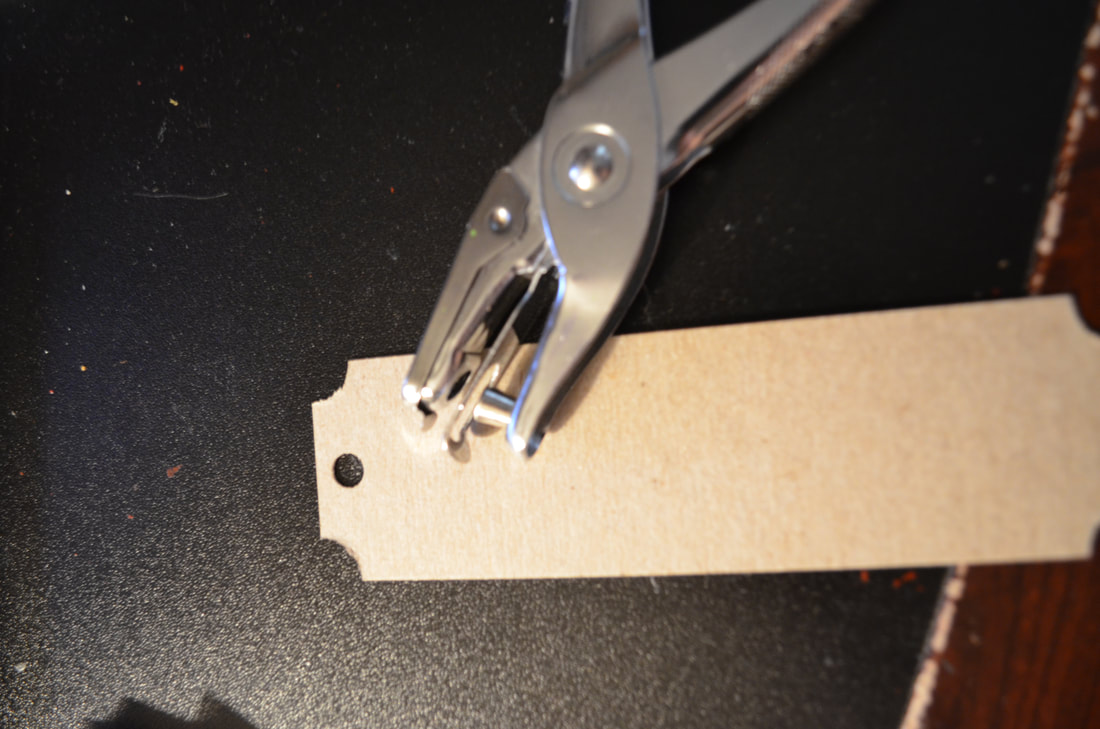 I laid my bookmarks out and traced them to see how many I could get out of a single sheet of card-stock. I was able to get 9 bookmarks per page. 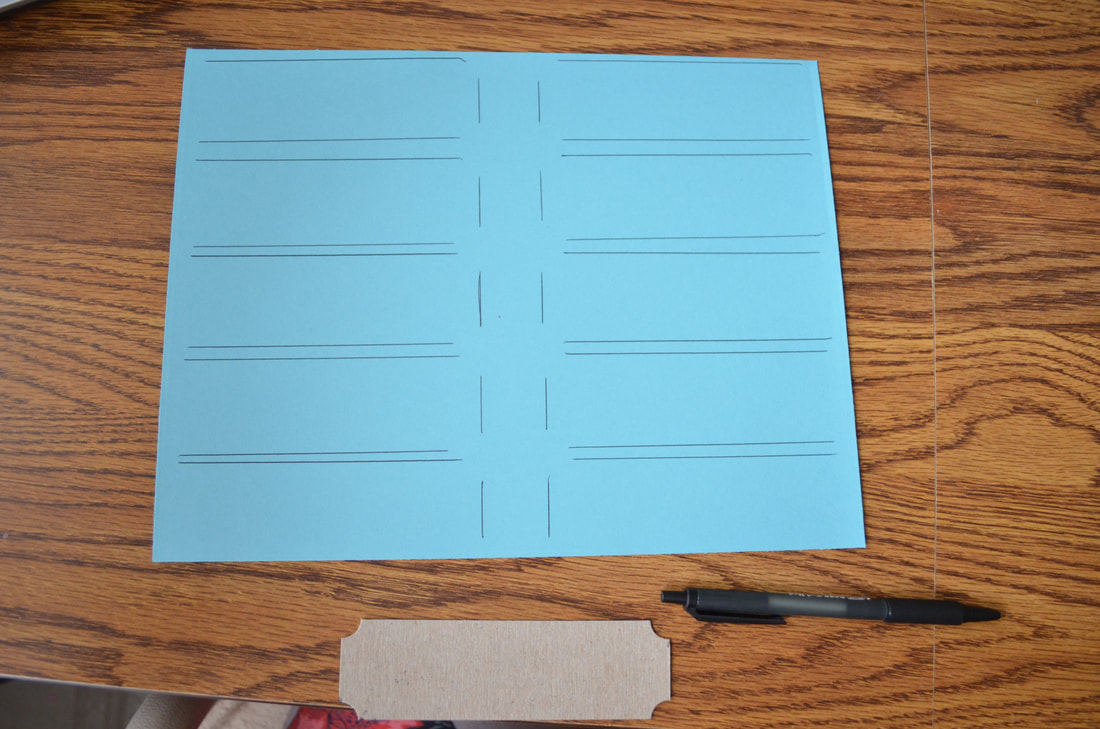 Cut out your bookmarks. Then use your paint brush and decoupage to cover the chipboard bookmark and fit the paper over top. 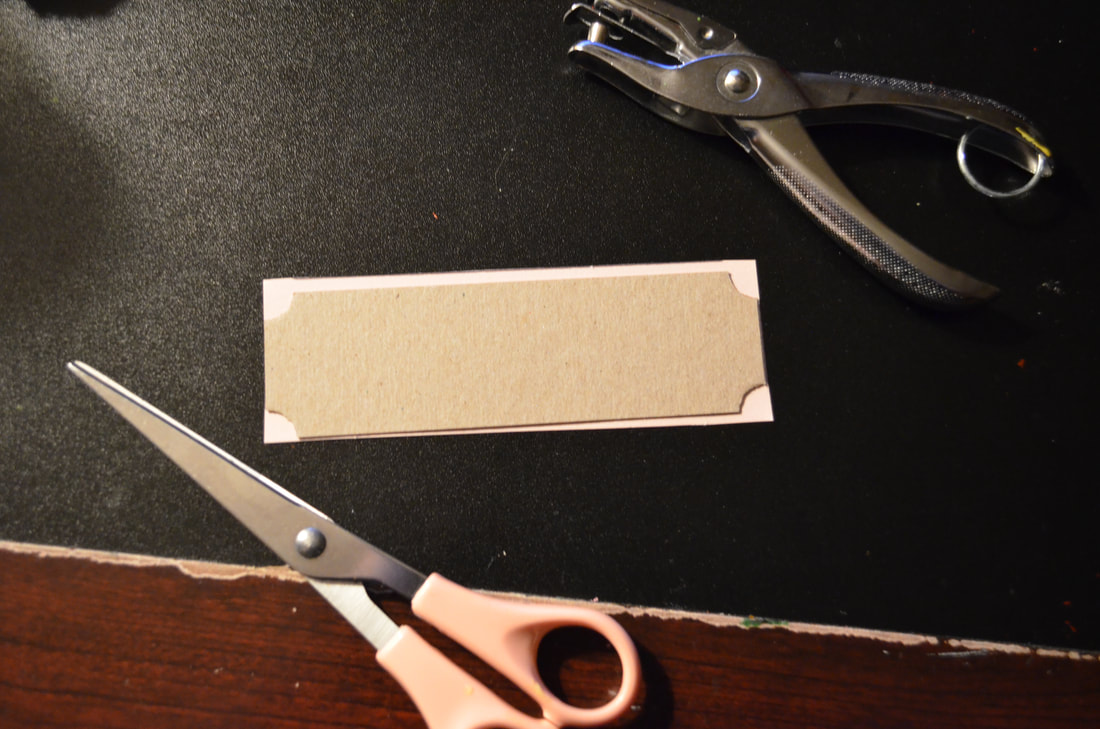 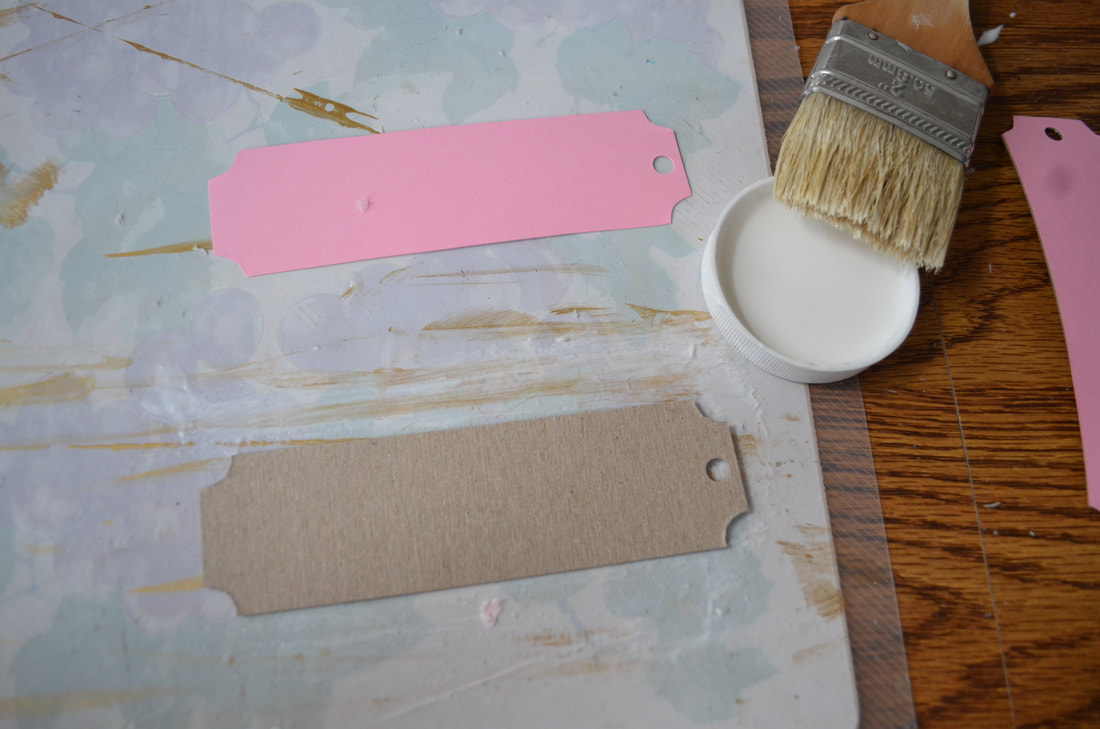 Once I had the paper and the bookmarks together it didn't take long for them to dry. This is where I started the long task of hand painting each one. We knew what we wanted for designs, and while I didn't come up with them I did purchase the designs from here: https://www.pazzles.net/wordpress/2017/03/27/beauty-and-the-beast-stained-glass-bookmarks. I finished painting the designs. There isn't really a tutorial I can give you for this. For the first so many I traced the designs onto bookmarks with pencil and painted over the grooves. This got REALLY old so I just started trusting my eye. I have a gift for painting and I'm rather confident in that. I let them dry and then added the floss tassels. I bought those on Etsy as well. They were in great condition and really soft! I had two out of the over 100 I bought that fell apart. I bought those from here: https://www.etsy.com/shop/ButtonsbyDoug?ref=l2-shop-info-name§ion_id=7499214.  As you can see in the above photo, I divided the bookmarks so that the top section has the person's name and their table number. These were sitting at a table sticking out of books so it made it easy for people to find themselves. Obviously, these could be kept, and were encouraged to be kept, so that our guests could use them later. But in order to incorporate them into our caterer's needs, they needed to be laying more traditionally at the table. We went on Amazon and ordered some packs of Spiel Pro Plastic Card Stands. We also picked up some self adhesive gem stones to place in the corner to distinguish who ordered the Salmon. 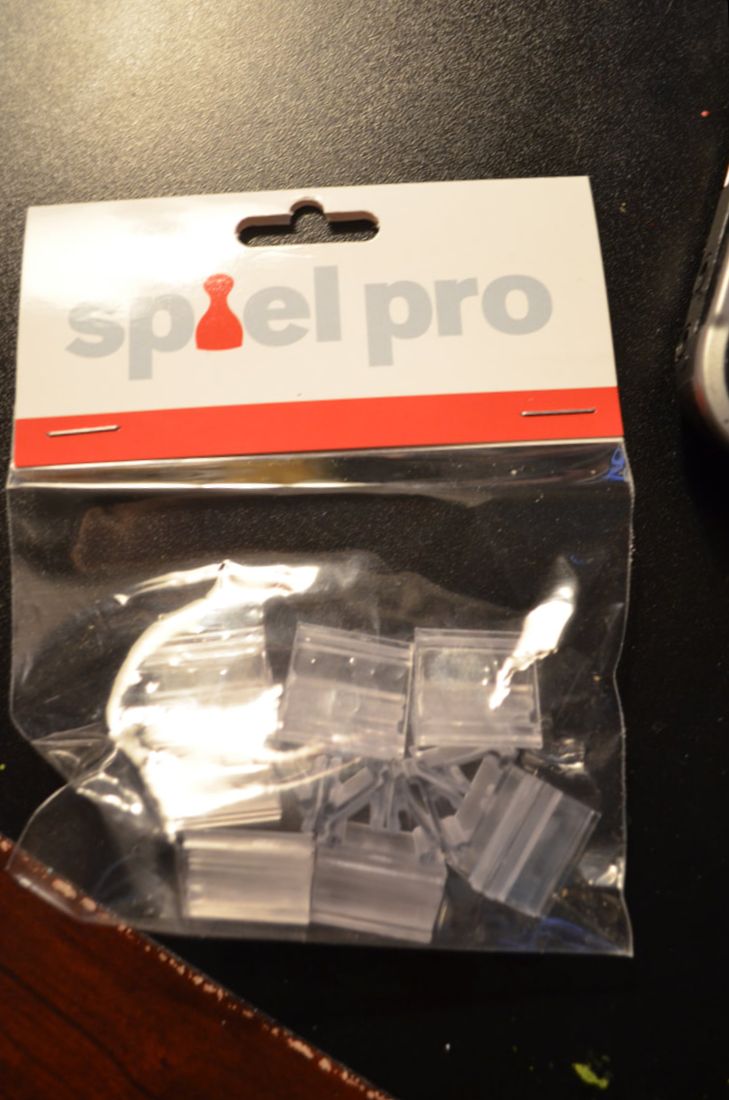 In order to make sure people knew HOW to place them at their seats, we also provided an example bookmark at the escort table. 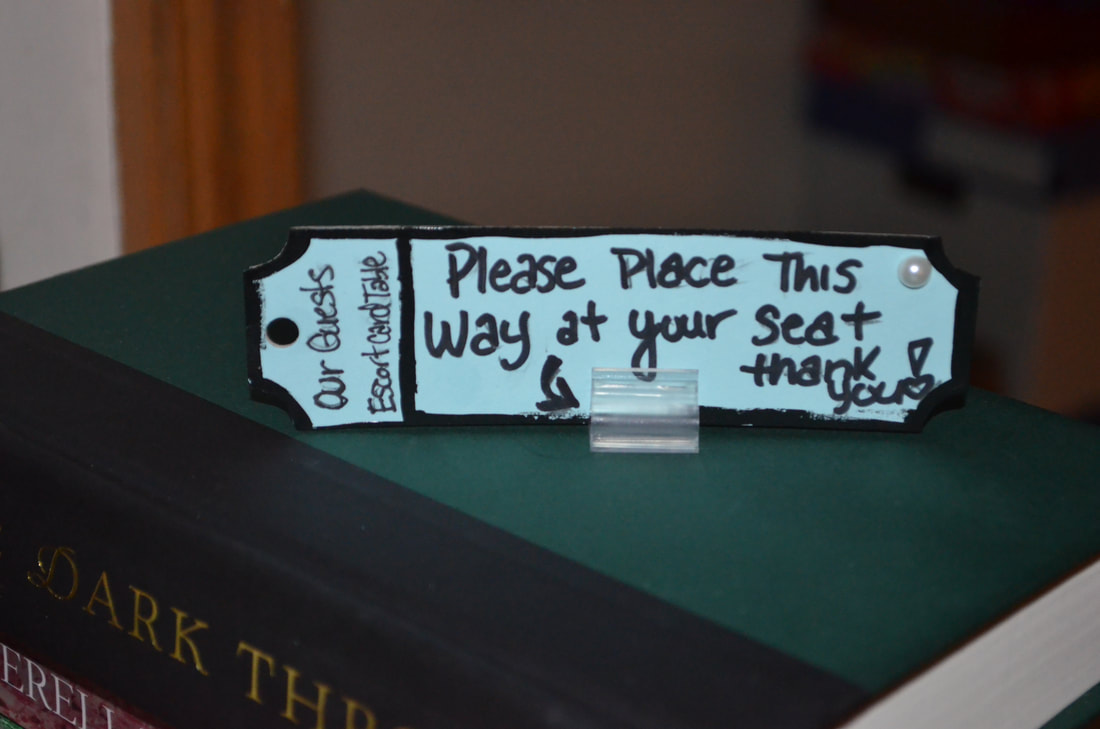 I took books from my personal library (if you didn't know, I also run a book review website). I used butter cream printer paper to cut out some ornate shapes and sharpie marker to write numbers on them. Each number represents the table the guests are seated at. Using NON-permanent glue dots I attached them to the front of the books. Placing the appropriate bookmarks in the novels I then used fishing wire to tie the books so that they would stay closed. Be sure not to tie them too tight or the books will not stand up. This is our escort table showing the finished project. 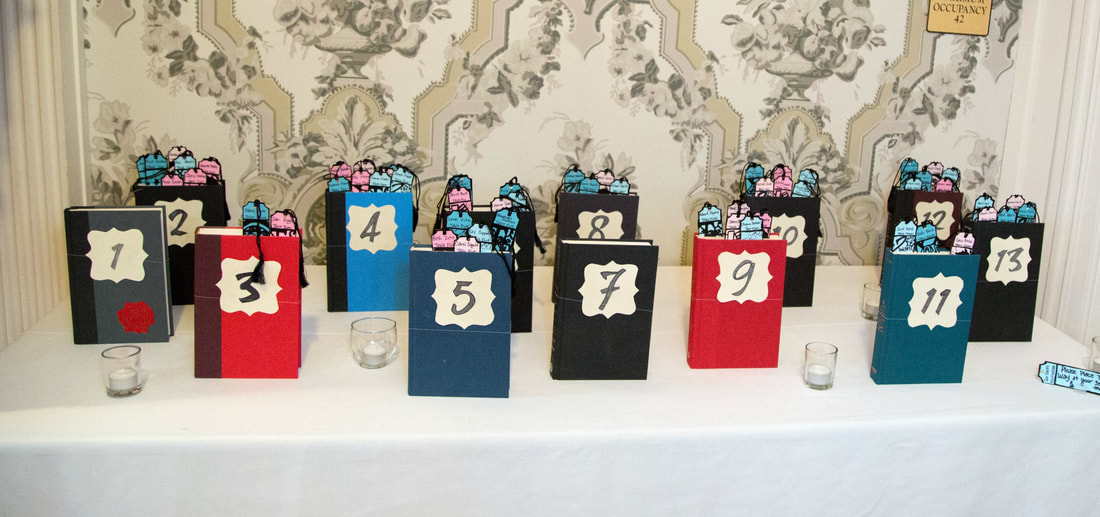 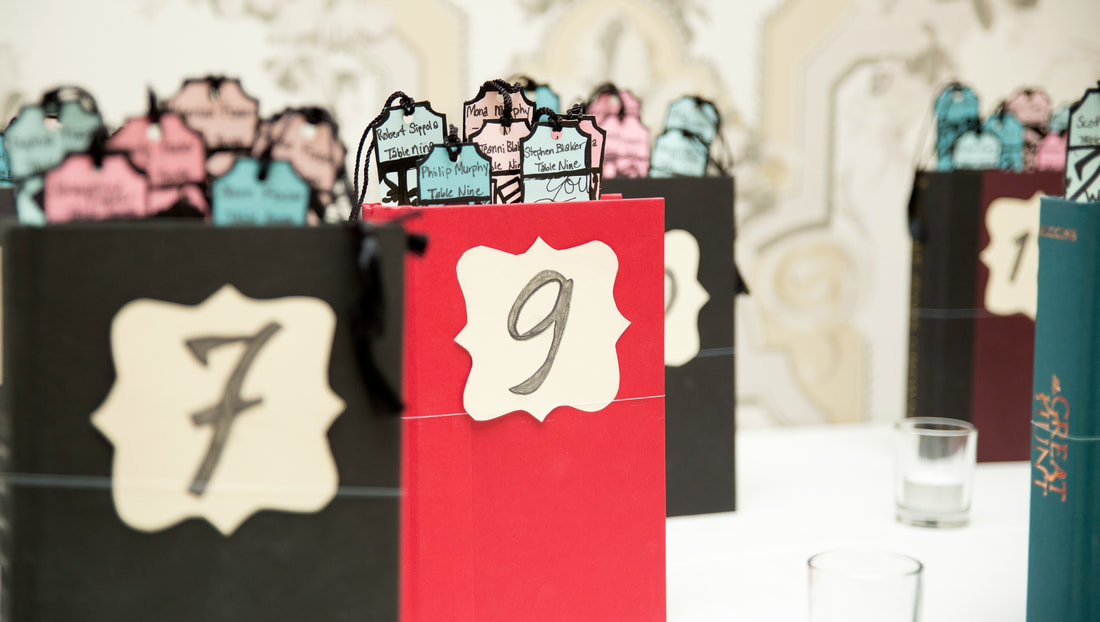 Everyone wants those wedding invitations that will leave your guests in awe. But to get them, it can be pretty pricey! My fiance and I had fallen for some Beauty and the Beast gate-fold invites we found online. The only problem is those would cost over $500 to have made. And that didn't include shipping, filling them out once they got to us, and then the price to mail them... What can you do instead? Jazz up some simple invites. And I'm going to show you how I did it! You will need:
Alright, so for the pre-printed invites I went onto Zazzle and ordered some that were Beauty and the Beast themed. They print at $2.20 an invite and I needed 62 of them. It should have cost $117.80, BUT Zazzle is always doing some sort of a sale or special coupon and I ended up getting them for $70.68. 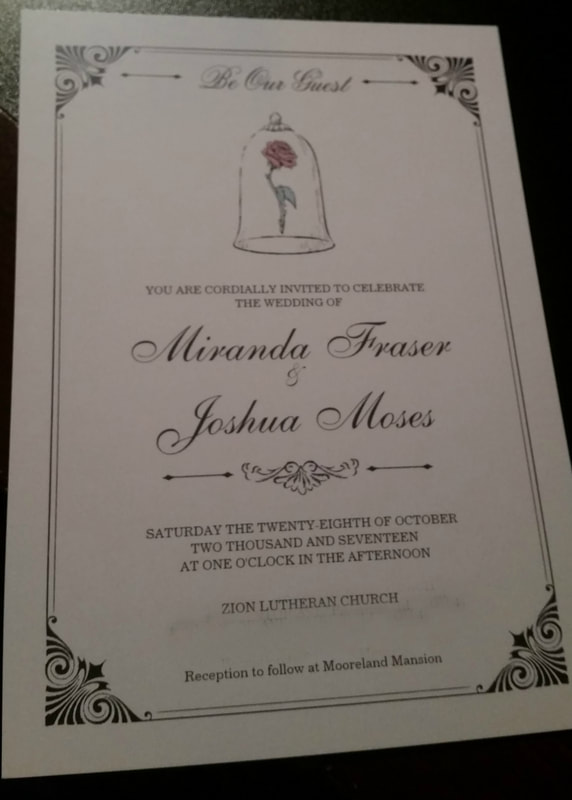 Our colors were burgundy and gold and we wanted to incorporate that into our invites so I went to Party City and picked up several packs of 10 inch Gold Paper Doilies. (Those sell for $2.49 a pack.) Once you got your doilies you're going to lay your invites in the center of the doily. Make sure you've found the center. 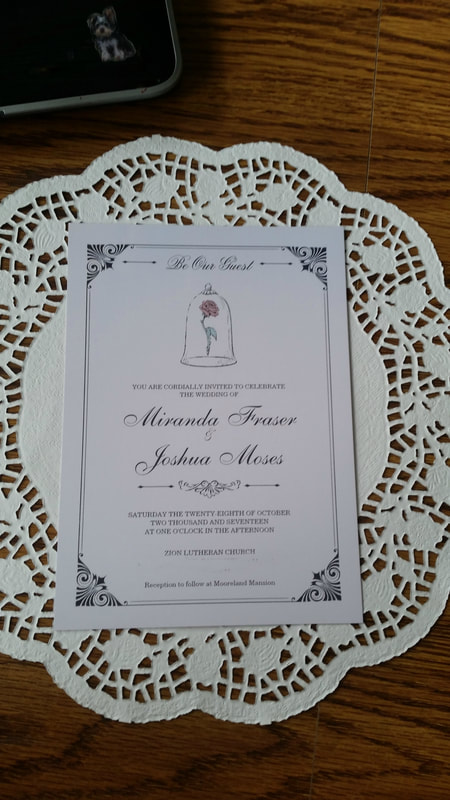 If you've found the center and you're pleased with how the sides are going to fold in, take your tape runner and add three lines of tape to the inside of the doily. 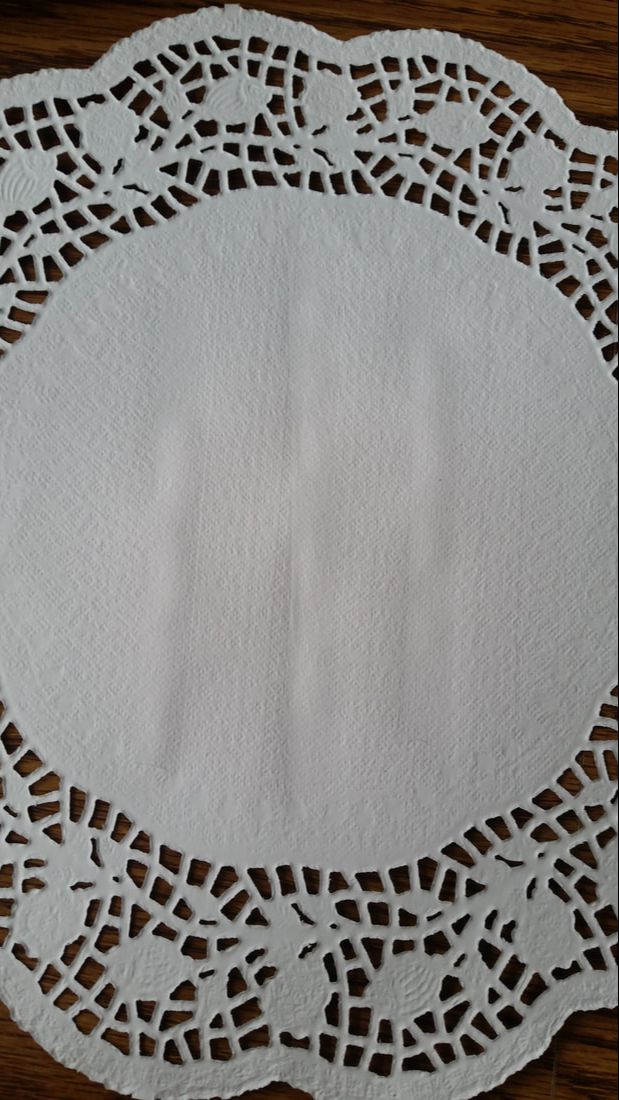 Okay, place your invite in the center again and then fold the sides of your paper doily over to create your gate-fold like in the photo below. 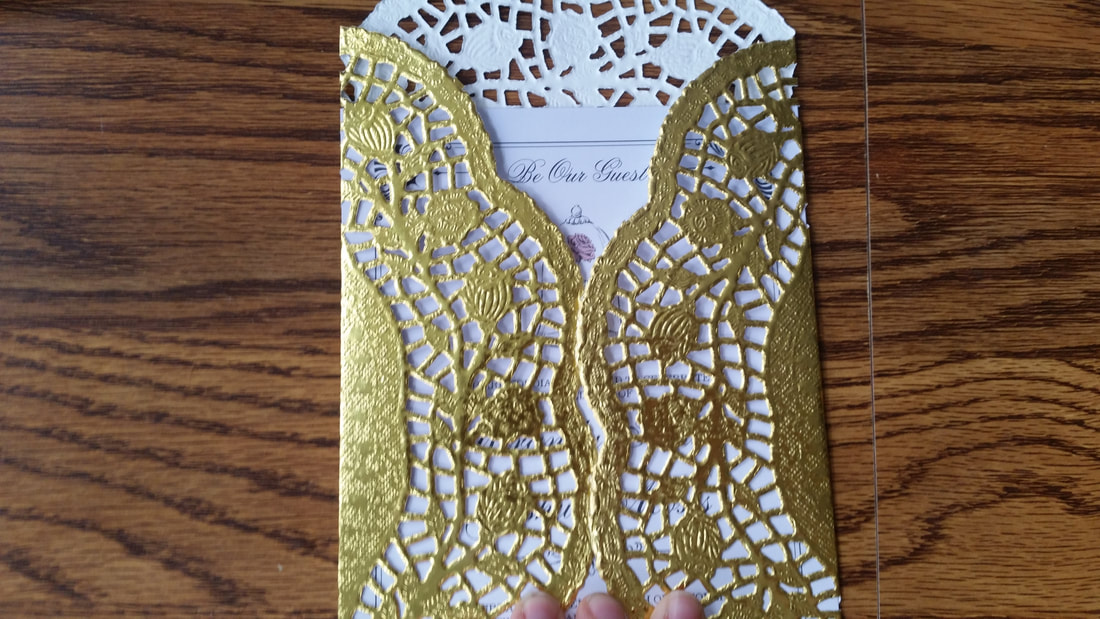 Once you have your gate-fold shape, you can see that there is extra doily showing over the top and bottom of the invites. You're going to want to cut straight across and remove that extra paper. 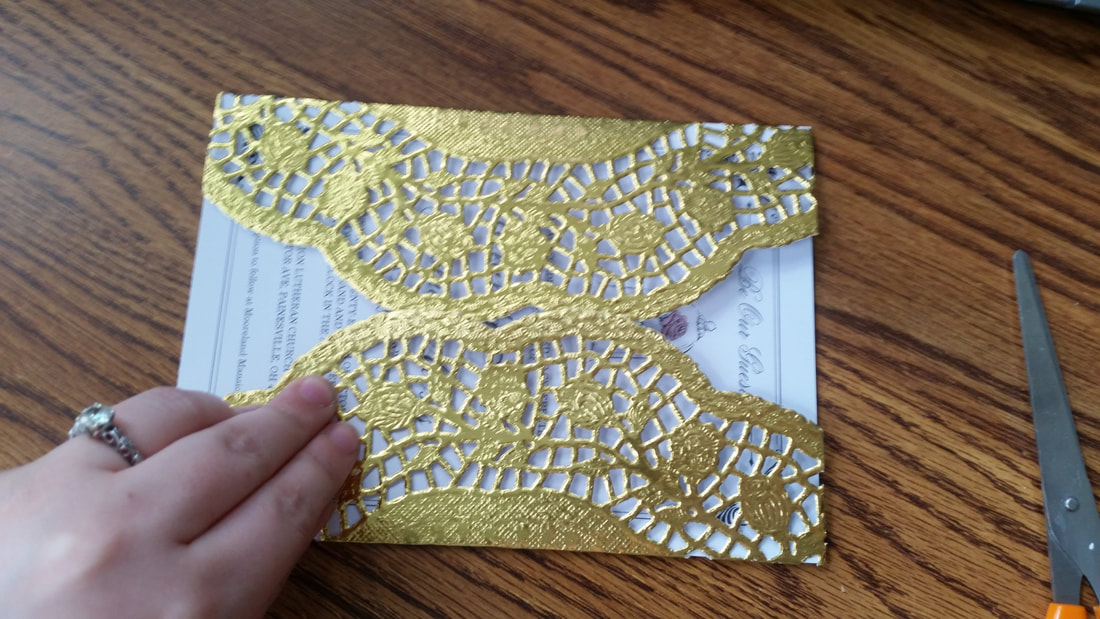 Believe it or not this gets old fast, and if you have a lot to do you're going to get tired of it. So, I just did all the gold gate-folds and then stopped for a day. You'll see that in pictures below. There is no shame in breaking it down a day or two. TRUST ME. So, it's the next day, the sun is shining, there's a fresh pot of coffee, and a bride with her war-paint on ready to get back to her invites! The next step is to make your ribbon sash. But this is where I goofed... I never actually measured to see how long I needed the strand of ribbon to make the sash. So, on your first invite follow these steps and then measure the ribbon to save yourself some grief. You need a piece of ribbon long enough to go across the back of the invite, following the gate folds to the front, and then making a little fold like the bottom of a ribbon on a present. Using your tape roller attach your ribbon to the back of the invite as close to the center as possible. 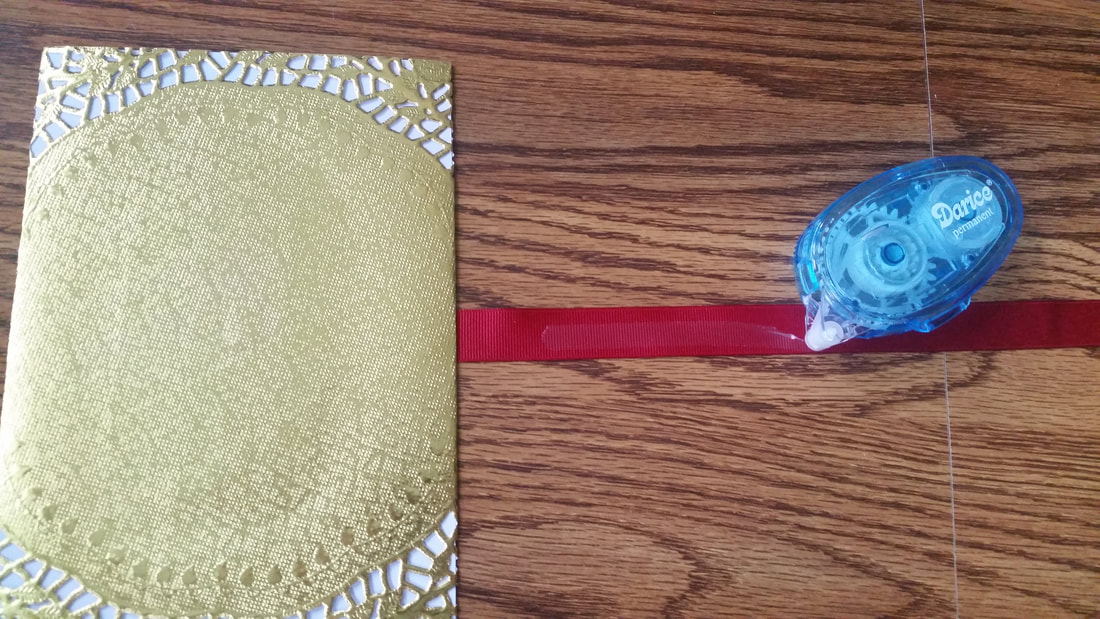 Once you've got it across the back, fold it over to the front of the doily. 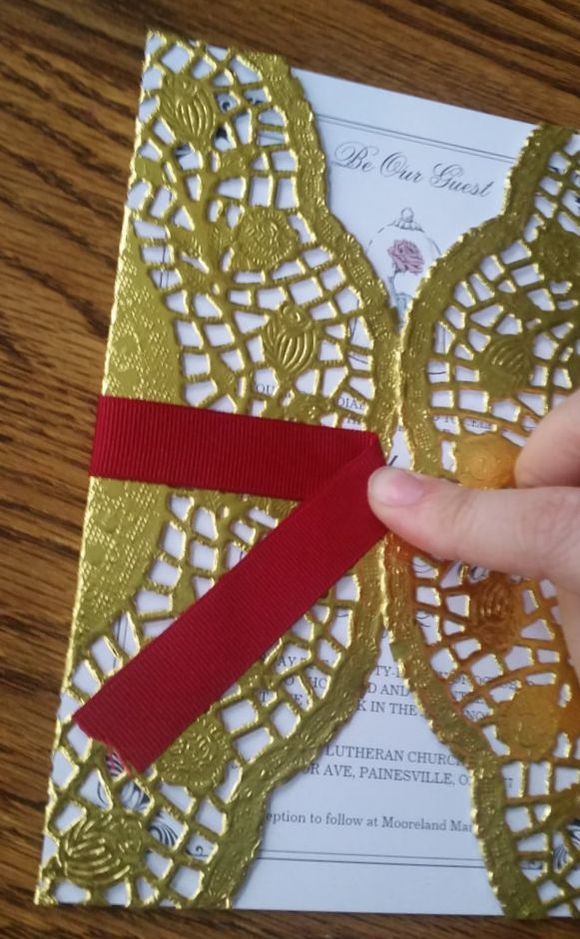 Where my finger is, unfold the ribbon, and use your tape runner to stick it in place. Ultimately you want the front of your card to look like this. 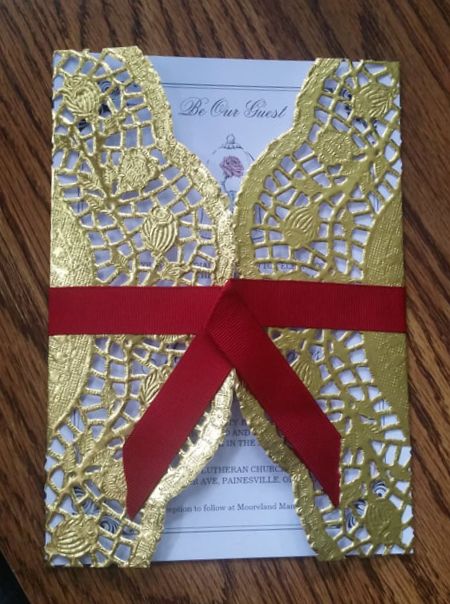 IF YOU CAN FIND MINI BOWS THAT MATCH YOUR RIBBON- DO IT. If not, here's how I finished my invites. I made mini bows out of the same ribbon I made my sash with. THIS ONE I did measure, lol. 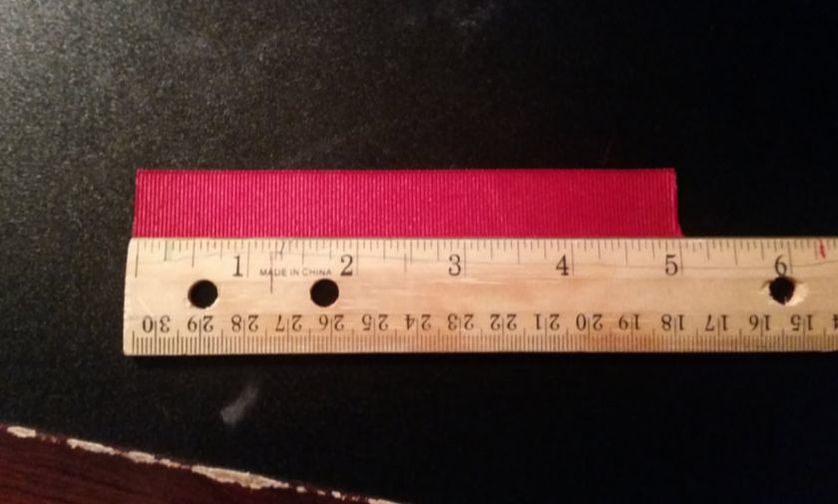 Take your five inch strip of ribbon and create a bow shape by gluing the ends into the center. See picture below. 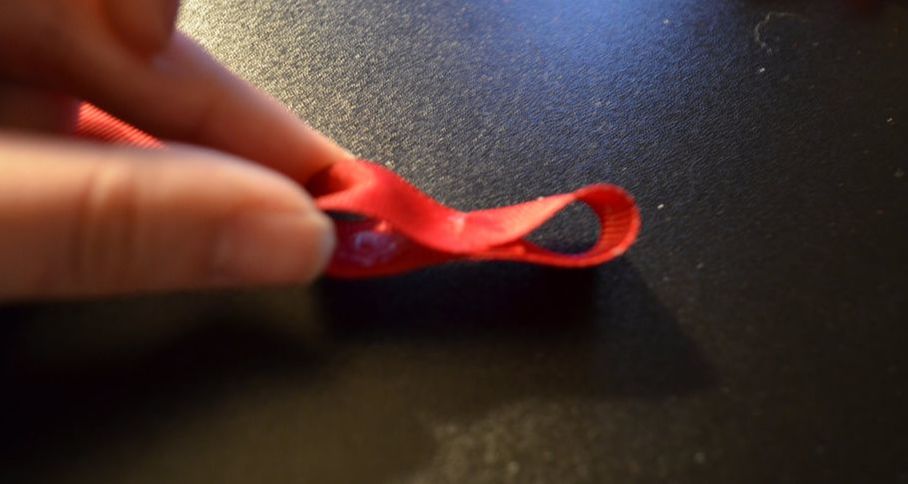 Now, I found that cutting little notches into the ribbon, from the top and the bottom, helped give it a better bow shape when you add the middle section of the ribbon. 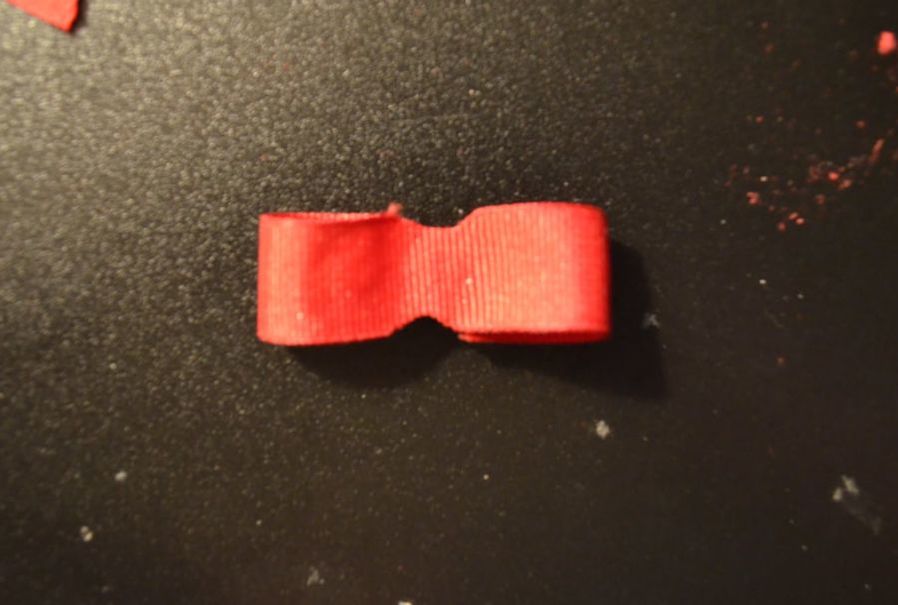 You're going to take another strip of ribbon and fold it like a taco. You're going to use hot glue to fill the center of this fold to create one long thin section of ribbon. As seen in the photo below. 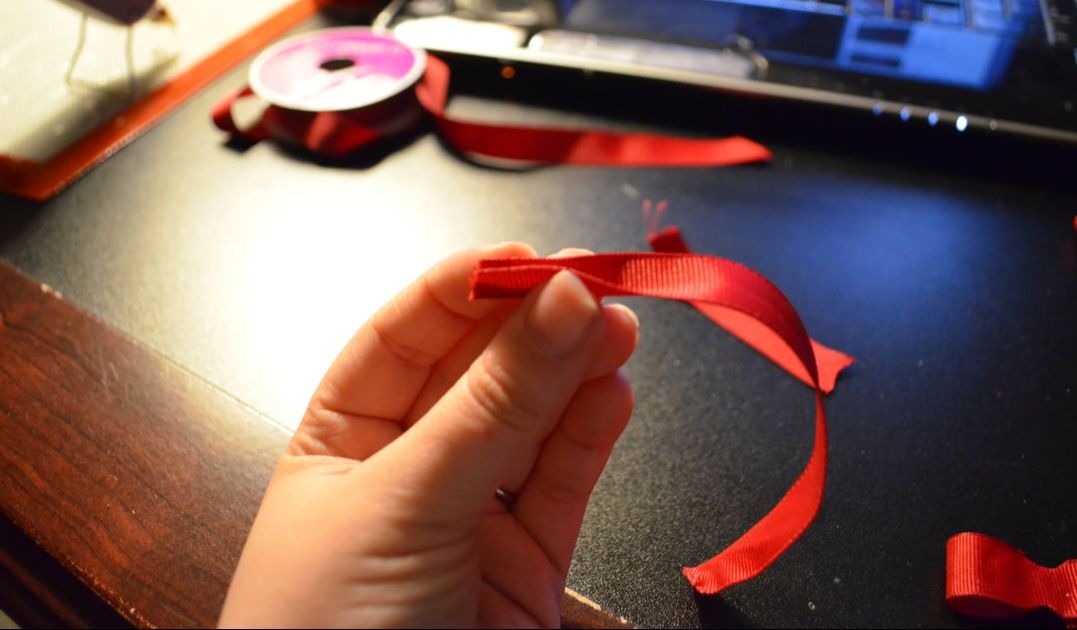 When you have this ribbon you're going to take it and wrap it around the center of the bow shape you started making earlier. You'll use the hot glue to attach them together. And then simply cut off the excess. 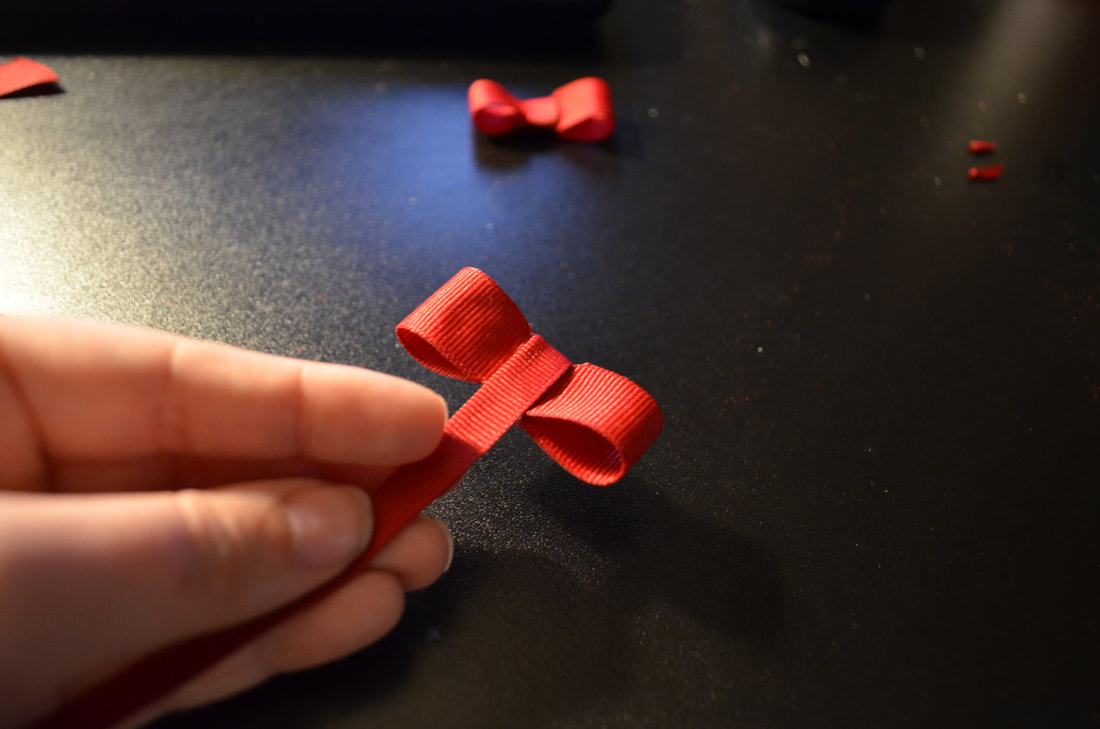 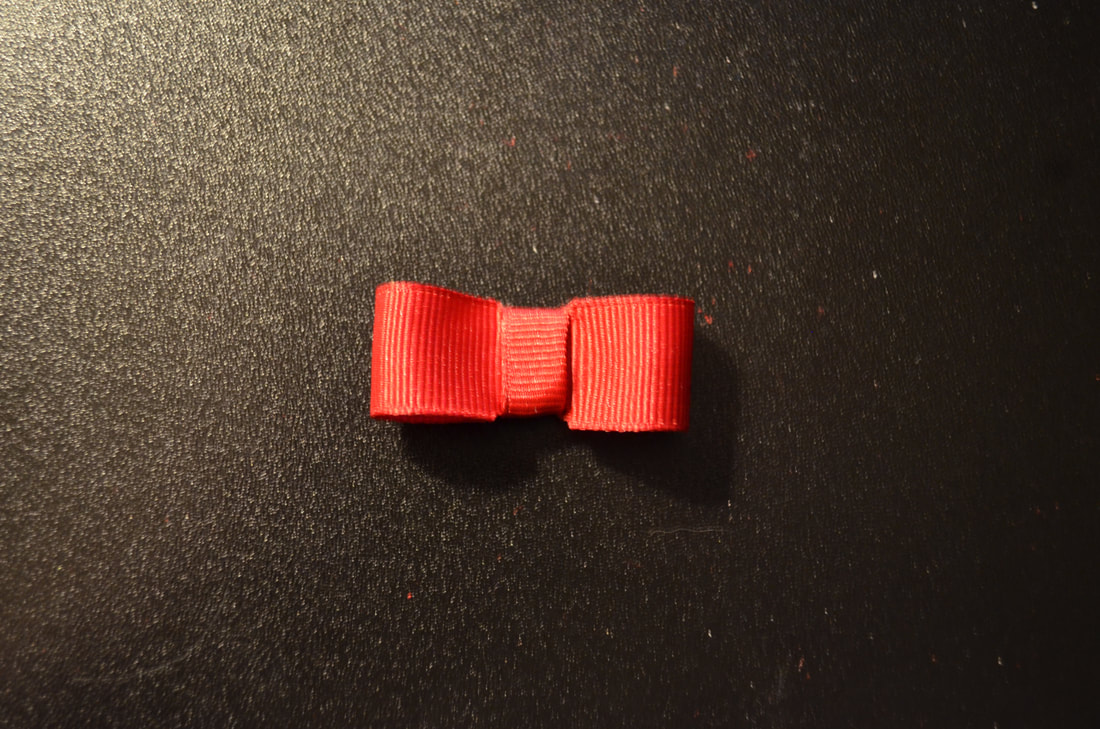 You're going to take these little bows and glue them to your ribbon sash on ONE SIDE ONLY. You want the other side to be loose so they can lift it and open the gate-fold. That's where the cheap glue dots come into play. You want a glue dot that will hold the ribbon for presentation but not a permanent one where you cant open it without destroying the gate-fold. 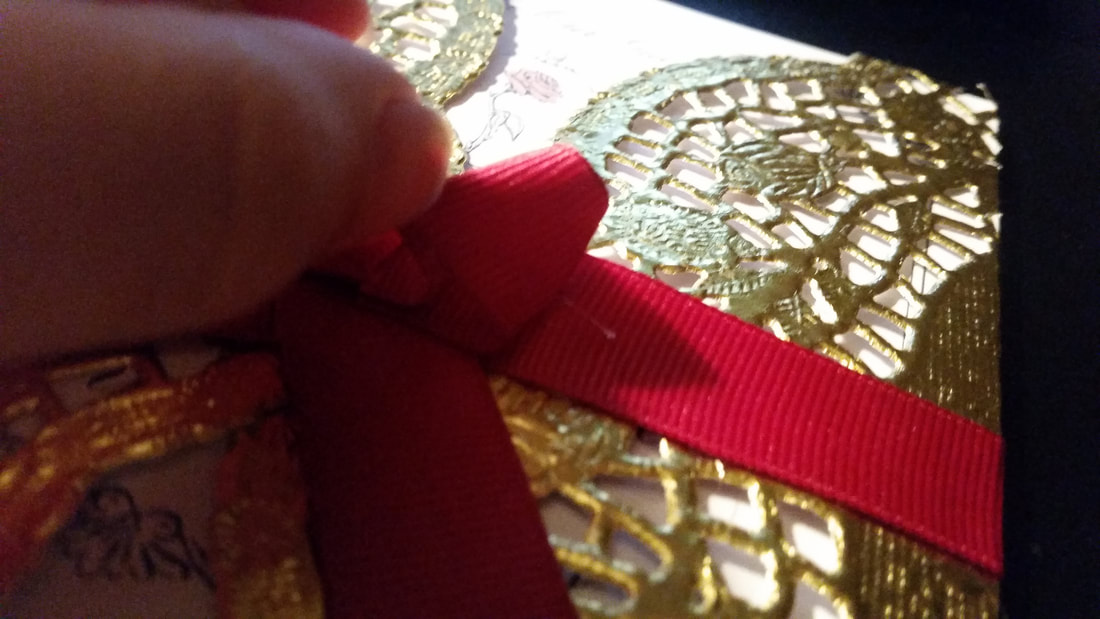 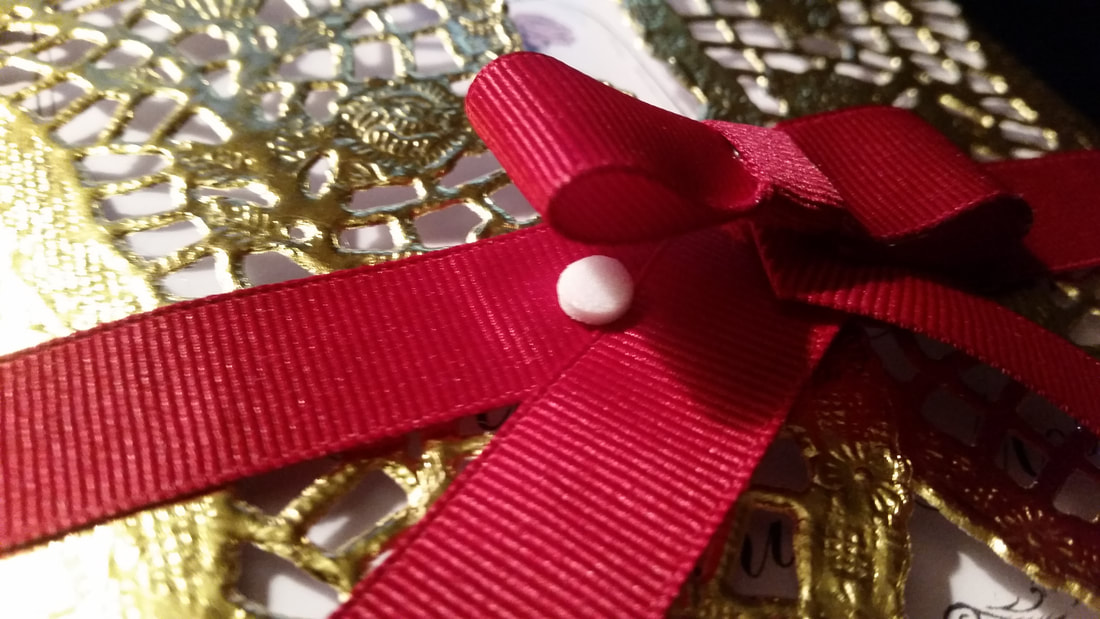 Your finished product is going to look like the picture below. We also had separate cards printed with the details of the reception and our wedding website. We then slid those into the gate-fold so when people opened their invites they were neatly packaged together. 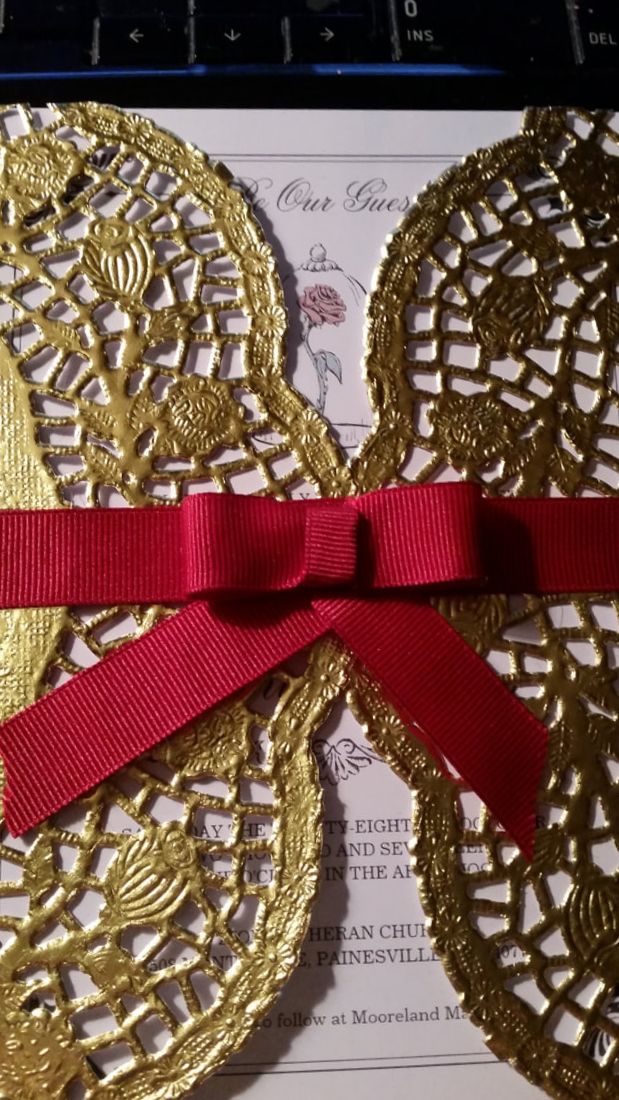 If you thought we were going to get through a Beauty and the Beast wedding without the Enchanted Rose Jar as centerpieces- YOU WERE WRONG. Of course I had Enchanted Roses! That was one of the most magical and romantic parts of the movie. And now I'm going to share with you how we did it! YOU WILL NEED: *Bell Jars *1/8" Acrylic Rods *Silk Roses with Wire Stems *Wire Cutters *A Drill *10" Styrofoam circles *Green Spray Paint *Hot Glue *Battery Pack String Lights *Prong Pins *Velcro *Floral Tape *Soft Craft Foam *Greenery Bushes *Gorilla Glue *Something to cut the Styrofoam with *A Saw So you don't necessarily have to start with this step but it would be smart get it done and set aside. Take your 10" Styrofoam circles and cut out square holes on the bottom where the battery pack from your string lights will fit. You can see my, now, husband diligently cutting away at the Styrofoam.... because I am a big baby and turn inside out at the sound of Styrofoam, lol. And you may have noticed I said "something to cut the Styrofoam with", well, this is why. He's over here using an ice cream scoop to make these holes. 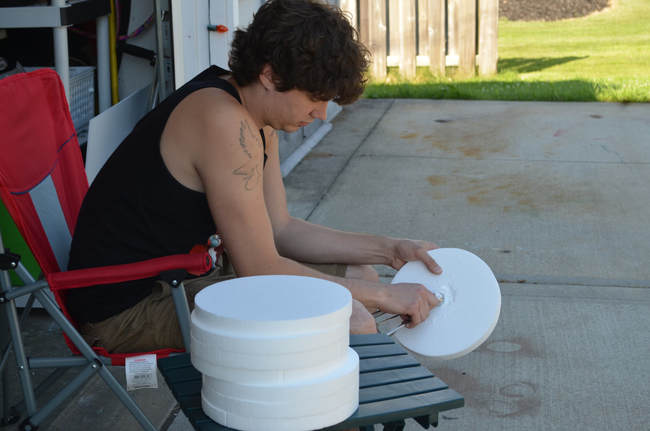 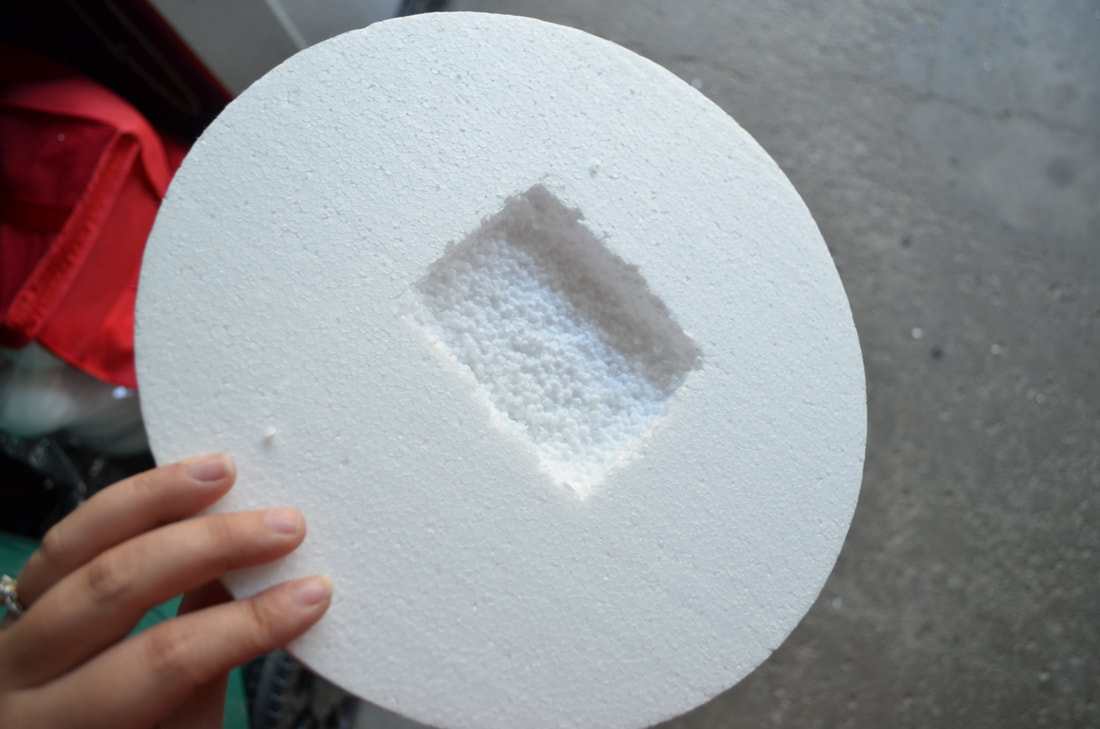 When you're done cutting your holes in the Styrofoam, use your green spray paint on the other side and around the edges. This way when you start turning that into your greenery base, any open spots between the leaves will look normal. Bright white patches are hard to hide. 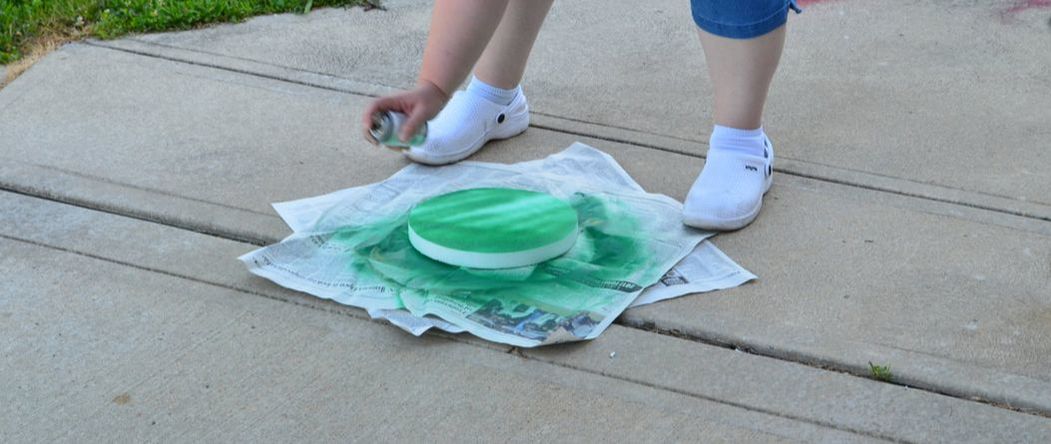 Now, the bell jars that we bought were at Michaels during their Fairy Garden Summer theme. They have a wooden base and will need to be drilled in the next step. BUT I want you guys to know that I searched for others like these and they were fairly easy to find. Try searching Conch Jars if Bell Jars don't come up and look for bamboo wooden base. I found a couple on Amazon for decent prices. Anyways, the next step is to drill a hole in the center of the wooden base. Don't go all the way through but deep enough that it will hold the rose securely. 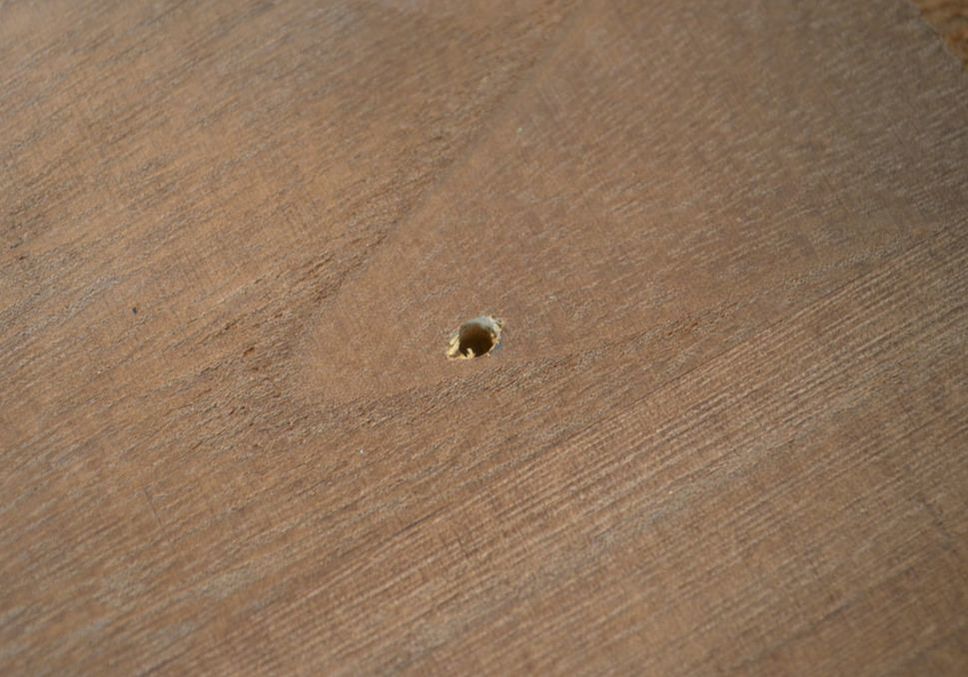 You may find that you have to drill a little deeper depending on how the next step goes. You'll need those 1/8" acrylic rods and a saw. You'll need to cut about an inch long section for each rose jar you're doing. 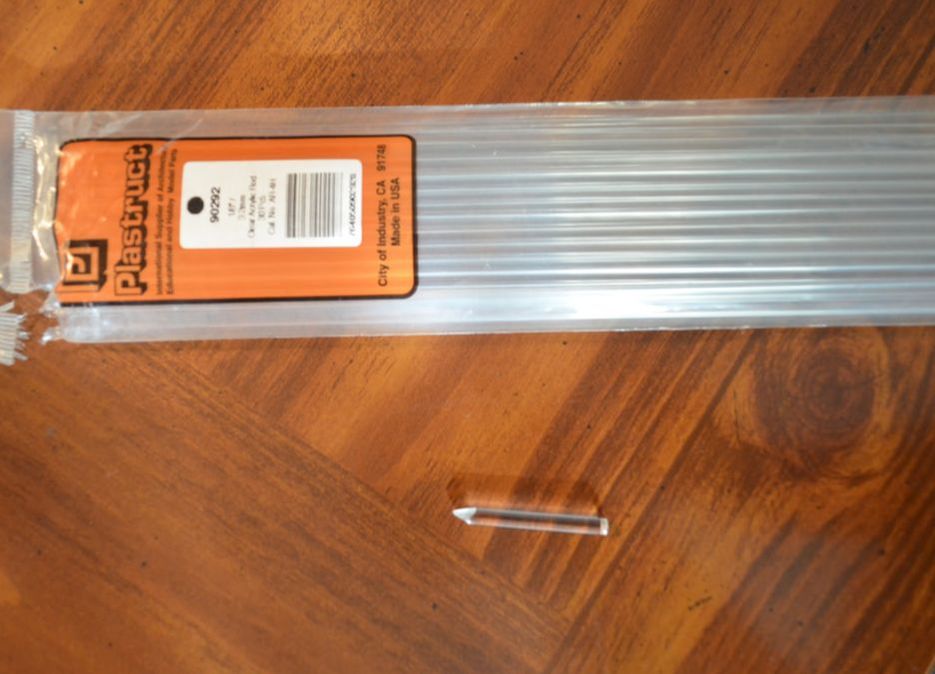 Put the small acrylic rod you cut into the hole of the wooden base. If it sticks too far out you may need to drill a little deeper. But for now we're going to ignore the acrylic rod and focus on the roses. Your silk roses will probably have leaves attached to them. Remove the rubber end of the leaf stem, you're going to need it. 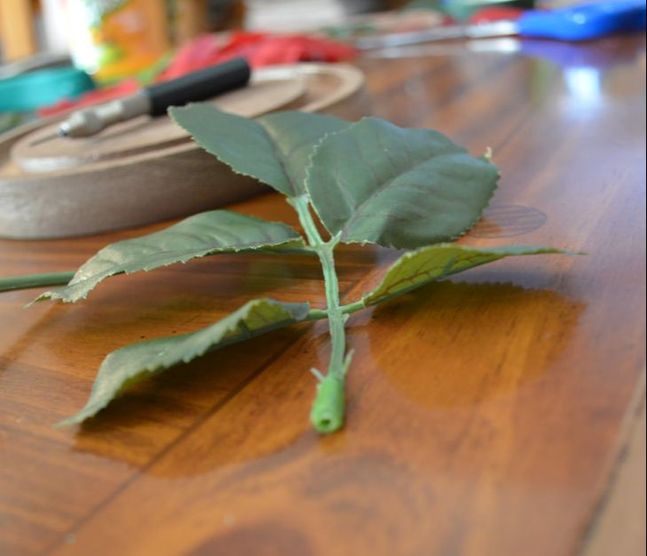 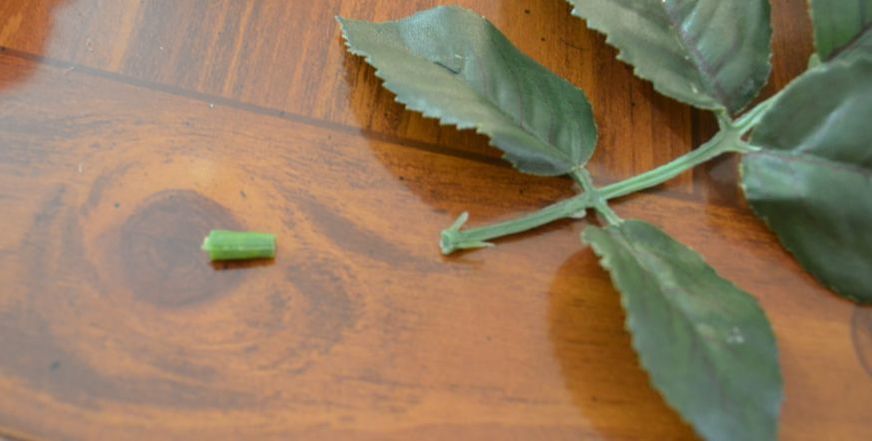 Now using your wire cutters you're going to need to cut down the stem of your roses. And in the movie the rose stem is not a perfect line, it's bent and a little crooked. So you can also see in the photo below that I used the wire stem to help me shape the rose. 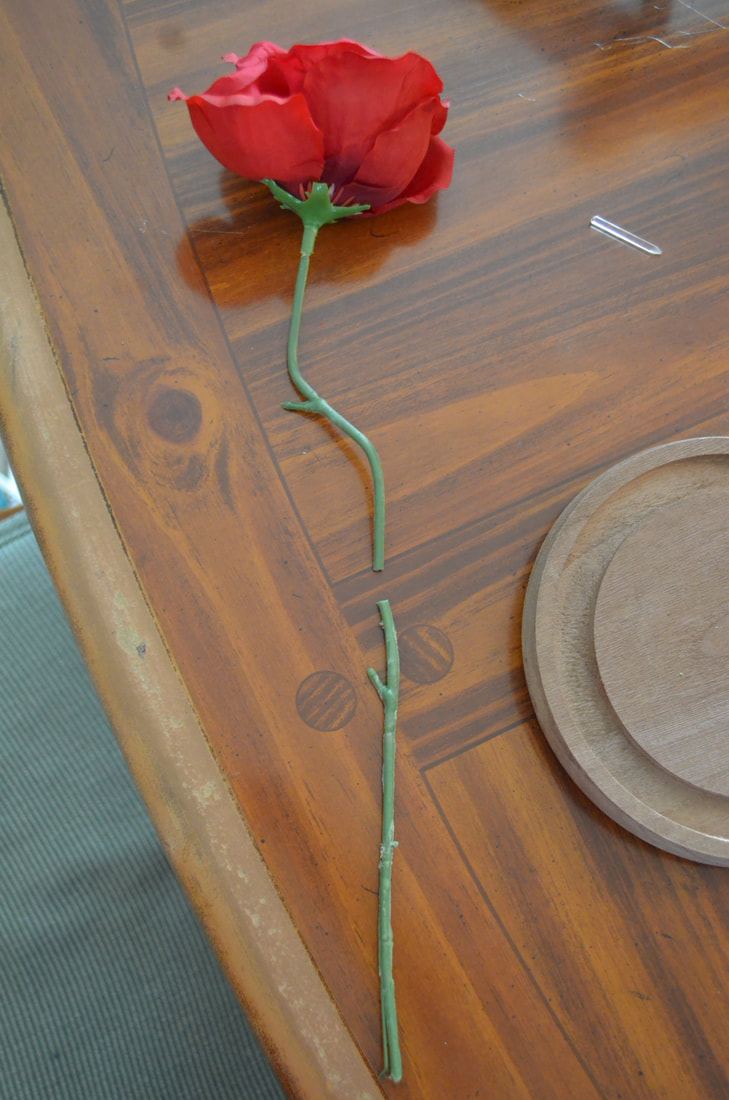 Use your wire cutters to strip the plastic off the stem at the very bottom. You want a small piece of wire sticking out. Attach the rubber leaf bottom onto the acrylic rod and then slide the wire in between the two. 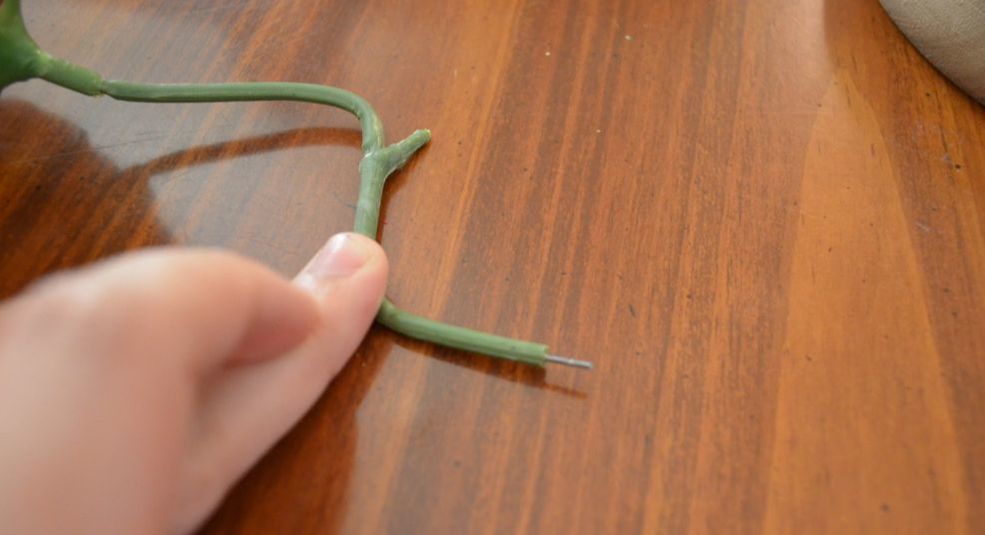 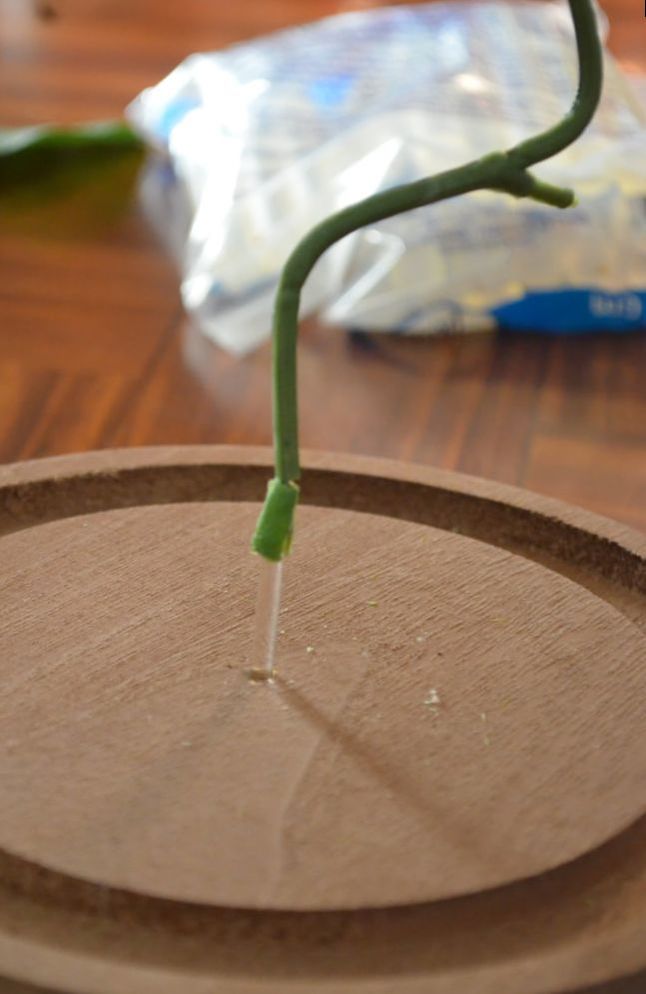 This is where your floral tape comes into play. Take the floral tape and wrap around the base and work your way up the stem. 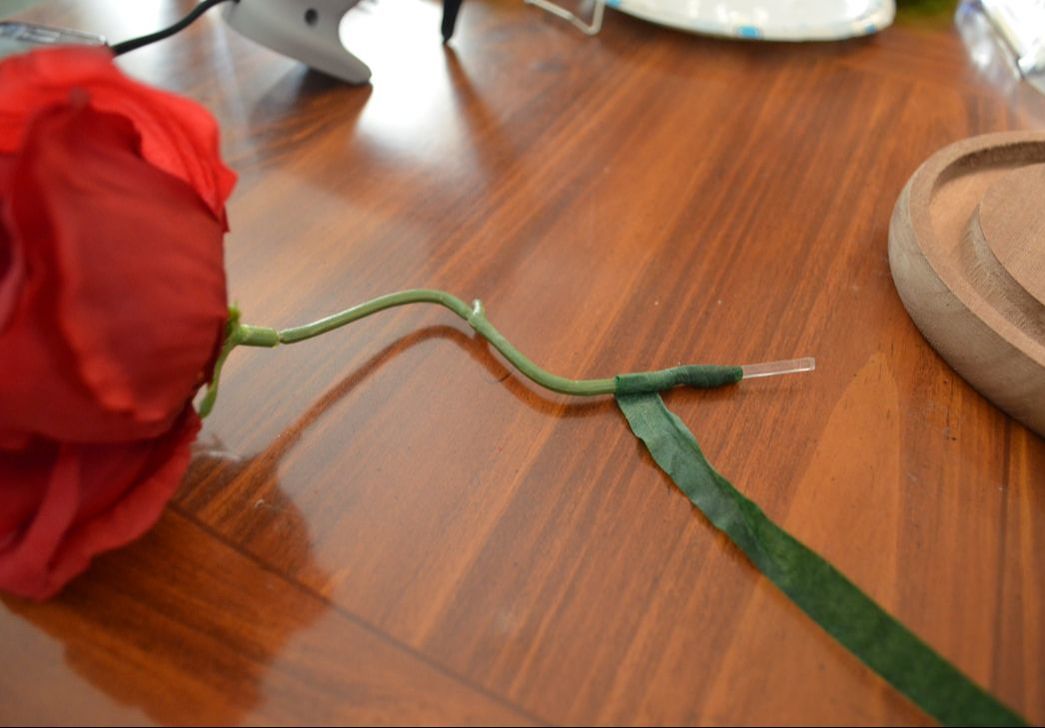 Continue wrapping up the stem and use it to attach the leaves. Take the leaves with the long stems, they're easier to attach. 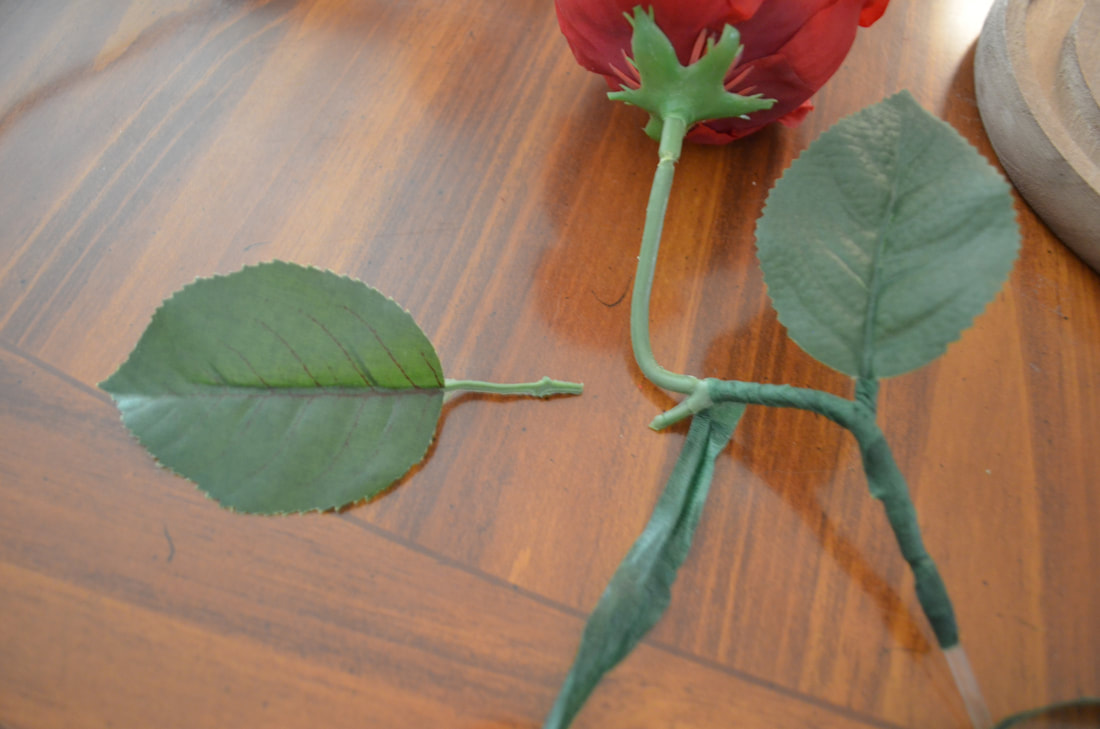 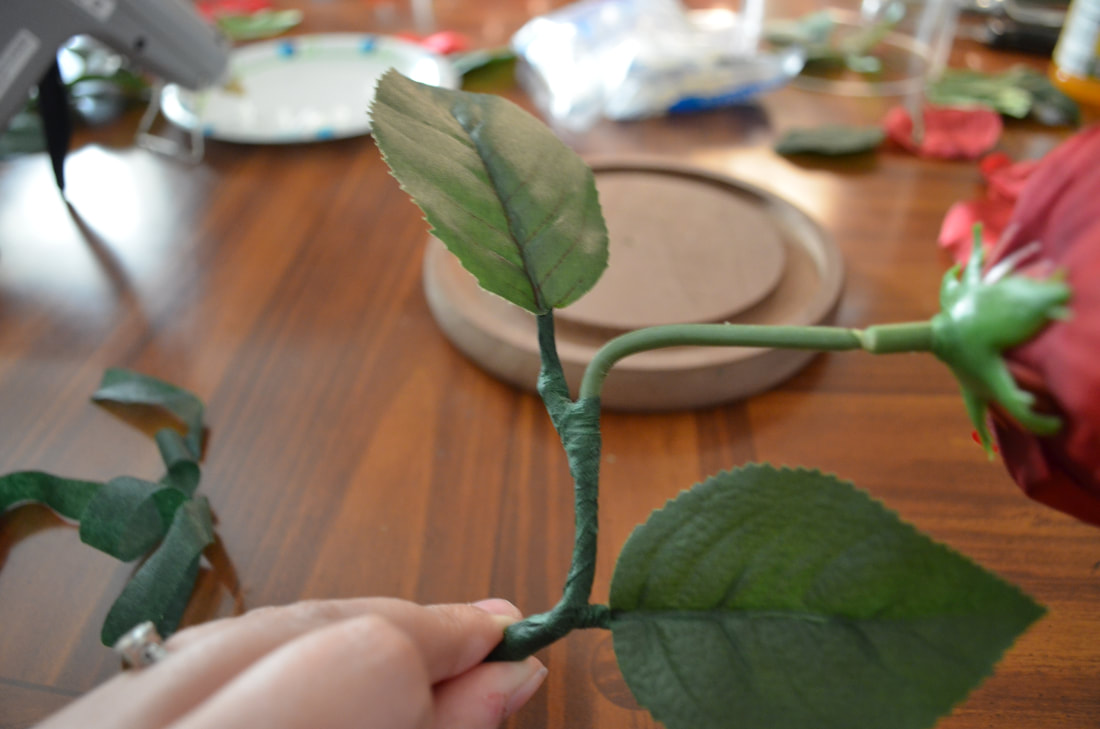 Once your whole stem is wrapped and bent into the proper position. You can add a dab of glue to the bottom of the acrylic rod and place it back into the hole. The next step is to take some silk flower petals, whether you have some from the other projects or you take them from the roses you're using in this project, and glue them to the base. Try and make them look like they've fallen. I did my best to take animated movie petal position into consideration. 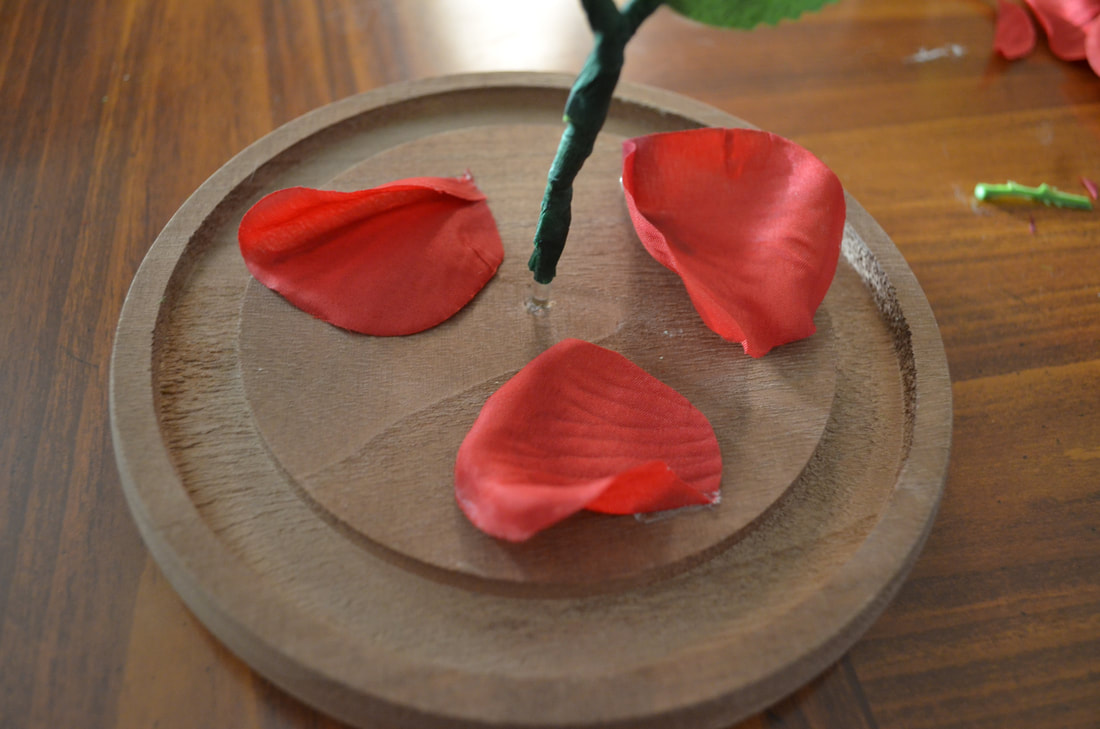 If you've made it this far, congrats! You can set your jar aside and go back to focusing on your Styrofoam circles. Take your soft craft foam and your Velcro. You're going to make a cover to help keep the battery pack from falling out. 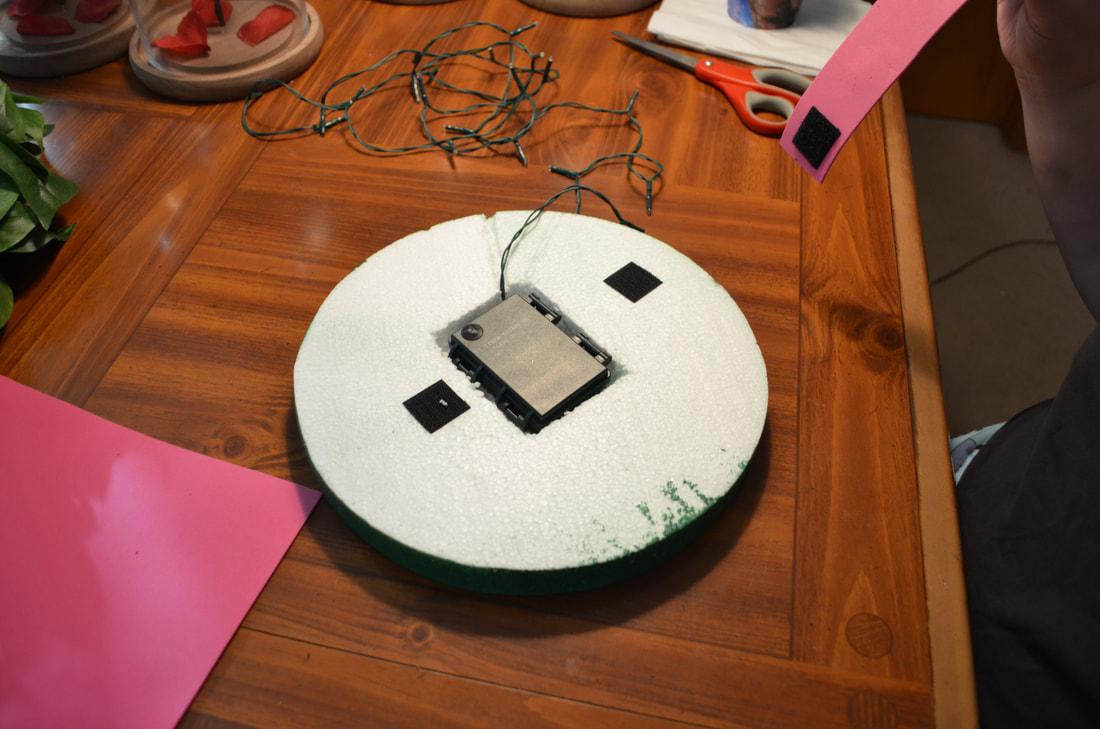 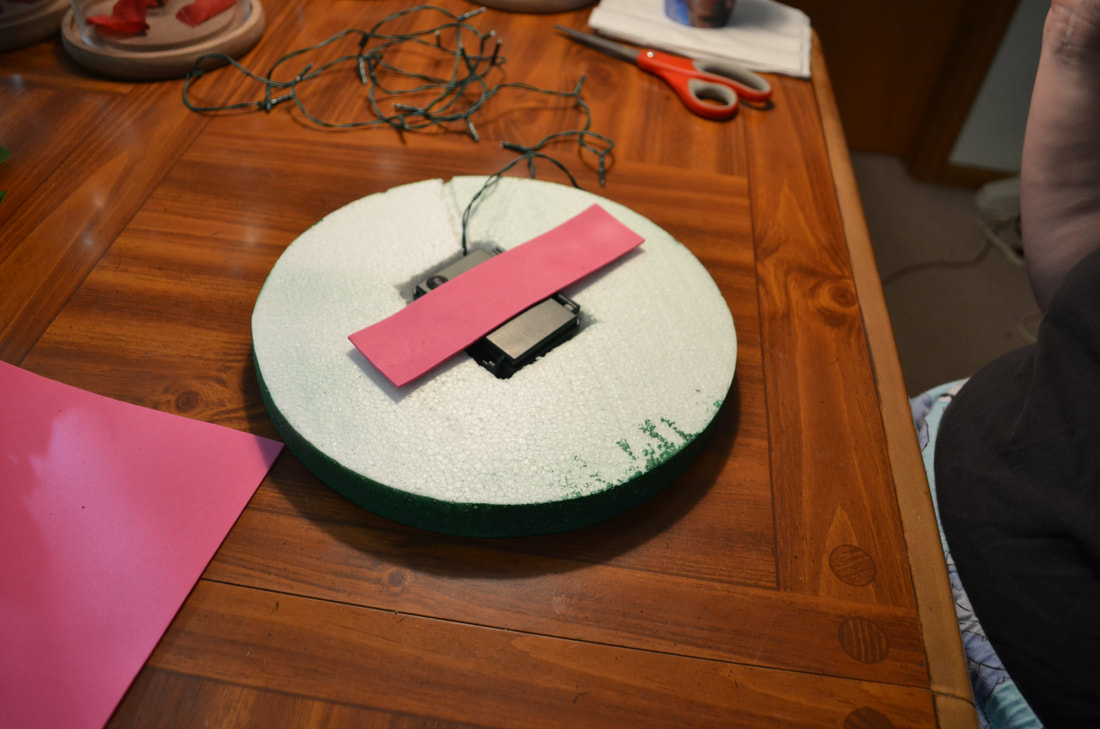 Flip the circle over and use your prong pins to attach the lights. You'll want to go around the center of the circle. 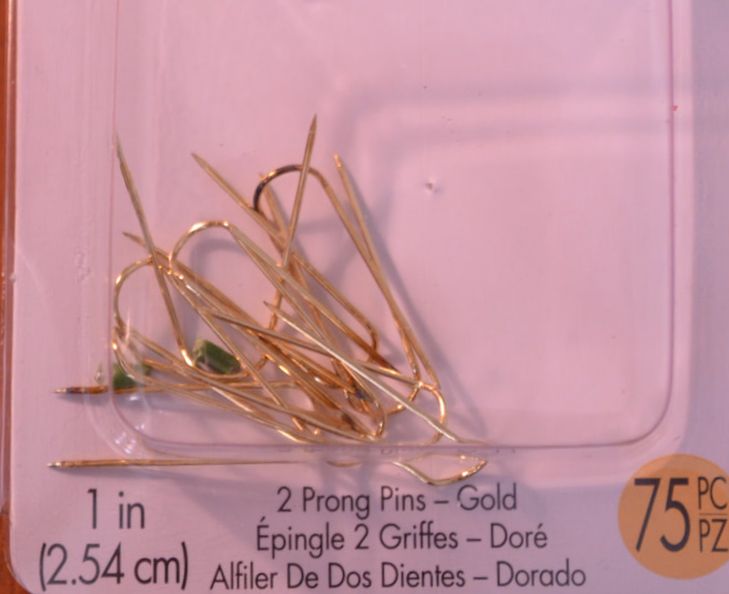 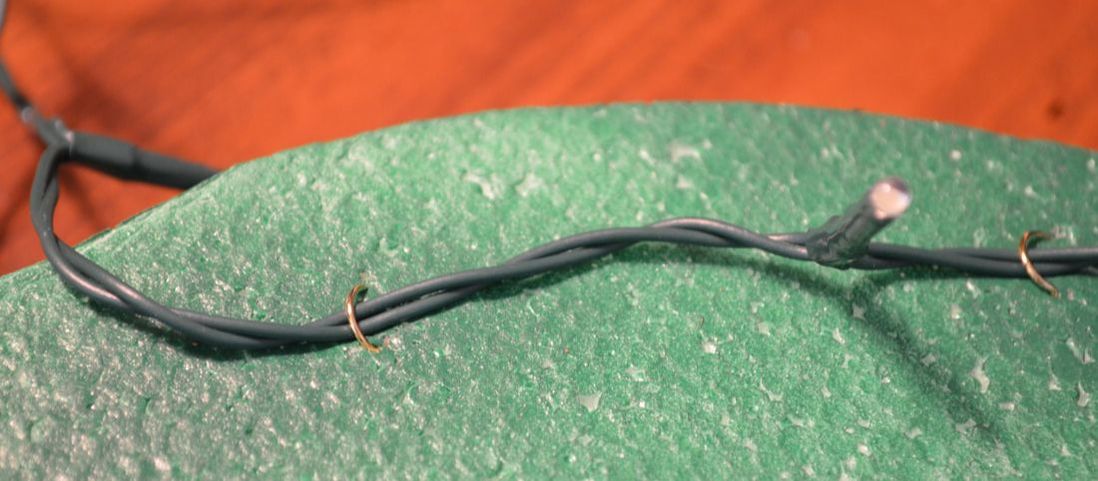 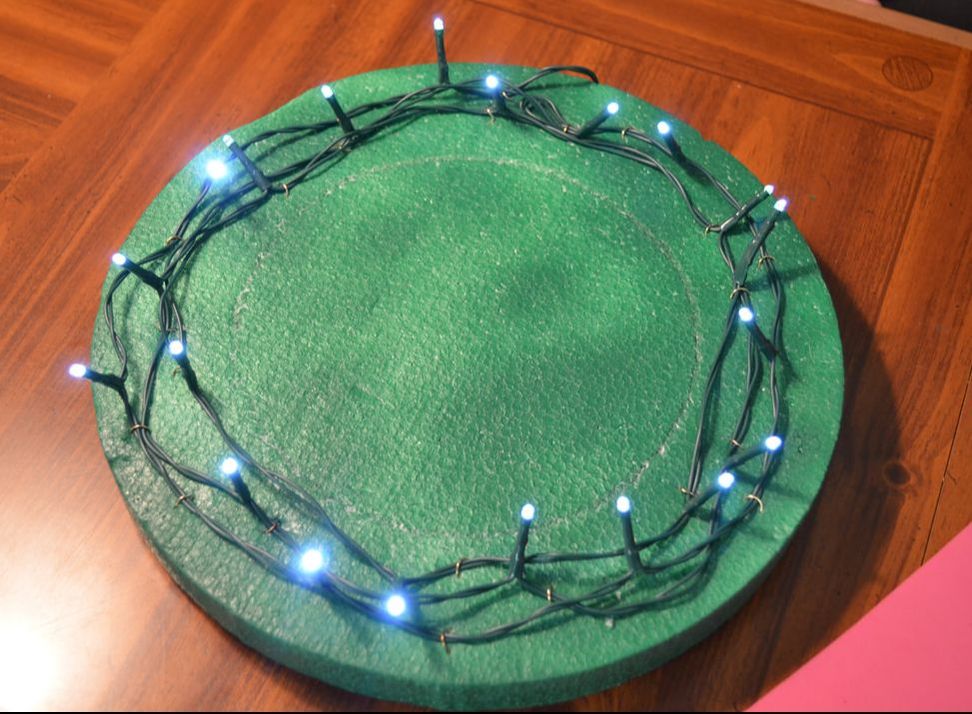 Alright, now that you've got your lights attached go on and grab your leaf bushes. You're going to take the branches and spread them out. Then slide up the stems to push the leaves together at the top of the stem. You'll need to use your wire cutters to cut the stems down. 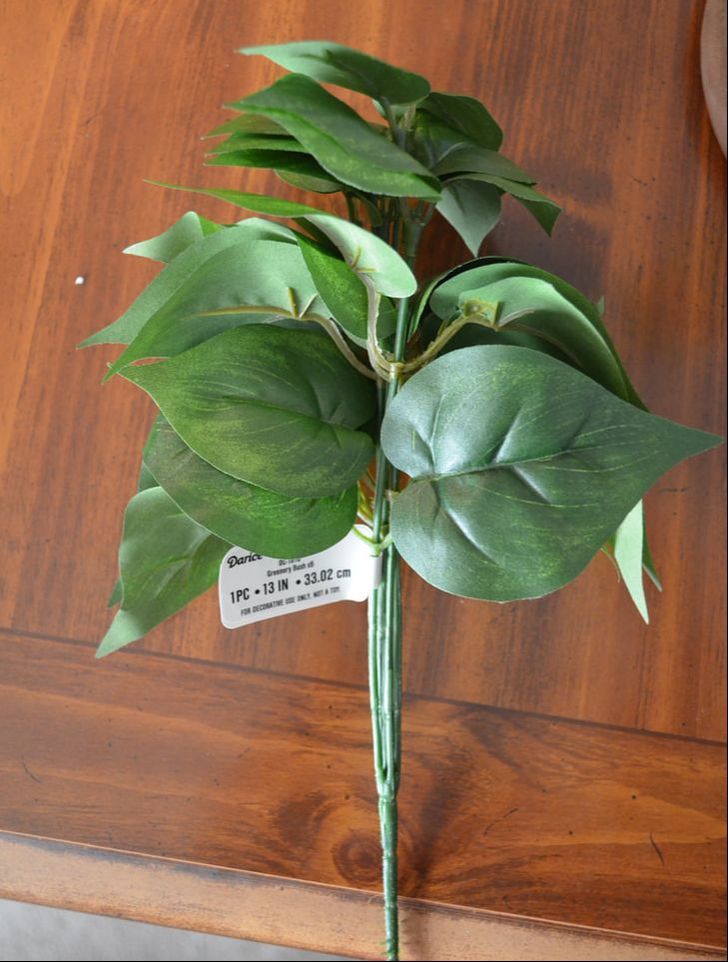 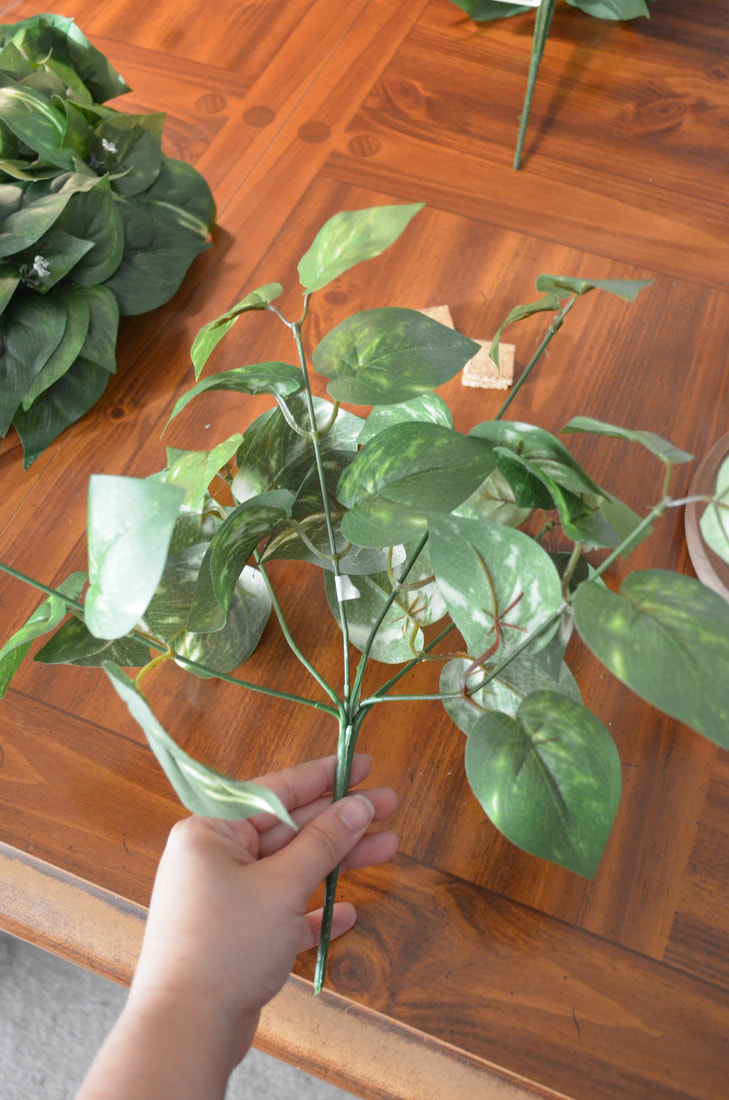 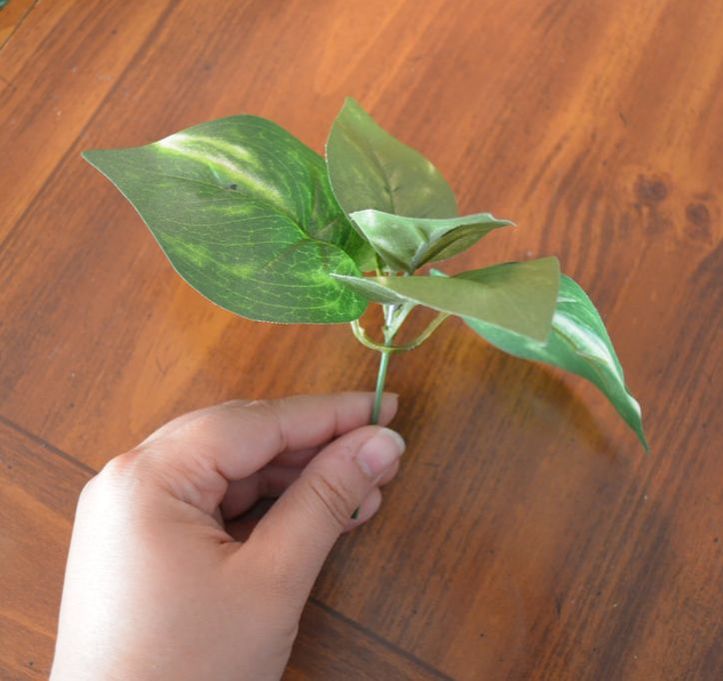 And now, you're going to take the small stems and start sticking them into your Styrofoam circle. You want to do this around the lights towards the outside. The idea is to hide the base as best you can. 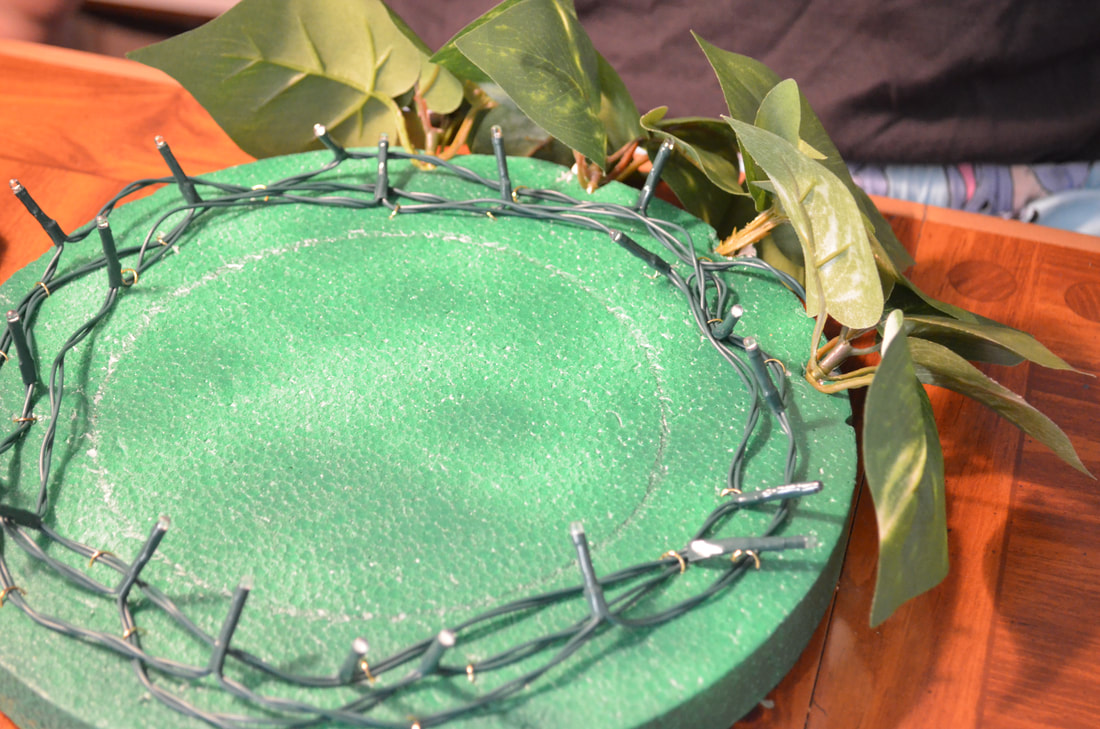 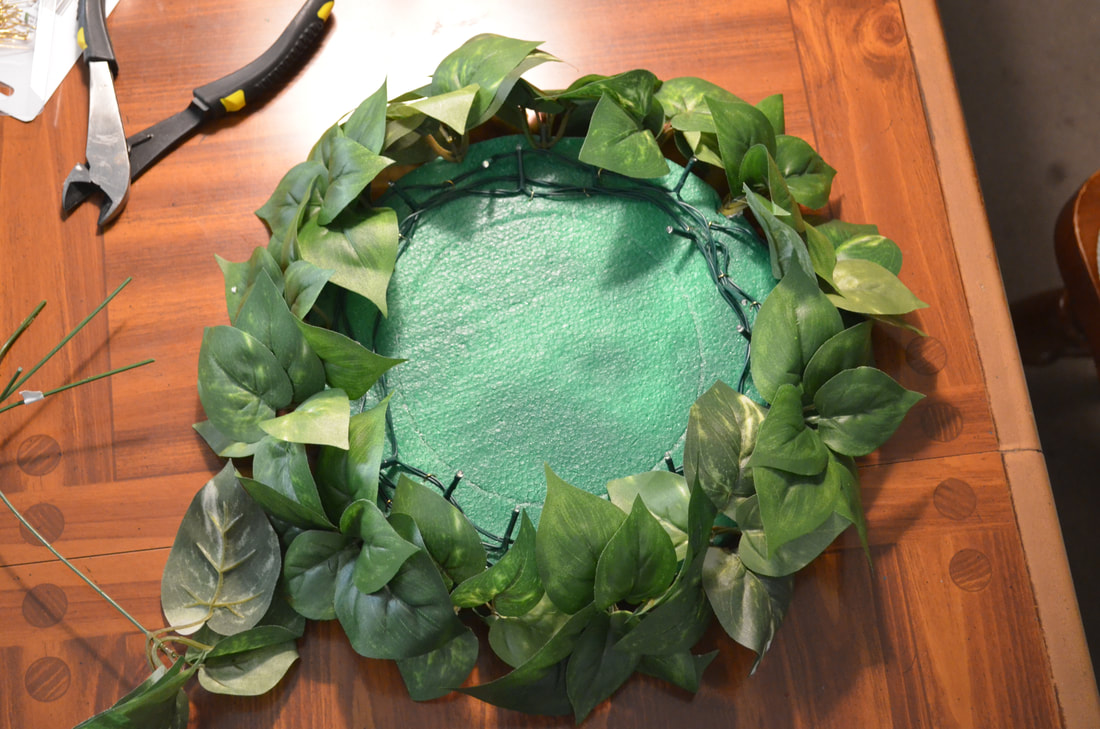 Remember to fluff the leaves so that it looks really full. Once you're happy with your leaves, you're going to gorilla glue the bottom of your bell jar (the wooden base) to the center of your Styrofoam circle. Once you're satisfied with this, take your gorilla glue and glue within in the groove of the wooden base. DO NOT glue the bottom of the glass dome and set it down. You are going to want to set the glass dome down INTO the glue, otherwise you will get glue on the roses and make a huge mess. 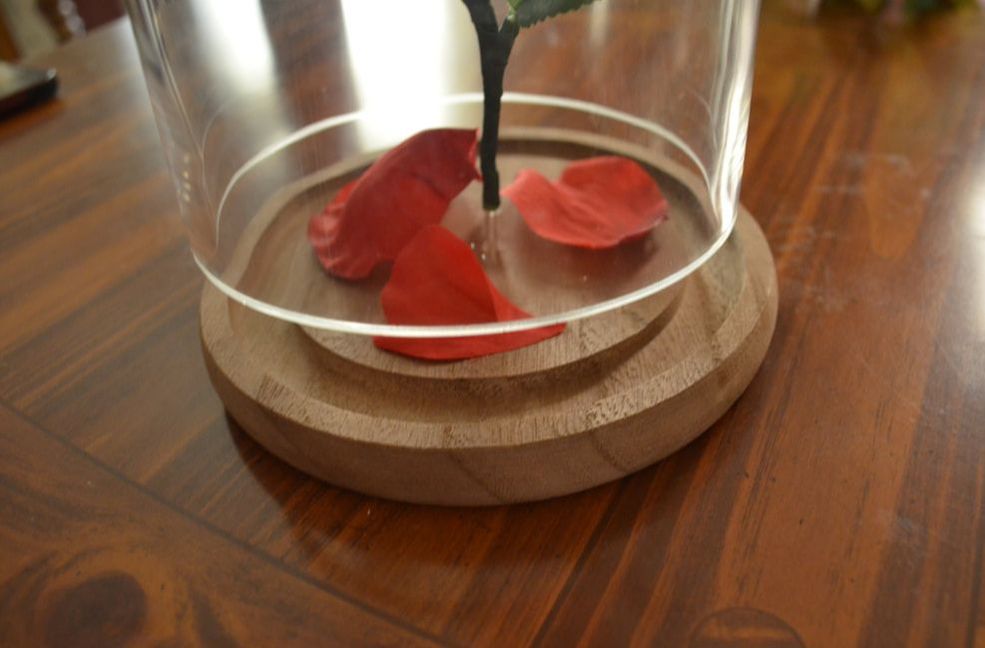 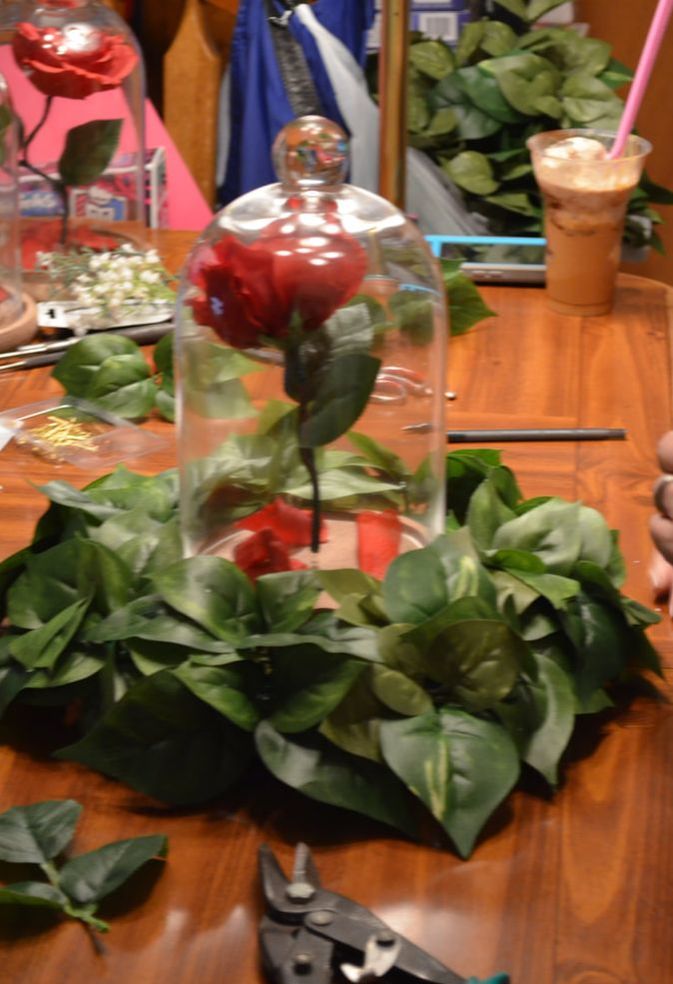 These are OPTIONAL steps. You can Windex your domes to make sure they're nice and shiny and have NO finger prints on the inside of the dome. AND if you want, take a can of air and spray the flowers, it helps fluff them, remove any excess hangers from glue and fabric shreds. 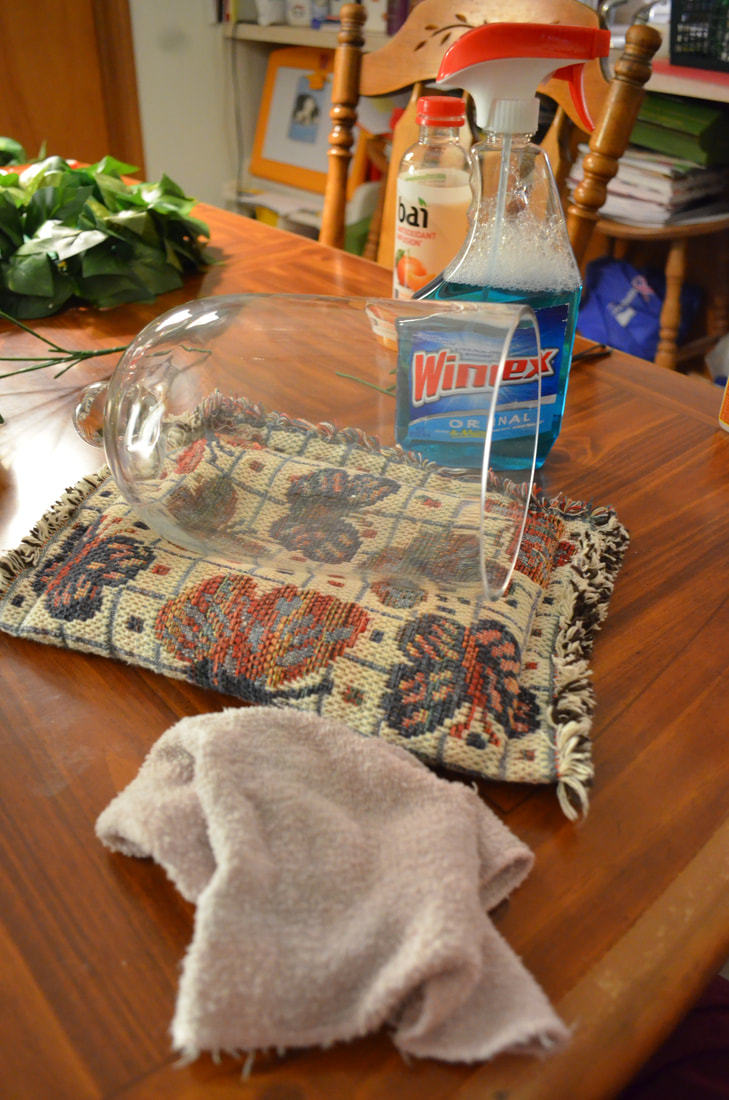 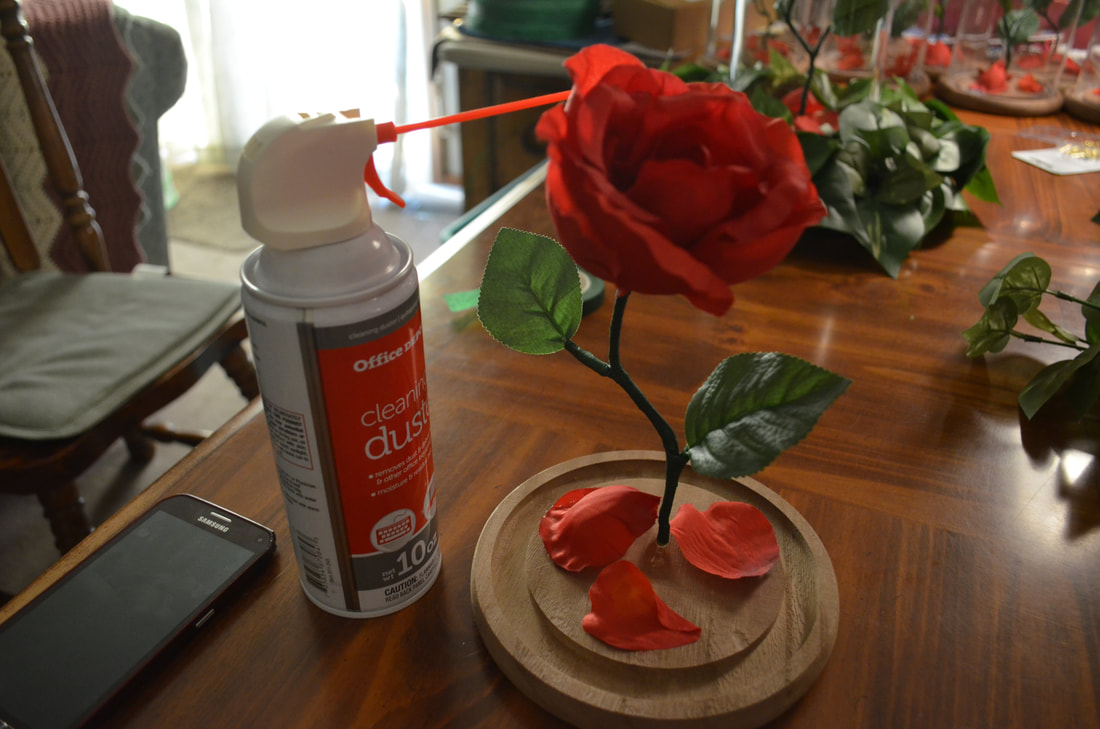 Now, this far along into the wedding planning. I knew that our church was already gorgeous and they were kindly going to put up the tall candles that go down the aisle for special occasions. We still wanted something extra so I made little floral decorations to hang from the pews. I made 16 of these, the same amount of candles we have, and they were SUPER fast. YOU WILL NEED:
We started by buying a bunch of kissing balls. I went to Pat Catan's and got 16 rose kissing balls. They're really cheap there, especially if you sign up for their Catan's Membership. (It costs you nothing but gets you all sorts of discounts and coupons... sooo why the heck not?!) Then we decide what color ribbon we wanted hanging down the pews. AND MAKE SURE YOU BUY PLENTY OF RIBBON! If you've got the crucial supplies, you're going to start with the kissing balls and the string that comes pre-attached to them. I strung this around a water bottle to make sure that I had it hanging the same way it would be attached to the pews. 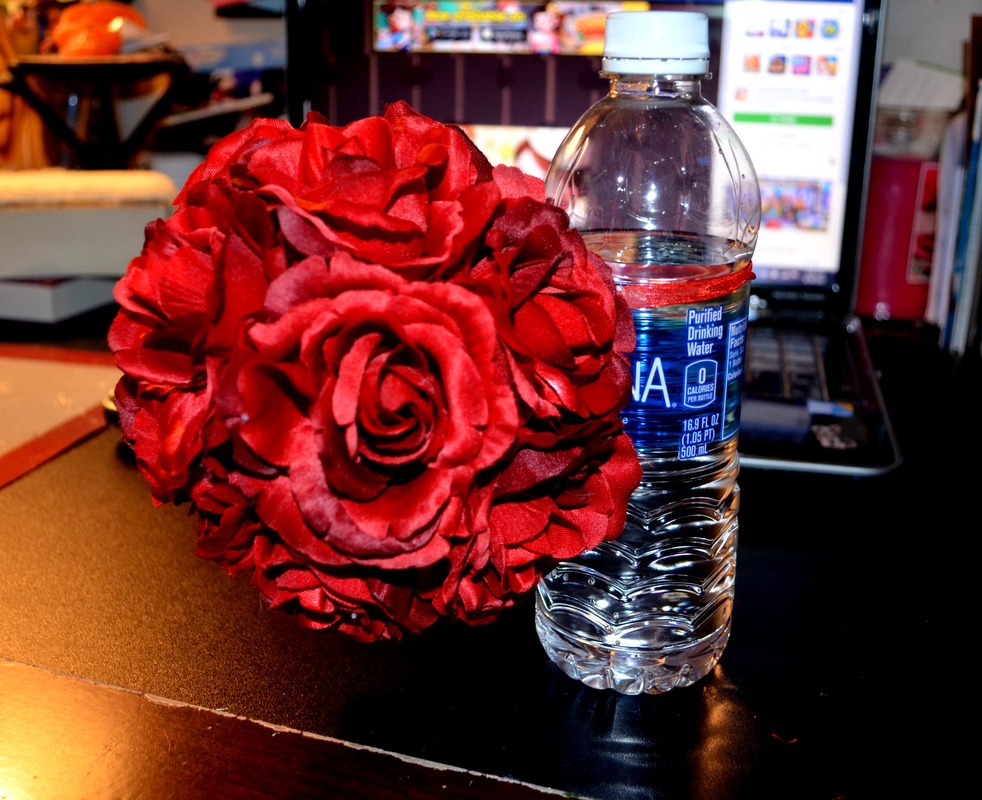 Now you're going to take your ribbon of choice and decide how long you want it hanging down. If you want it hanging to the ground YOU'RE REALLY GOING TO NEED A LOT OF RIBBON. I unfortunately couldn't get any more of the ribbon I bought so I had to keep them shorter. But they still looked gorgeous lining the aisle. I took three strands of the ribbon per kissing ball. You're simply going to find the center of the bottom of the ball and using your hot glue gun, you're going to attach your ribbon. The beauty of the kissing ball is that as you are gluing the ribbon, you're also tucking the ribbon behind rose heads. This way no one is going to see where you attached them or any glue residue. I added some mini strands of gold ribbon as an extra accent, but this is totally up to you. 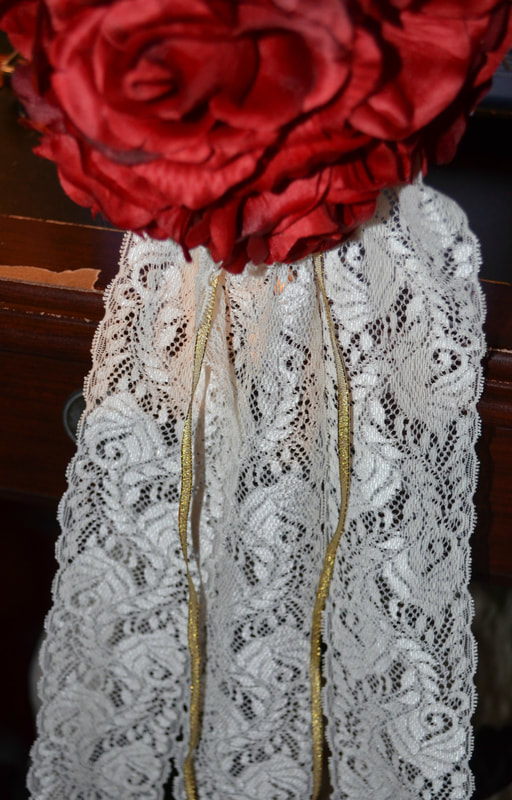 Now, those pipe cleaners are really for convenience when attaching these to the pews. The way our church is set up, these were being attached to little brass knobs that hold the TALL candles. If I had left the pre-attached ribbon (the one I used to hold it to the water bottle) I would have had to try and slide these OVER the tall candles and hope they sat properly. Since that is just a ridiculous thing to have to worry about, I replaced the ribbon with pipe cleaners. This way, come the day of set up, you're just lightly tying them around the brass knobs and everything is good to go. 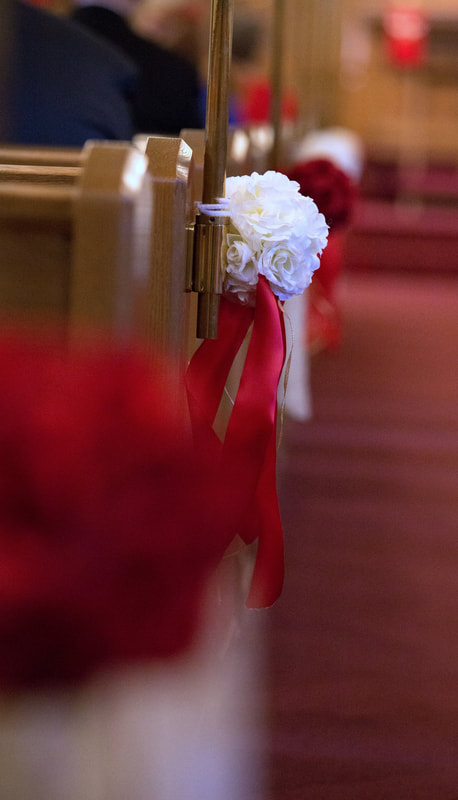 Minus putting a few books on our Teapot Centerpieces I hadn't really found a way to incorporate books into our Beauty and the Beast theme. BUT THOSE ARE CRUCIAL! I searched the internet for all kinds of ideas and I found a gorgeous book escort chart... on a Swedish wedding photography-site with NO information on how to make it. Soooo I called in my expert crafting team- Jeanni and my mom. And together we made this bad boy. And NOW I'm going to teach you how we did it. YOU WILL NEED:
Now, we knew how many tables we were going to have at the wedding when we actually built our chart. We were originally looking at 16 tables but when our final headcount was all said and done we only needed 13. Take this as a cautionary tale to not make your escort chart unless you actually have your finalized headcount put together. Since we knew we were only looking at 13 tables I got a 27x40in poster frame at Michaels. Then my mom went over to Dollar General and bought a bunch of romance novels and thrillers that were all the same size. Originally my mom and Jeanni started measuring the books and finding their middle sections before running the drills through them. I think at some point they stopped and just sort of trusted their eye... But it's all good. So grabbing your drill, you're going to want to drill straight through the books on each half. ((BUT you should leave several pages UNSCREWED. Basically open the book in half, and then half those sizes.)) Stick your screw through the holes and then put an acorn nut over top of them. These acorn nuts are going to come in handy (trust me). 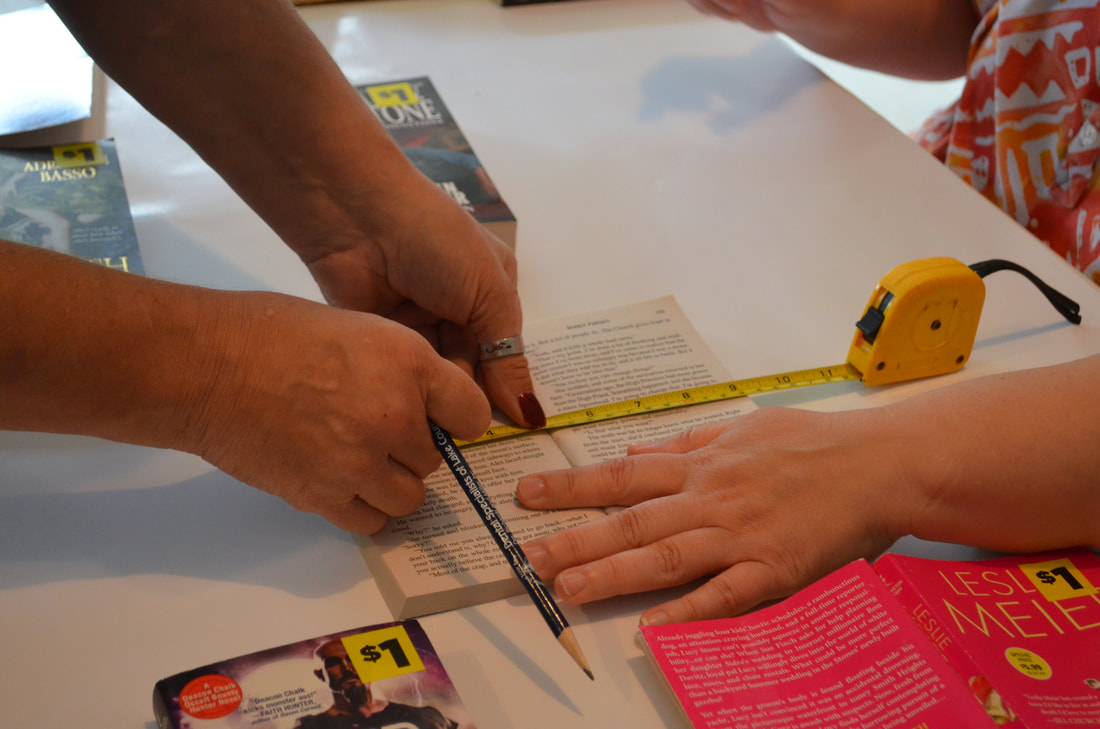  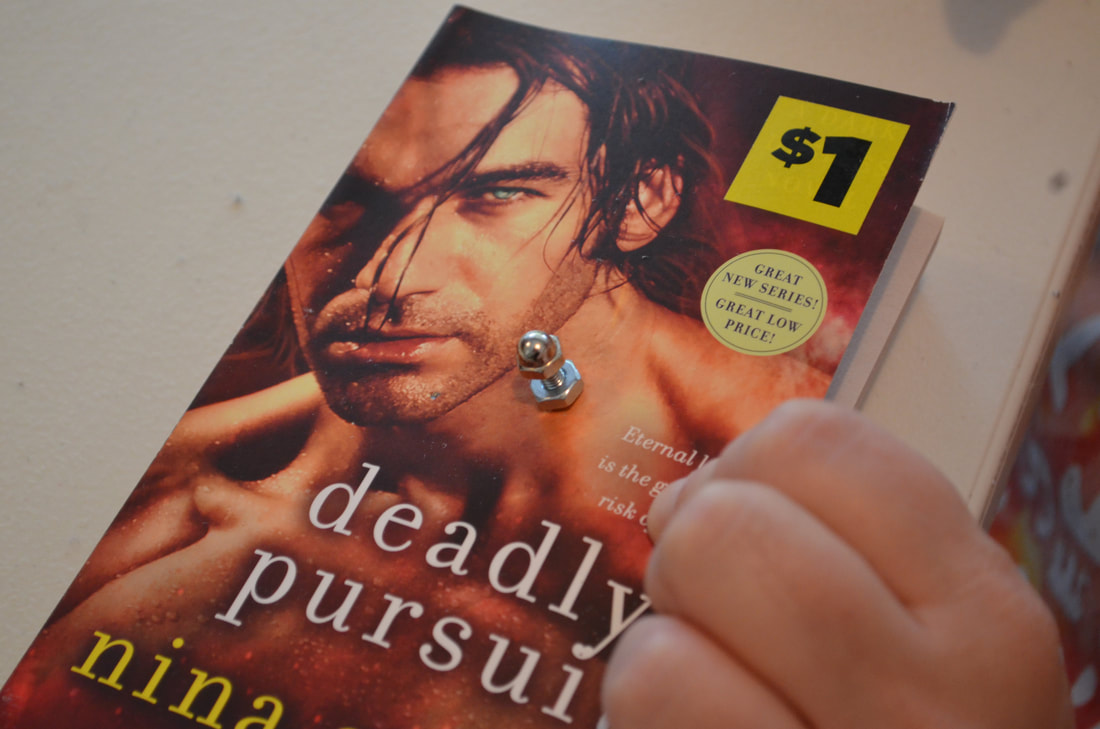 Once you got your books drilled and your screws put into place, you're going to need to get rid of the plastic sheet on the frame. There's no good way to remove it. You gotta just kind of break it and pull. You should really do this outside as it can be quite messy.  The cardboard backing on the other hand you're going to keep. Take the rolls of fake moss and cover the backing with it. The E6000 should do the trick to glue it down. The moss will, inevitably, hang over the edges of the backing. And this is where your trusty box cutter will come in handy. 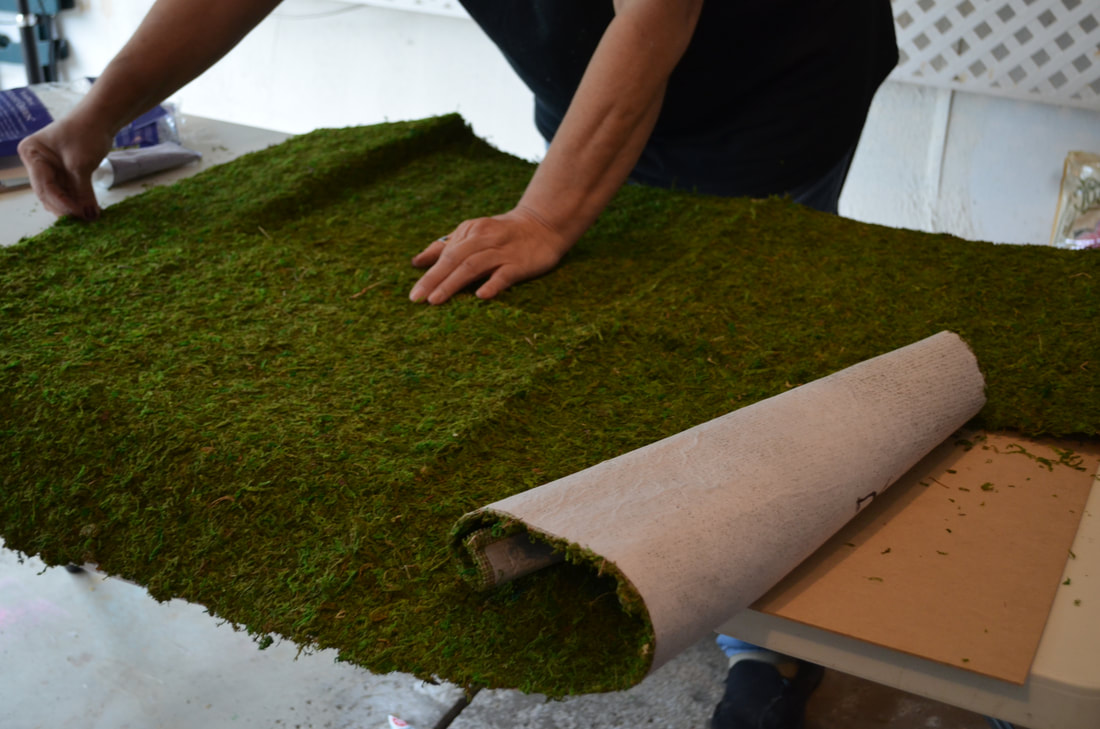 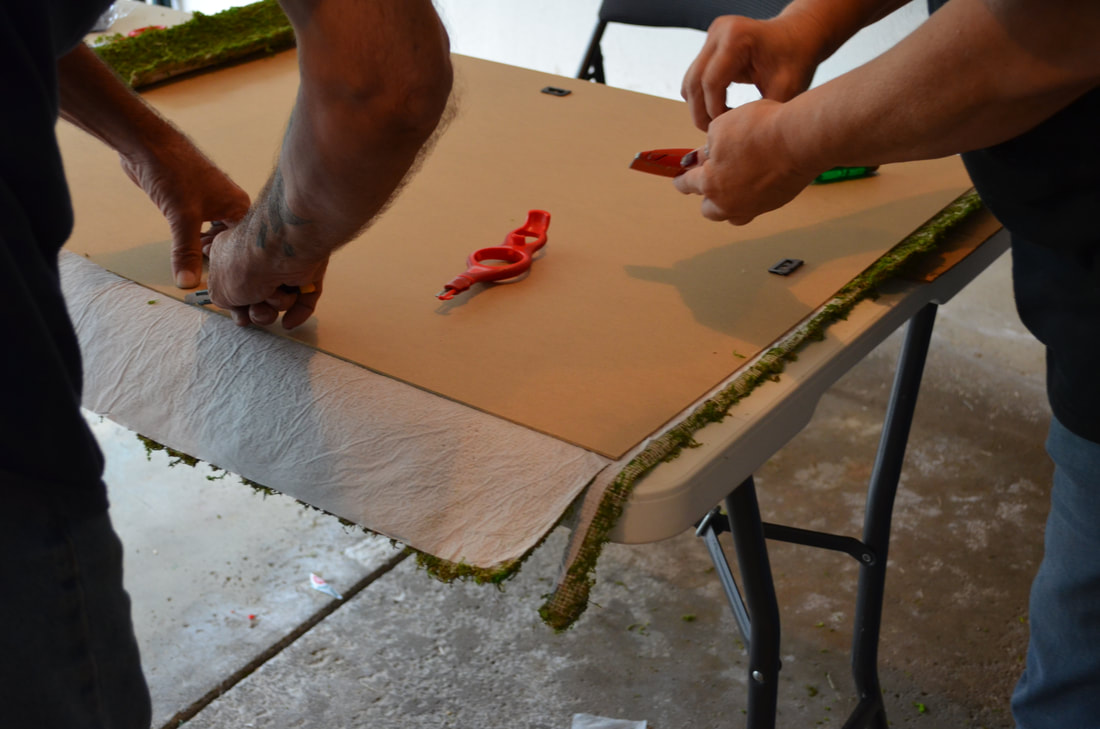  Now, here's where the paint comes in as optional. I dipped the Acorn Nuts into paint and placed them on the moss. This way I left little paint dots and I knew where to drill! WOOT! Genius! 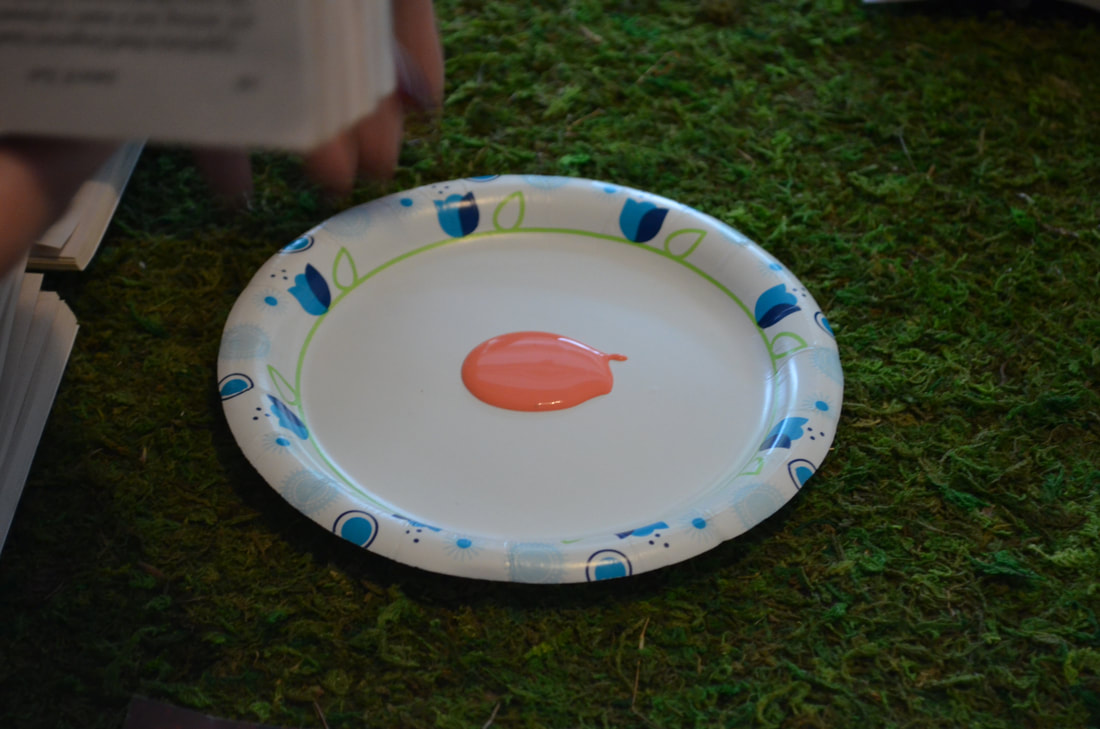  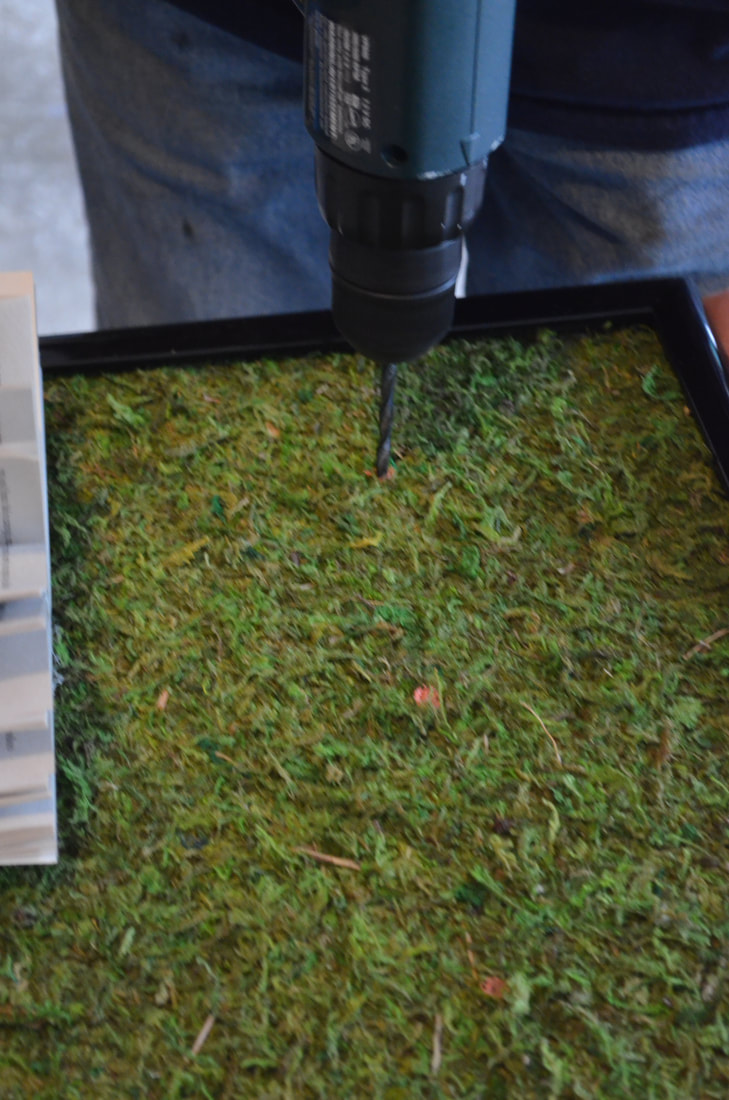 Earlier I mentioned that you only want to screw through part of the book. Here's why, you're going to take your hot glue gun and pony beads and glue them every so many pages to help the book have that nice round look. 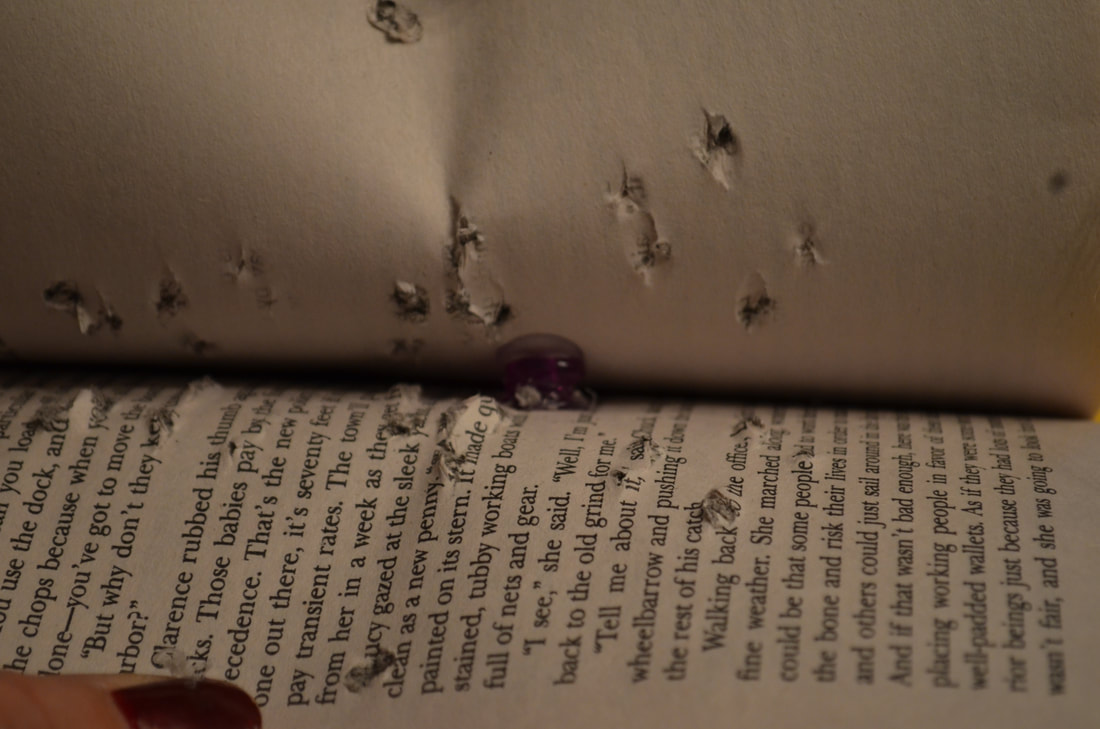  Now you're going to take your decoupage and glue your pages together. And as you can see in the above picture you're going to need to weigh them down so that they actually stick and hold their shape. It's about a 24hr long process with the decoupage and if some STILL don't hold just touch it up with the hot glue. 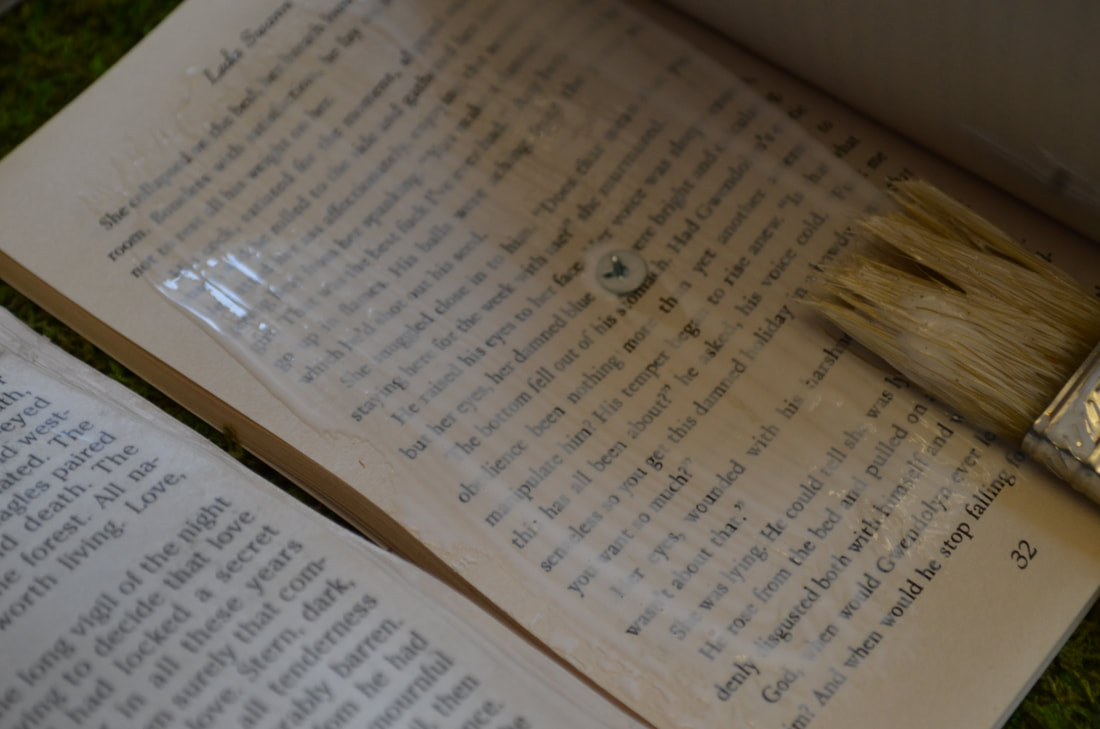 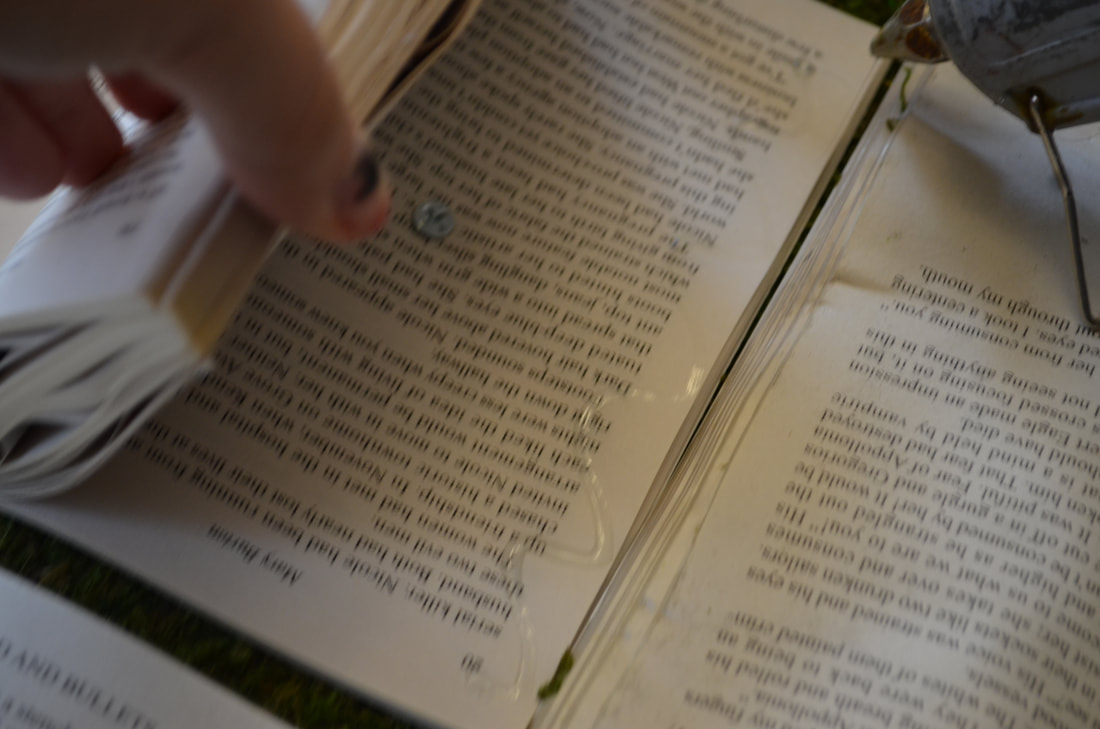 Now, you need to print the paper to place OVER the books. This is where the Buttercream printer paper comes into play. I made a template to show you how we designed the books. I did pixalate out the last names as I don't know how people will feel about having those exposed, lol. 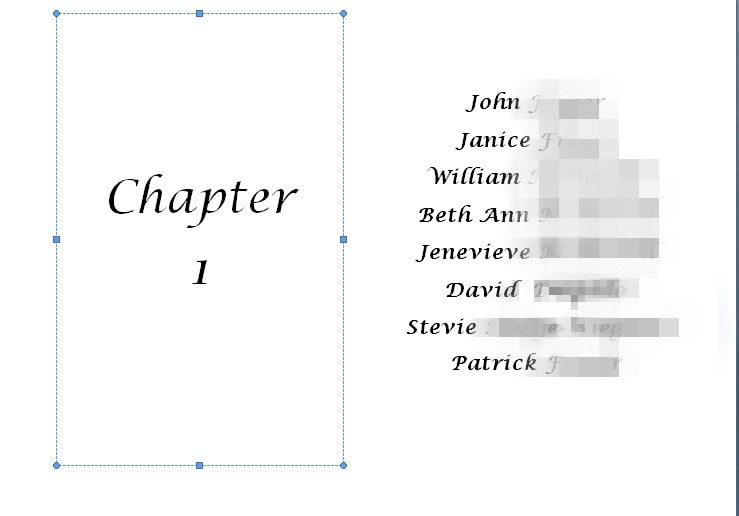 The left half of the page is in a 48 size font and the right size is printed in 22 size font. I printed these out and fit them to the books. This is how. First thing first, when you print the paper make sure you fold it in half and then fold the very center over a little bit like this.  Now hopefully you bought extra books, you know, in case you mess up. Because you're going to need one the same size as the ones you used for your chart. Set your book down on your folded paper and trace around it. You'll want to cut around that for it to fit over the book.   I actually used an Elmer's glue stick to attach these to the book. It was really simple and didn't leave residue or bumps. 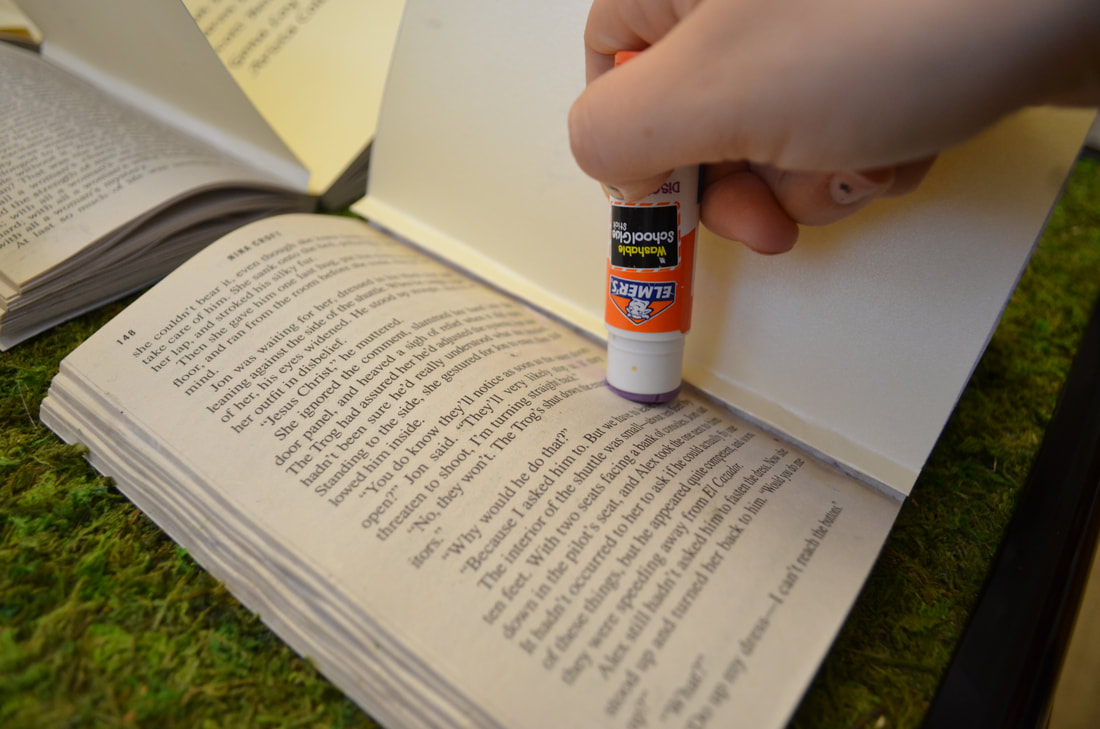 Now, here's where those decorate extras come into play. I ordered a whole bunch of bookmark tassels on Etsy (Link to the store:www.etsy.com/shop/ButtonsbyDoug?section_id=7499214 So I decided to hot glue some of those to the books to make it look like there were little bookmarks dangling in the center of the books. I glued it into the top of the books because once this is hanging up you're not going to see it.  I also took extra flowers and leaves that we had left over from doing the centerpieces and bouquets and used it to jazz up the corner of the chart. See examples below. 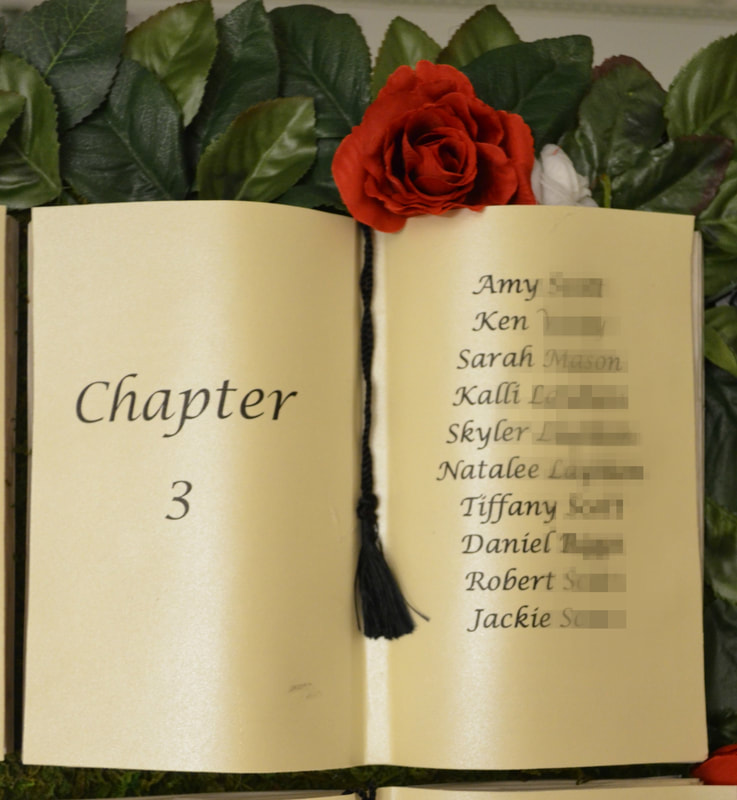 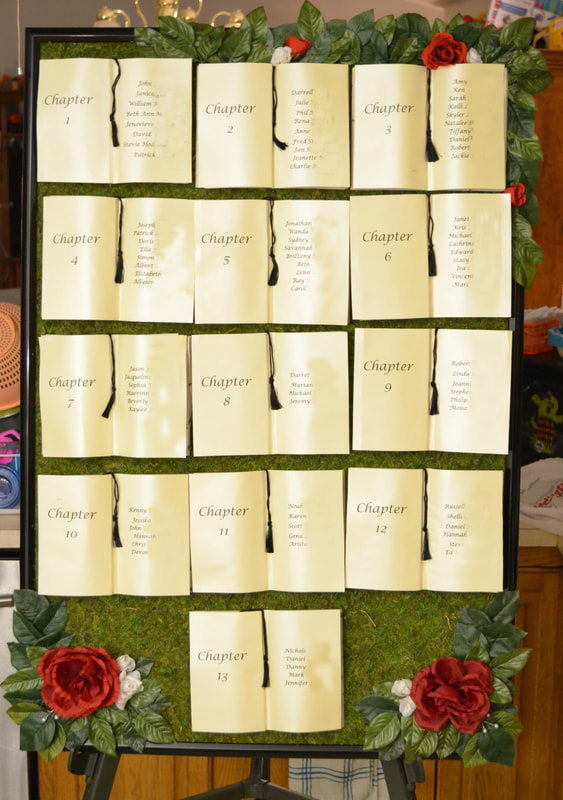 And we got our wedding photos back sooo here it is! In hindsite I wish more of the books looked straight. But by the time we did this, so much time had been put into it and we were so close to the wedding that I needed to stop worrying about the decor and focus on honeymoon plans. 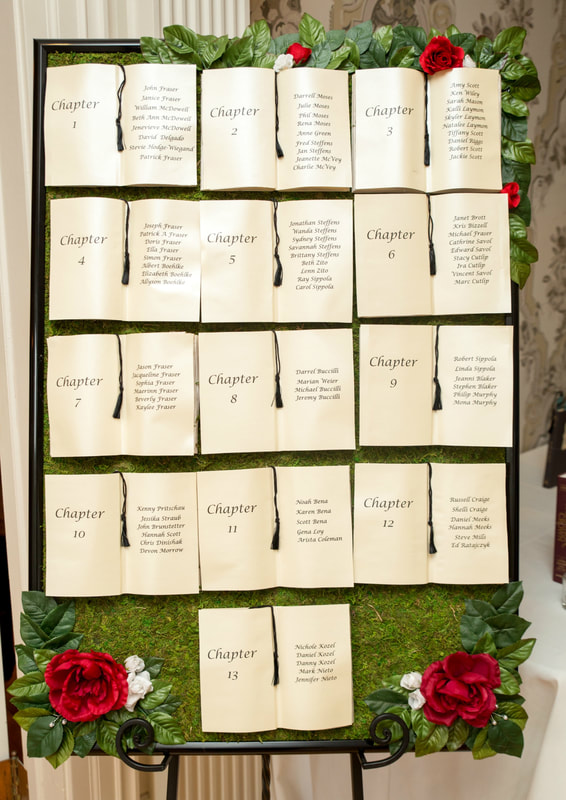 |
AuthorNow that the weddings over I'm a far less stressed woman and here to share the journey. Archives
February 2018
Categories |
 RSS Feed
