|
I am so unbelievably proud of this project. It came out so amazing and I don't normally feel THIS proud of a craft. But I also know that die hard, long time, polymer clay artists are hit and miss about the application of polymer to glasses or mug. There is a risk of it coming off and so I will show you what I've done and tell you the risks as we go. YOU WILL NEED:
While I didn't list it in the supply list, I am using my trusty silicone sheet for this project. My grandmother-in-law loves cardinals, there's even a family joke about it. So I decided to make her a cardinal mug for her birthday. I printed out a coloring book page of a cardinal (a small enough size that it would fit a mug) and stuck it under my silicon mat.   Since I can see it through the silicone mat I shaped my clay over top of the coloring page.   I removed the coloring sheet down below it and smoothed out the clay. Then using the coloring book as a template for where the lines should be, I etched them with a toothpick.  When I was happy with the way it looked I placed it on a mug and made sure it fit.  Following the polymer baking instructions I set the oven to 275 and waited for it to heat up. Now, they say not to heat Polymer Clay up in the oven but when you paint mugs and glasses, they tell you to heat it in the oven before baking it. So I compromised and placed my mug in the oven when it was at 250 degrees. I don't know if it helped anything, but neither my clay nor my mug seemed to have been affected. Then I baked it for 30 mins and let it out to cool. Once it's cool you can pretty much pop it right off the mug. Then I placed it over a solo cup to paint it. This way I didn't have to worry about getting paint on the mug.  When all the painting was set and I was satisfied with it I coated it in my polymer glaze and let it dry.  Once the glaze is set, and looks fabulous, grab your trusty super glue. Now, THIS glue was recommended by a long time polymer user for this exact type of project. And if you search it you are likely to find others. Though even they say this is not a guaranteed hold. With projects like this hand washing is a MUST but it doesn't guarantee that the glue or paint wouldn't breakdown. And the other fear I've heard is that the heating up of a mug from the hot liquids inside it could cause the clay to expand and thus fall off. I don't know what's going to happen in that department but I think if you stress the LIGHT HAND WASHING, like I do with my hand painted glasses, that they should be fine. So, the loctite is supposed to hold it on best and you really only want to apply thin strips of it. This way it doesn't ooze out and around your clay onto the glass or mug.  And after 24 hours your clay should be adhered to your mug and you can do as you please. I just really think this came out gorgeous. It came out so wonderful that my husband's family didn't know it was handmade! My heart just soared at their delight! I definitely want to try more projects like this.   
0 Comments
Our mother loves cacti but between her terrible green thumb and the dangers of us touching them... (might have happened once before)... she doesn't own any. For mother's day my little sister and I put our heads together and made her foam 3D cacti. YOU WILL NEED:
 I got these at the local Dollar Tree, they were the perfect size and best of all only $1. I take the lid off of these and top off the lid. I started the cut with it upside down, but honestly it was WAY easier to turn it the other way and cut through it.  Once I got that finished I hot glued it to the paper mache container. It makes it look like the edge on a terracotta pot.  I then took toilet paper rolls and cut them in half and hot glued them in a criss-cross form to the bottom of the container.   Then I took a paper plate and cut a circle out of the top of it. Using hot glue I attached it to the inner rim of the container. This creates your pot and you can set it aside for now.   Moving onto your cactus, we made a small ball cactus first. You're going to want to cut the shapes out of your green craft foam. Ones like in the photo below. They won't be perfect unless you're using a template or something, so don't be rough on yourself. I think for tag teaming this with a seven year old, we killed it. You will need three of each shape (the one without the spikes and one with).   Fold them in half so that they have a crease, you're going to need those in order to make the project work. And then hot glue the two sides together. This will leave you with three thick cactus sides. And I apparently was more distracted then I thought, because I forgot to get a picture of this so I'm going to do my best to describe it. And I drew a sketch to hopefully give you an image. You're going to take two of your sides and fold them in half. Then leaving one flat, glue each of the folded sides to it. (left, center, and right)  Then I made a flower to put on top of it. So I'm going to show you a photo of the top of the cactus with the flower on top and then I'll explain how to make the flower. I just hope the photo shows what I was trying to explain up above.  So to make the flower on top of our ball cactus we're going to take that craft felt and cut out a 5 pronged shape. You could cut out two of them but in this case, I cut one star shaped flower and five little petal pieces.    I also cut a long stand of yellow felt and wound it up in a spiral making the center of the flower. Then I glued around it with the little pieces of red. Moving on we also made a 'normal' cactus. We cut out two of these (see photo below) and glued them back to back. I also cut out some small rectangles to help give the base of my cactus stability. 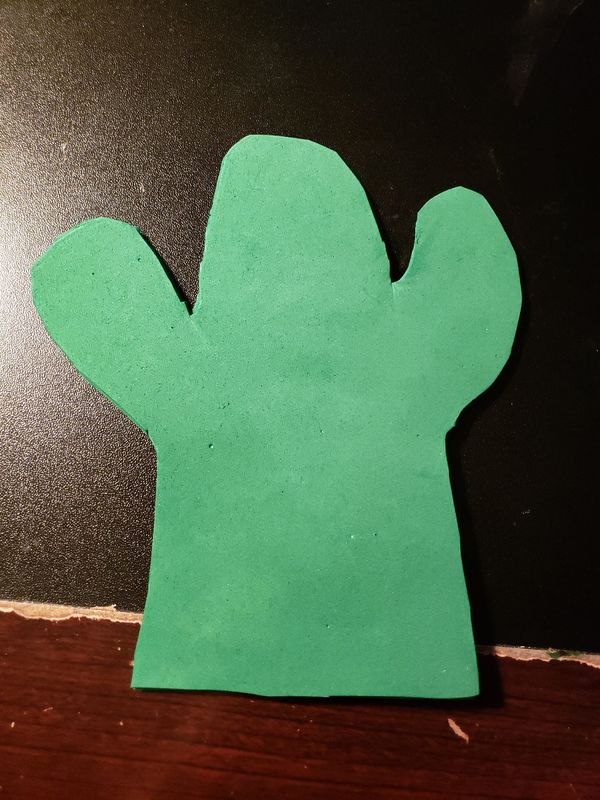  Using toothpicks and white paint we made little needle looking lines all over both cacti.  Notice the little blob that looks like ketchup up there? Yeah, we used that to paint the needles on the ball cactus. Personally I would have liked to alternate them, not paint every one, but Jenna insisted each needle be red.  We mixed three paints to create a terracotta pot color and painted our paper mache pots. Mink Tan by Americana, Camel by Folk Art, and Orange by Folk Art as well.  Once they were dry we glued the cacti down to the paper plate center we made earlier. Then using my hot glue and cotton balls I made "dirt" around the base of the cacti.  I mixed paint to make a nice dirt color and then gently and patiently painted over the cotton balls. Now, some of them may start to pull back or fall apart. I found that really making sure they were soaked in paint made them more malleable and stopped that from happening.  When you're done painting them set them aside and let them dry. They look so much like dirt and felt so solid, that no one knew they were cotton balls until we told them! I also added some flowers to the other cactus. This was literally just little weird shapes of yellow felt and small spiral of white felt in the center.  This was a mother's day gift my little sister and I put together for our grandmother. But you could change the saying to anything you want. And you may be thinking "NOPE, felt flowers are too much work. I'll just use pre-made silk flowers." Hey, that sounds like it will be gorgeous too! I'd love to see it! But I will be giving step-by-step to the various felt flowers I made for anyone who is interested in them. YOU WILL NEED:
 I got this plaque at Michaels for $3.99, and yes this is from their website. I messed up and all my photos of it before decorating came out blurry. You're going to want to find the center of the plaque, where your words are going to go. BUT more importantly for where you're going to center your flowers around. I found that a paper bowl, which creates a 6 inch circle, was perfect. 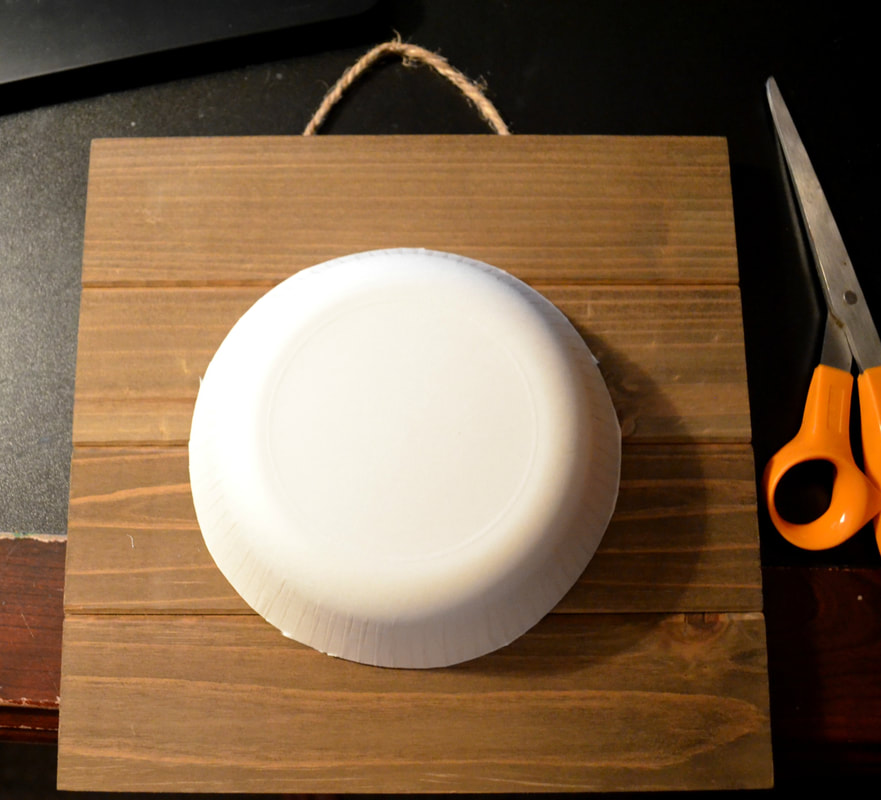 Next, I had planned on printing out a sign to help me get the wording nice and neat. Hopefully the download template works for you guys, but I've had issues in the past so just in case here is how I made that. Go to Microsoft Word and open a new file. Click, "Insert" and the circle (or whatever shape you want), click on it and select the size. In this case the size is 6"x6" and make your shapes color white or else you're going to be using colored ink for probably nothing. Then Right click on your shape and you can add your text. In mine I used Harrington font, italicized, at size 36.
 As I said my intention was to use this, take my xacto knife to make grooves to follow, and paint over it. I did end up painting but I realized on the first line that my painting was going to be too thick and busy to fit the words exactly how I had printed them. This is why I listed a paint pen in the supply list. I think if I had one of those I could have done it just like my print-out. But, alas, I had to make it work with my favorite gold paint and a paint brush. I love the craft smart metallic gold. I used it on a lot of our wedding decorations.  So here's the finished product. I think it came out gorgeous and my grandmother loves bright colorful flowers so it's a home run for her.  Now, here's how to make the felt flowers shown above. You are going to need sheets of craft felt you can get at most craft stores. They're less than a dollar a sheet.  Using green felt, I cut out leaf shapes. I think of them as tear drops that are slightly oblong. Make plenty of those because they're key to creating the wrapping affect on the plaque.  Here is how I made the roses. You're going to cut a square of your choice color felt. Then you're going to draw a spiral with bumps.   Then you're going to take your scissors and cut along the line on your felt. Also remember once you've cut your spiral to go back and round the outside where the straight edges and corners are. Then I used a toothpick to help with the next part but it is optional. I put a dot of hot glue on the tip of a toothpick and wrapped the very center of my spiral around it.  Once you've got your spiral going be sure to put a dot of hot glue every so many turns to keep it from unraveling. And remember that you're creating a rose so make sure as you're twisting it that it looks like a flower.   And to finish off the rose, if you used a toothpick to create it, simply flip it over and cut it off. I have a pair of Cutco scissors that I use for crafts where I have to cut tough things. I mean they cut through pennies, so they're pretty good for this.   Moving onto the white flower. I honestly can't say for sure what that flower is but I think my mind was inspired by lilies. Though as I write this I also see poinsettias, so I don't even know. I cut out a six pointed shape with long petals. Then six triangle like shapes in white. I also cut out three yellow ones but I forgot to photograph those.   I put hot glue in the center of these triangles and folded them in to make little pointed tubes. I then glued those to the center of the original white shape. They look pretty good considering this one was honestly a made up on the spot decision.   The purple flowers where were daisy inspired are super simple. I created a five petaled outline on a sheet of felt and cut out two of those per flower. And in hind-sight those kind of remind me of the flowers in Spongebob...   I hot glued those on top of the other like you see in the photo above. And then using the same idea as I did for the roses, I made a small smooth spiral of yellow for their center.  Just like the rose I hot glued this into a circle. But instead of spiraling it upwards like a blooming rose, I kept it relatively flat like watching a cotton candy machine spin. And then glued it to the center of the purple flower.  Now, the blue flowers are big pom poms. I originally was calling these hydrangeas but then I remembered those are totally different. But whatever they are, they're super easy to make. You're going to take a rectangle of felt, as long as you want it, and cut it out.  Then using your hot glue gun, put hot glue on one edge of the felt and then fold it over so that the ends meet. Once that's finished take your scissors and cut slits all down the folded center.   Then you're going to take your cut up strand of felt and roll it in a spiral like a cinnamon roll. Again, using hot glue as you go to keep its shape. And the little cuts will create a nice poof pom-pom look. If it's not big enough you just make another strand and glue it on.  And finally the red poppy flowers. I cut out hearts with no point on the bottom. You'll need four for each flower. Honestly, they kind of remind me of baboon cheeks but that's probably way too immature of a description.... but look at them.  Now put hot glue in the center of these buts and pinch them together to get a nice petal shape. Then gluing those petals over top of the other and gluing the center together, you create your poppy shape.   I took black sharpie and colored the center of the poppy all black and then added the little lines and dots that poppies are known for.  Finally, using hot glue I attached them to the pallet. This is also important because it gives all those spiraled flowers a final touch to be held together. Anyways I hope this gave ya'll some ideas and that you enjoyed this. As always if you do this project I'd love to see it! 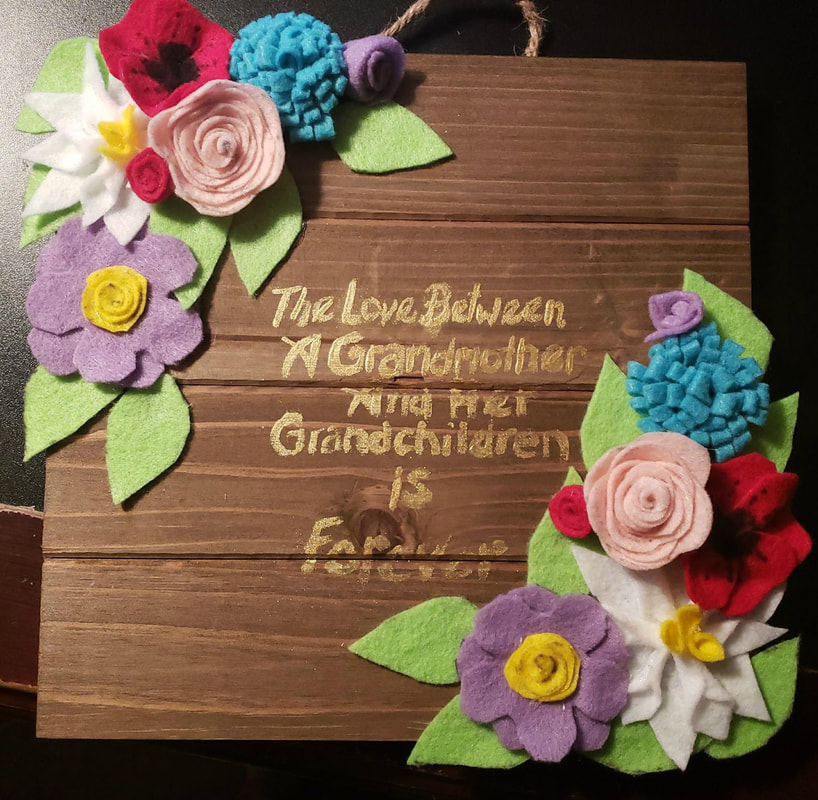 This is an interesting project for a few reasons. First of all this is just an awesome looking project to begin with! You can use these mini treasure chests for a toy for your kids dolls, as a jewelry cases, for a pirate themed birthday party, and I'm sure you can think of plenty of others. Now, the second part of this is that the box being used to make these chests are Denture Cases. And this one is actually being made for that very purpose. And this project is also different because I'm going to start this artcile by using this as an opportunity to bring to light health problems that people of all ages can suffer from. Such as Gaten Matarazzo from Stranger things. He has Cleidocranial Dysplasi, which affects bone and teeth growth, the "teeth" he has in stranger things season two? Those are actual dentures! Many of you might remember the photo of the little boy who had to wear a cranial helmet and his parents had it painted to look like a pilots helmet. Why can't that logic apply to all kinds of health problems? Why not personalize a denture case? Give someone a reason to smile every day. And let's be honest, this isn't even just the younger generations that would love a cool denture case. My grandparents were waaay into the idea. I just wanted to give ya'll food for thought and maybe encourage you to find a way to make someone else smile. I'm a firm believer in making a good situation out of a 'bad' one. Now let's jump into it! YOU WILL NEED:
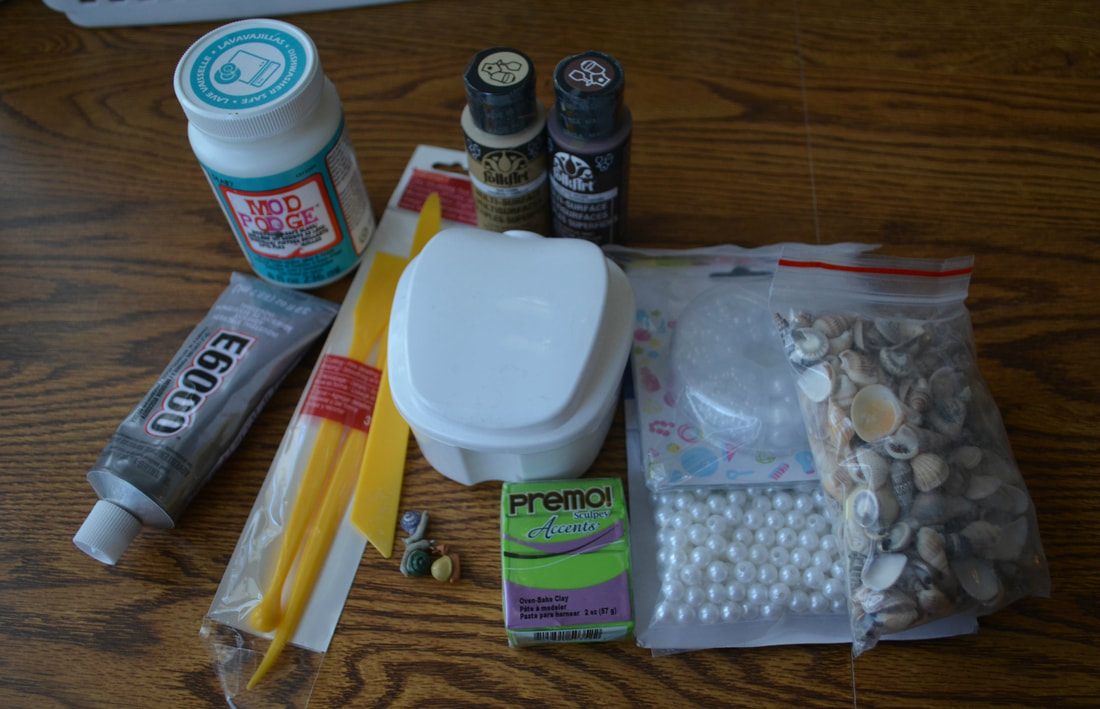 As you can see I'm well prepared. I also wanted to make seaweed to go around the chest, so I bought some Premo Polymer Clay and some clay tools. In a previous craft post I shared how I made those. I'll include the link to that here: https://agirlwhoneedstocraft.weebly.com/just-crafty-things/simple-polymer-clay-diy So we're going to start with painting the chest. I stand by enamel paint for multi-surfaces. If it can be painted on glass it should work for anything. And since I am using this as a denture case I did not paint the inside. Though I can't help but think that this would be really cool with a gold lining and little gem stones glued to the inside of it. I almost want to make another just to try it. 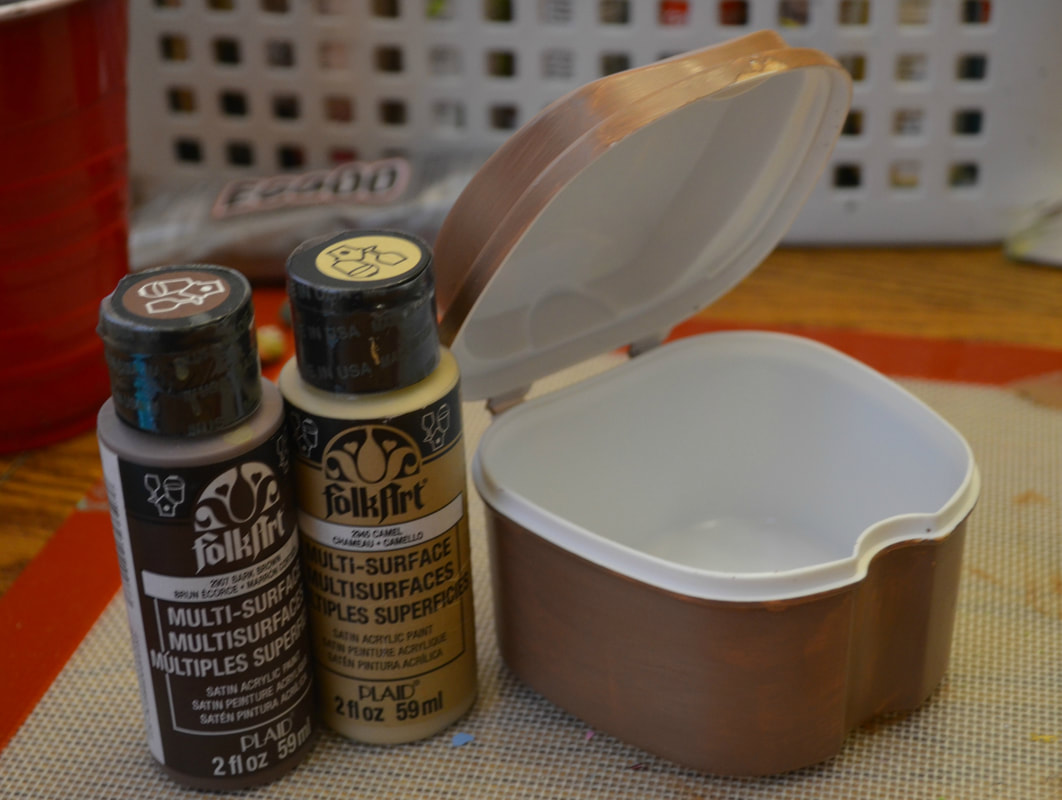 I mixed the Bark Brown and Camel Folk Art Multi-Surface paints together to get the chest color of my choosing. Enamel paints dry fairly quickly but I do find that painting on plastic is like overlapping lines on a wipe on wipe off board. If you go over a spot you've already painted, the whole thing streaks off. I had to paint it in coats and let it sit to get a good coverage. When it was finally dry I moved onto the next step of gluing the clay items onto the chest. I had already mapped out where I wanted them and so I followed the lines I could see through the paint. I used a mix of E6000 and Hot Glue. Hot Glue makes for a fast attachment, but the E6000 is supposed to make it last longer. I found that I had to use the E6000 on the main part of the clay and then Hot Glue on the bottom to help keep it put. 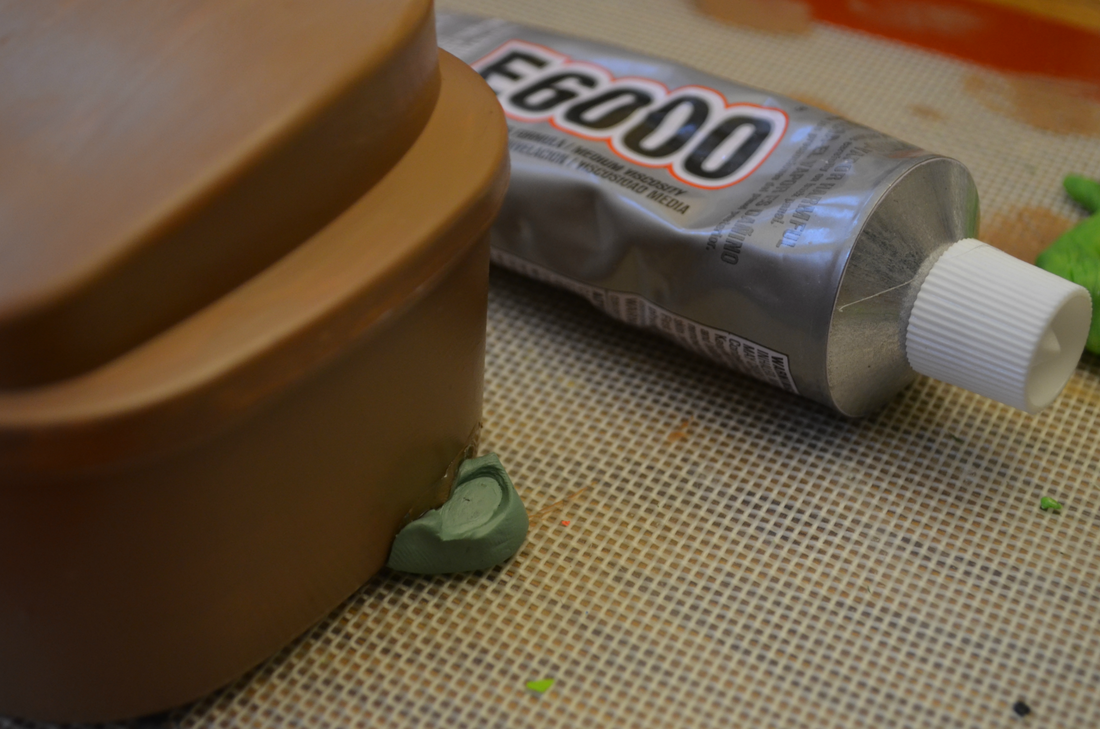 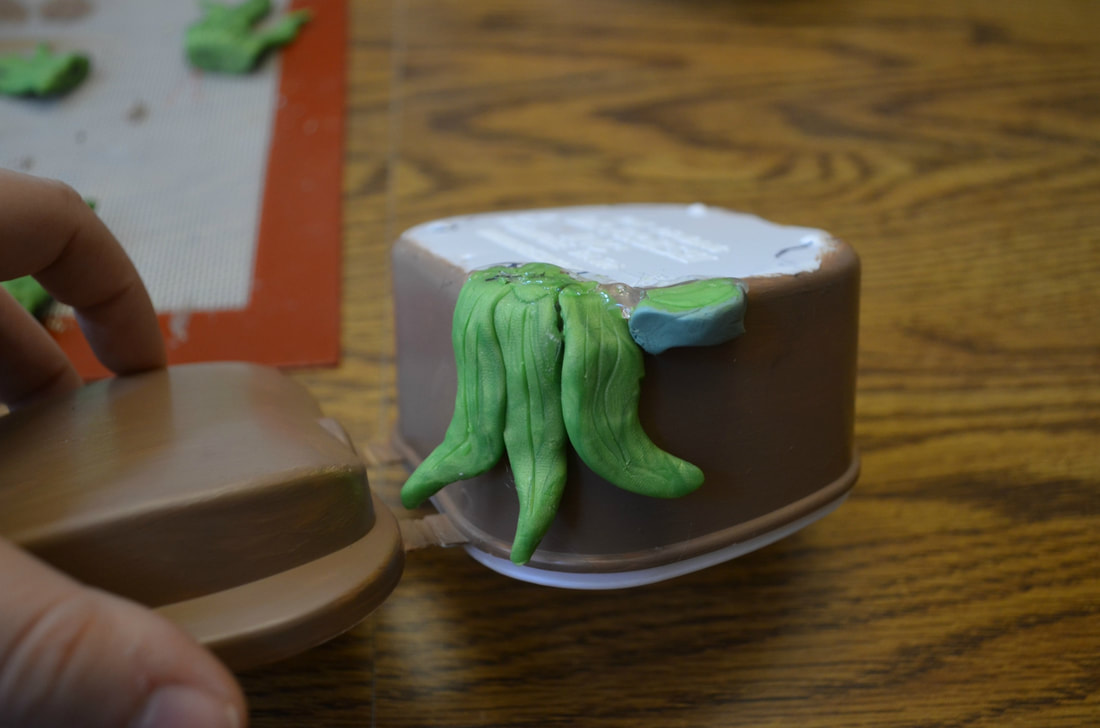 Downside to this was that when I had to adjust an item, the glue was pulling the paint off the case. This is why I say even if you're not going to be using this near water you really should put a sealant on it. Even just scratching the paint caused the white case to show. I didn't panic about this when it happened. I merely continued decorating my case. But I will show you what I was dealing with. 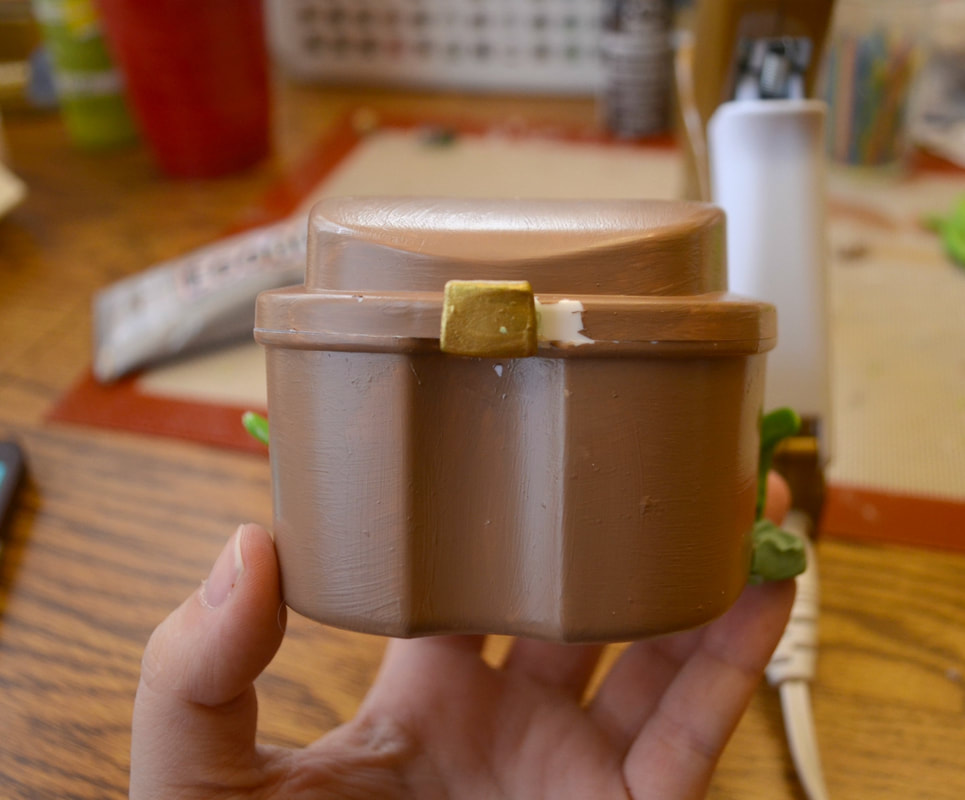 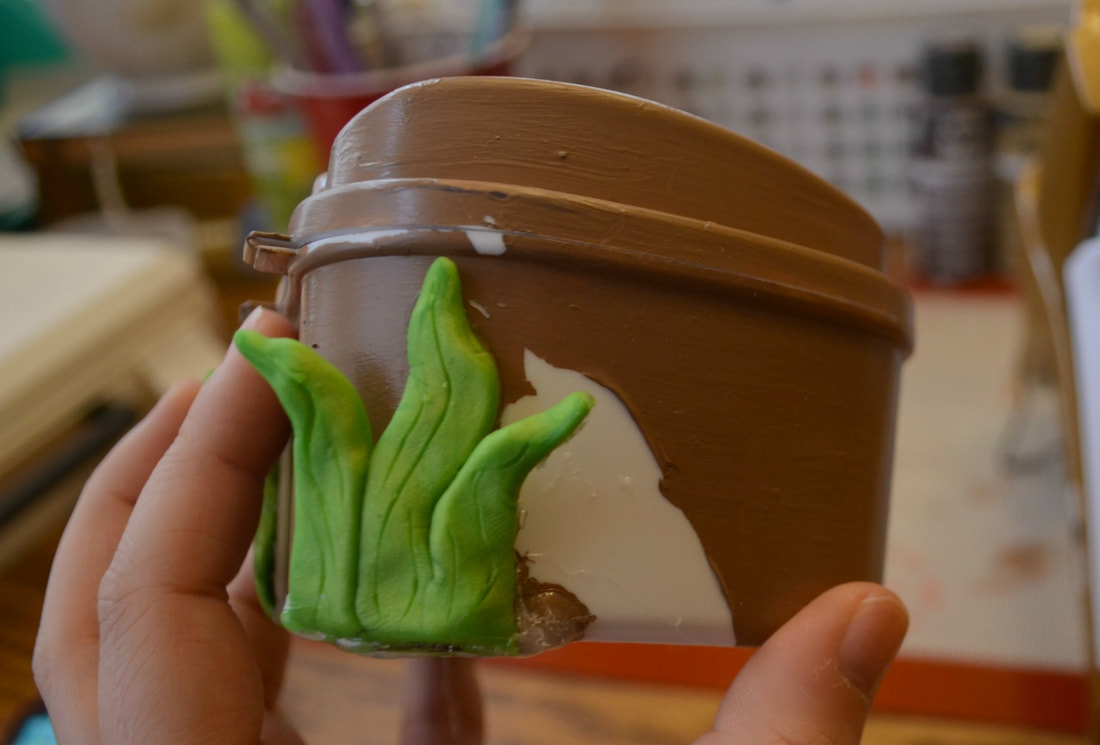 Continuing to use my trade off of E600 and Hot Glue, I attached pearls, sea shells, crushed shell parts and the two mini snails I was attaching to it. AND I KNOW they're not aquatic snails, but let me have this! 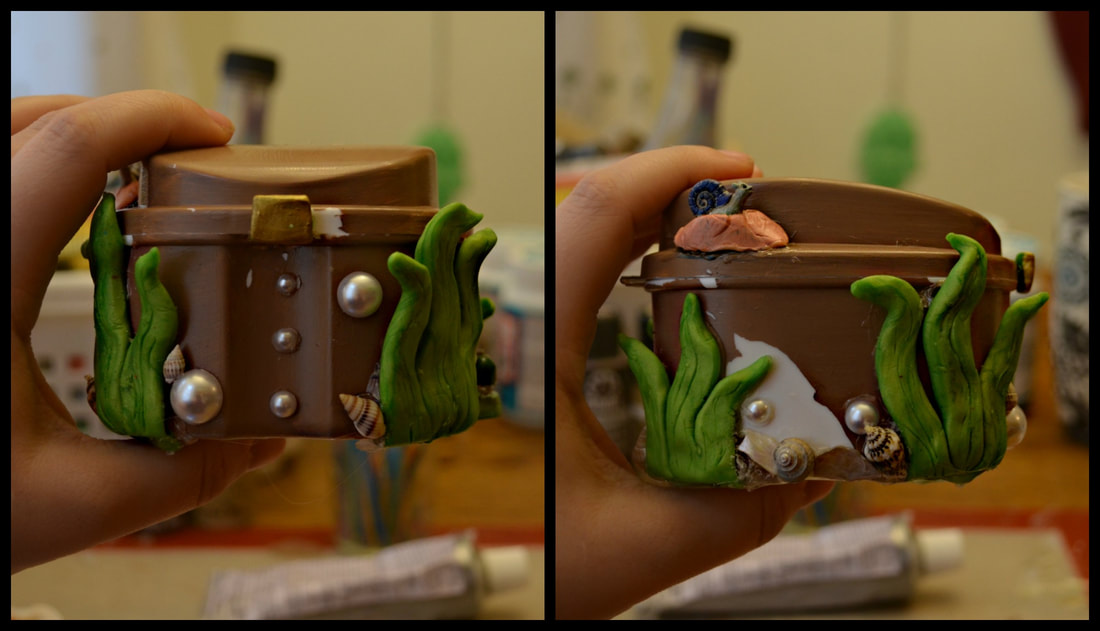 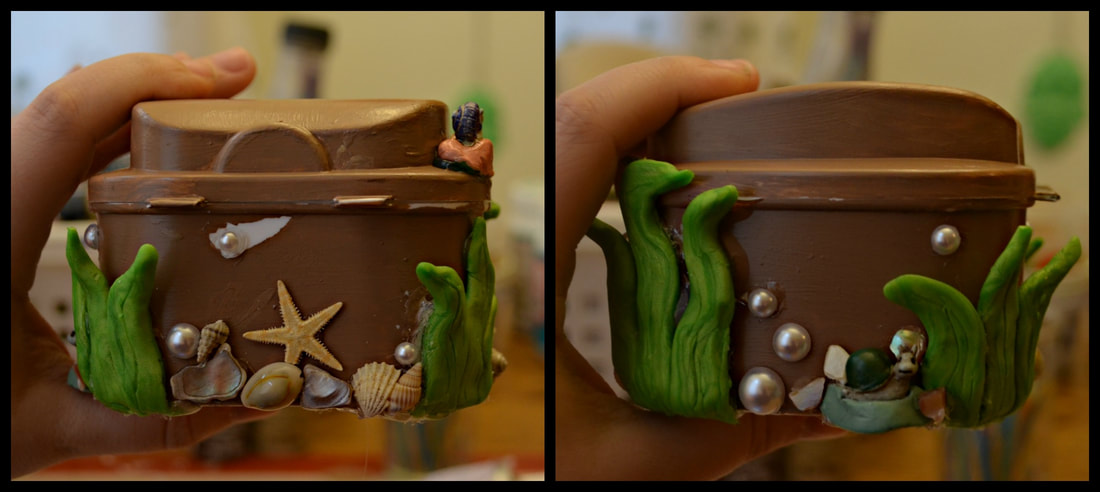 The Seaweed I had in the front of the container kept leaning forward. I used a little E6000, applied it with a toothpick behind the seaweed, and then using bulldog clips I adhered them to the side. This kind of glue takes 24 to really hold but within the first 10 seconds of application, the bonding begins. I gave it two hours to set while I worked on other projects. When I came back the seaweed was holding firm and I was able to move on to decorating the lid. 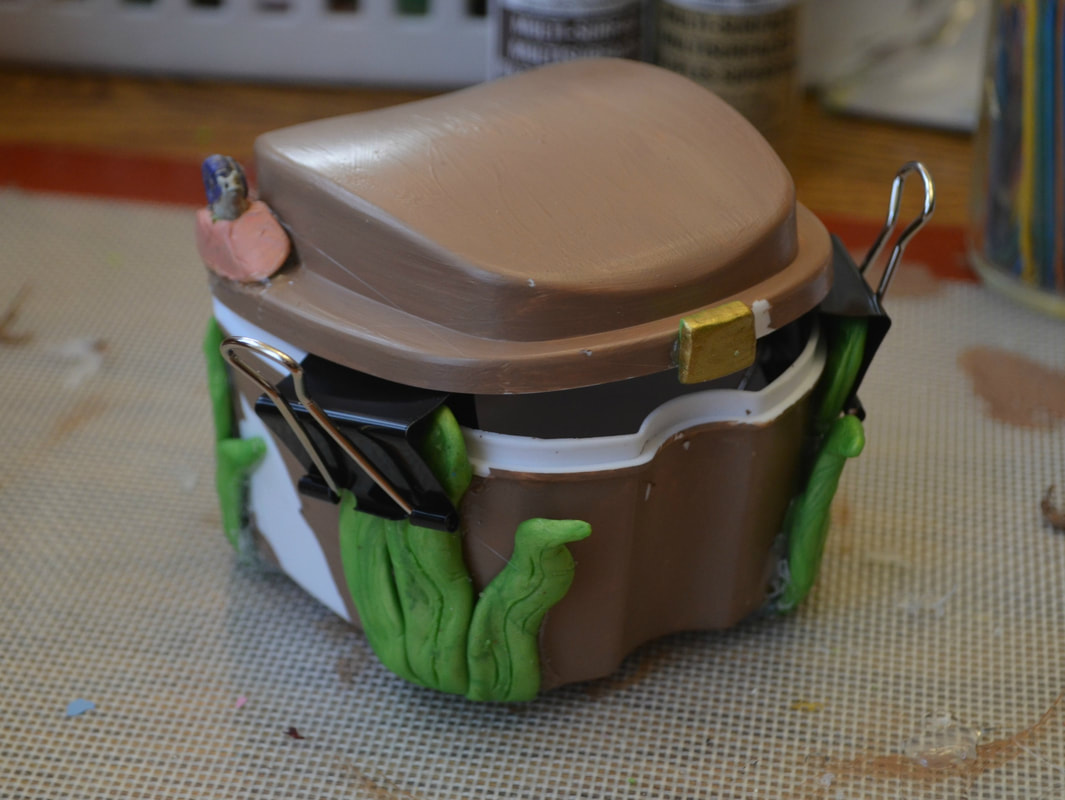 I really love a good pun! How could I resist this opportunity? 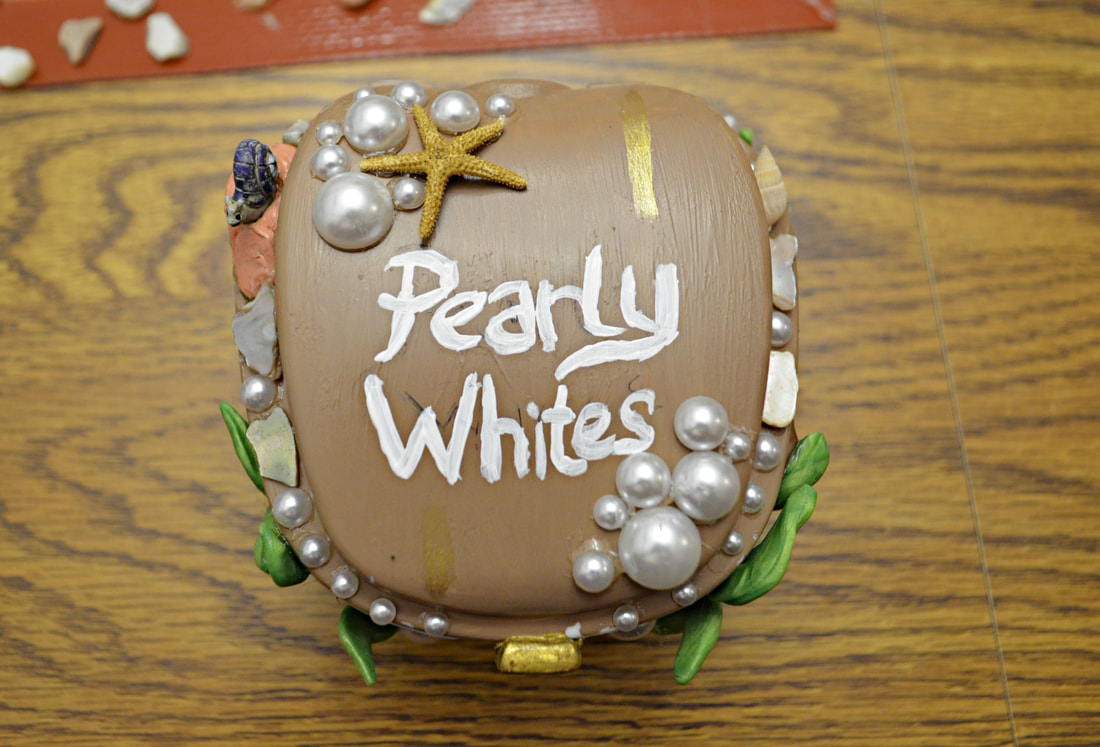 I totally forgot to mention that I did buy regular craft pearls but instead fell in love with these "half" pearls, they made this project so easy! And the shells were mostly from my personal collection but you can get bags of mini shells from Michaels or Amazon. 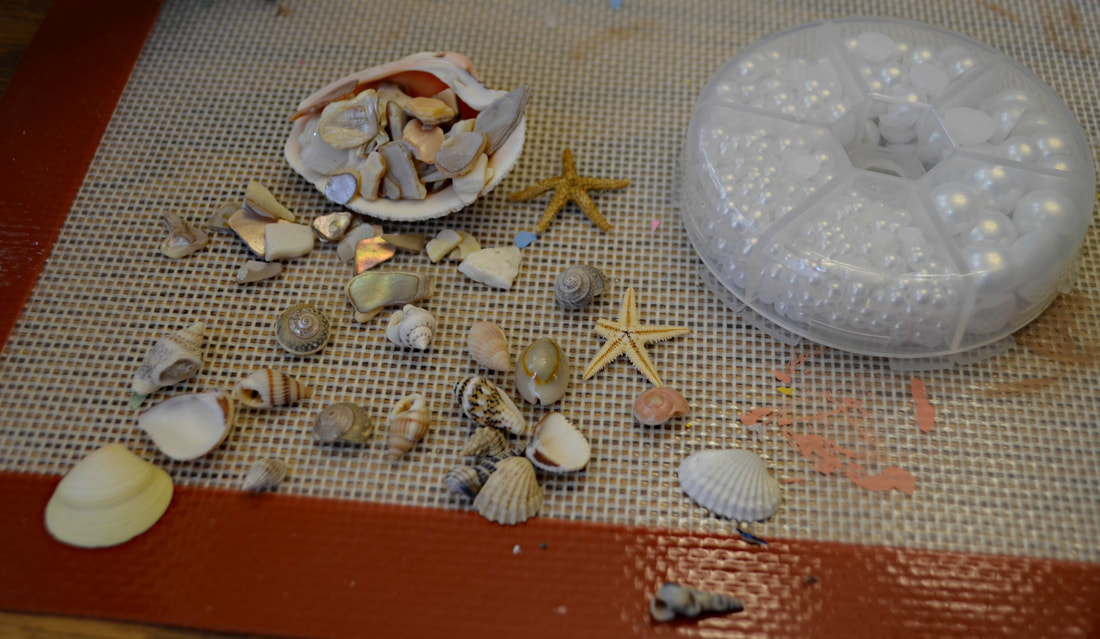 After I was happy with the lid I used my brown paint mixture to touch up all the spots where paint had peeled or been scratched. And I also painted the bottom for good measure. I set this out and let it dry over night. Like I said it takes 24 hours for E6000 to really hold and I wanted to make sure that none of the pearls or shells popped off while I was applying the sealant. 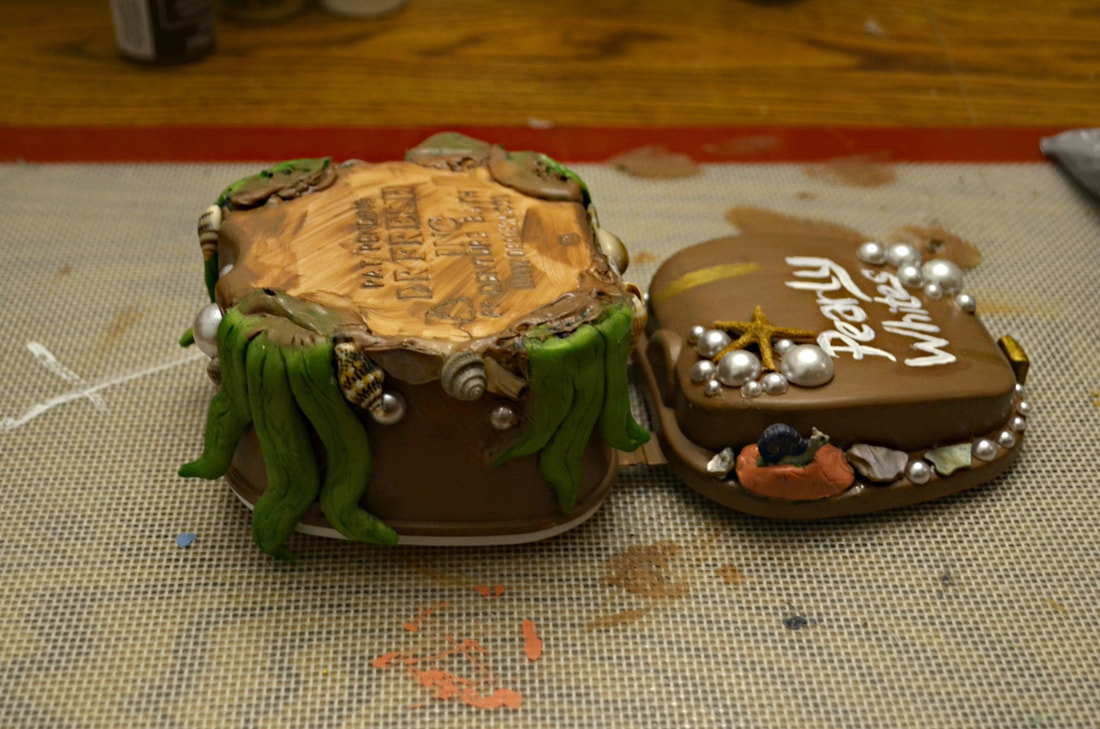 Being that this one is going to be used around water I used the Dishwasher Mod Podge, but if you just want to seal it, anything should really work. Once again I was careful about getting it inside the container. I also realized that when I took the picture my big brush was in the decoupage bowl, but I ended up using a much smaller brush that allowed me to really get in and round all the decorations. I wanted this puppy is sealed REAL well. 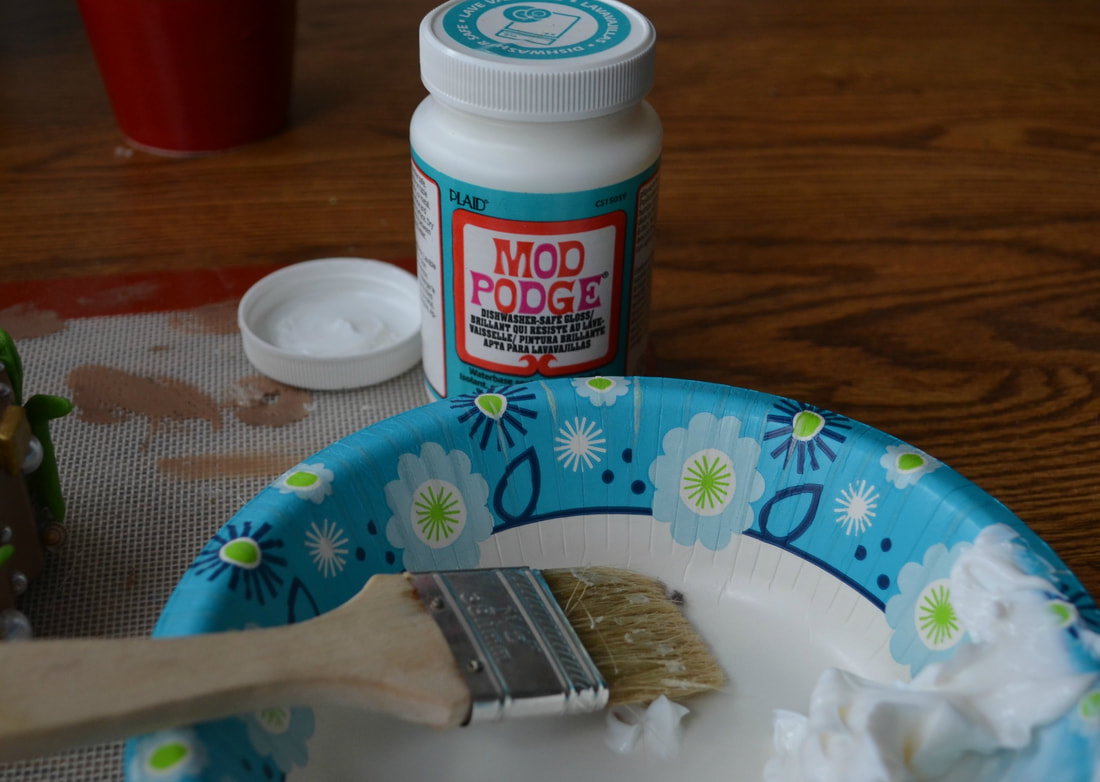 I applied a few coats of this for good measure AND I STRESS getting it around items. I even sealed the bottom. Which brings me to the final step, using hot glue to form a bottom. Sometimes Denture cases are a little off center and they tip. I learned to make little "legs" using hot glue by just putting small dots on the bottom. The other thing you can do is make a ring around the base entirely. I chose to do this just in case. It keeps it balanced and most importantly, it makes sure the chest isn't sitting on the sink in water where the mod podge and paint can slowly be worn down. And there you have it. A finished treasure chest. In this case it's going to make someone smile and their guests too. But remember this would make an adorable gift for a child with a doll set (especially those 18" ones that are all the rage) or a cute jewelry container to place your rings/necklaces in when you go to get a shower. And the top of the chest can be painting to say anything, or perhaps just covered in shells and pearls. I really do encourage ya'll to think outside the box. And think of someone else as well. The gift of joy is the sweetest gift of all. 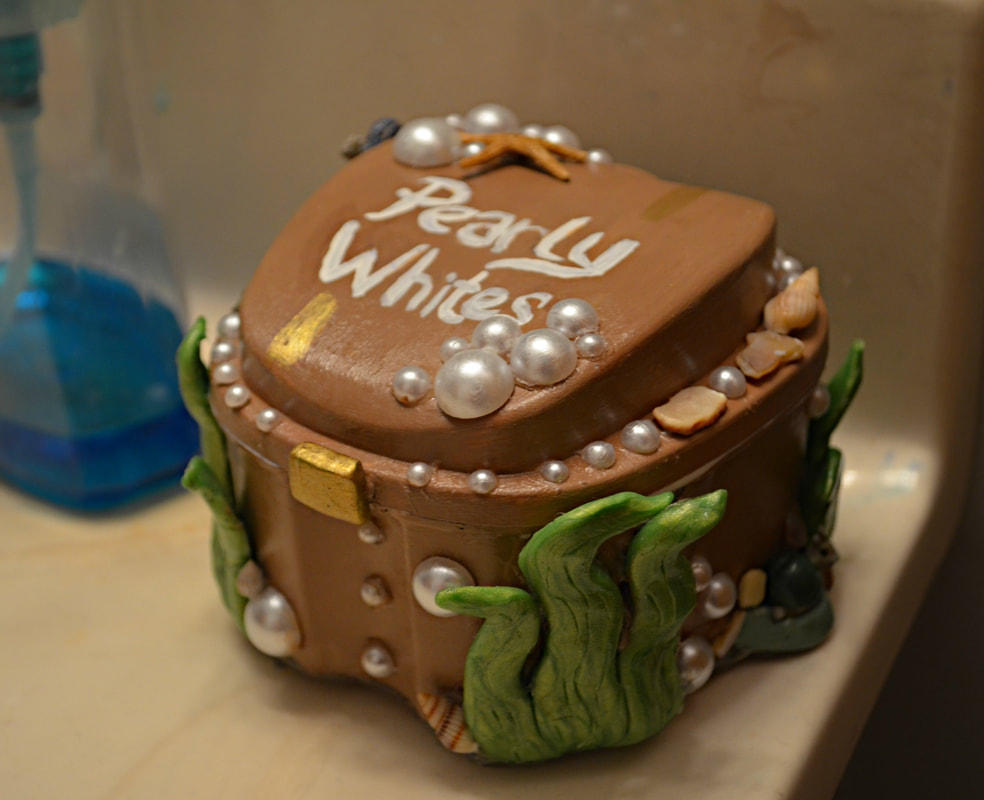 Continuing to learn about Polymer Clay I decided to try out some puppy themed designs. Now, by the time this releases I should officially be a puppy mommy to TWO pups not just one. My husband and I are adding a little corgi to our life. And I've been dropping little hints to our friends and family. (If the adoption is official, I'll include a picture of him below) YOU WILL NEED:
If you google Dessert Dog Stickers and look through images you'll see the idea of mixing animals with objects is nothing new and it's really cute. I knew I was going to make a Corgi but the dessert part just kind of came to me. Once your mat is laid down grab your clay. I decided to stick with the chibi look and use a yellow for his coloring. Taking a chunk of the yellow I shaped it into a circular shape. The first one I did as a tester, had an oval shaped head and my mom preferred it that way. When you're happy with your head shape also make two little ears. I made the ears in the shape of triangles and then softened them in a teardrop fashion. I think it did a pretty good job of shaping those adorable corgi ears.   I used white and a tiny bit of red clay to make soft pink for the inner ears. (And later the inner mouth.)   Then using the body color (whatever color you choose to make your corgi) and a chunk of white clay, mix them together to make a lighter shade for the face.  Using black polymer clay I made three small balls. Two round ones for his eyes. The third Rolling TINY black lines of clay I started to shape out the mouth. Once I was content with the shape of everything and it's placement I made two TINY dots of white clay for the center of the eyes. Then using white and a decent amount of red I made a darker pink for his tongue.    Using the light pink we made for the inner ears, use a tooth pick or small clay tool to fill in the inner mouth around the tongue. Then taking your white clay roll it out in a long tube. Taking your roll of clay, weave it back and forth to make a whipped cream look. It's easier to see than to explain... I also used a toothpick to carve grooves to really give it depth.   Using more of the white clay make a "collar" of white clay around the neck of the corgi head. I made it wavy, I wanted it to look like he had just popped out of a sundae. 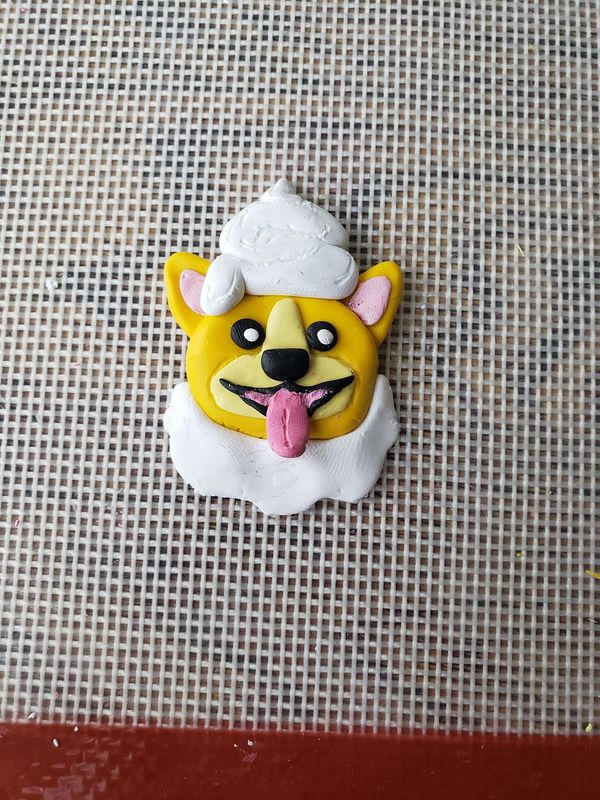 Using the same color as your dogs head, make two little legs. I made them wider at the top and smaller at the feet in a cartoon-ish charm.  And as the final touch to my design I took a small chunk of the red clay and rolled it into a ball. I stuck it on top of the whipped cream and wallah- the cherry on top! ((I also used an eye screw and twisted it into the top of the charm so that I could then turn it into a key-chain. Almost forgot that step, lol.))  If you hadn't already done so make sure your oven is preheated to the proper temperature before baking your clay. With the clay I use it's 30 minutes for every quarter inch of thickness at 275 degrees. Most polymer clays are the same but some need slightly less time so always check before baking. Now, I like to place my aluminum pans on a cookie sheet, but whatever works for you. Set one pan down, line it with parchment paper so as not to burn your clay, and then place your polymer clay creation inside. Then using your bulldog clips attach the second aluminum pan over top of it, like so.  Once your clay is out of the oven and cooled down you can then cover it in a glaze. This gives it a nice shine, but for the type of craft I just made it really isn't necessary. I just think it gives it a nice touch.   And as of June 12th we are the proud parents of a little Corgi named Finnigan! Here's some photos of the cute little bundle of joy! He's also the reason this tutorial is behind, we wanted to announce him to our families first.   In my ever expanding list of polymer crafts I decided to give this a try. I've always been a fan of cute USBs. I figured to give you guys an easy tutorial I would make a camera. I take thousands of photos, especially during the spring and summer, so a USB just for photos is a great idea. And I also made a book USB for my writing. YOU WILL NEED:
Alright so starting with your USB sticks. I did some research on this before I started just popping things in the oven. Supposedly you can just bake regular zip sticks as long as you break off all the plastic and outer coating. BUT that made me very nervous so I bought nano zip sticks. They are no more expensive then the regular length ones I normally purchase from SanDisk. But with the nanos all you have to do is make sure there is a hole for them before you bake your clay.  (STEP #1) Taking your zip stick, if you use the nano, simply push the plastic end of the USB into the clay to form it's spot. If not remember to remove the outer casing and then sculpt your clay around the metal. And remember that your zip stick is going to be plugged into your laptop, computer tower, xbox, etc. So if what you sculpt has any 3D parts or odd shaping, you'll need to have a flat spot for it to sit flat against whatever your USB is going into.  Once you got your indent made simply remove the USB and work on flattening out the surface and sculpting more. I suggest as you work on your item periodically take your nano and place it back into its indent. It's very easy to mess up it's location simply by flattening a part of it or pushing too hard on your clay. Anyways, continue building your item. For me I am making a camera zip stick. So I started with a black rectangle block of polymer clay.  I'm torn between wanting to just show you guys how to make a USB out of clay and how I made the camera. I will show you the step by step of the camera but I'm also going to tell you if you just want the basics just skip on down to (step #6) (Step #2) Next you're going to want to want to make the lens for the camera. Taking a chunk of black clay break about half of it off and roll it into a ball. I have one of those tools with the ball at the end of it to make a nest indent, but your pinky would probably do just as well. (It is hard to see in the second picture but the center is a rounded dent.) 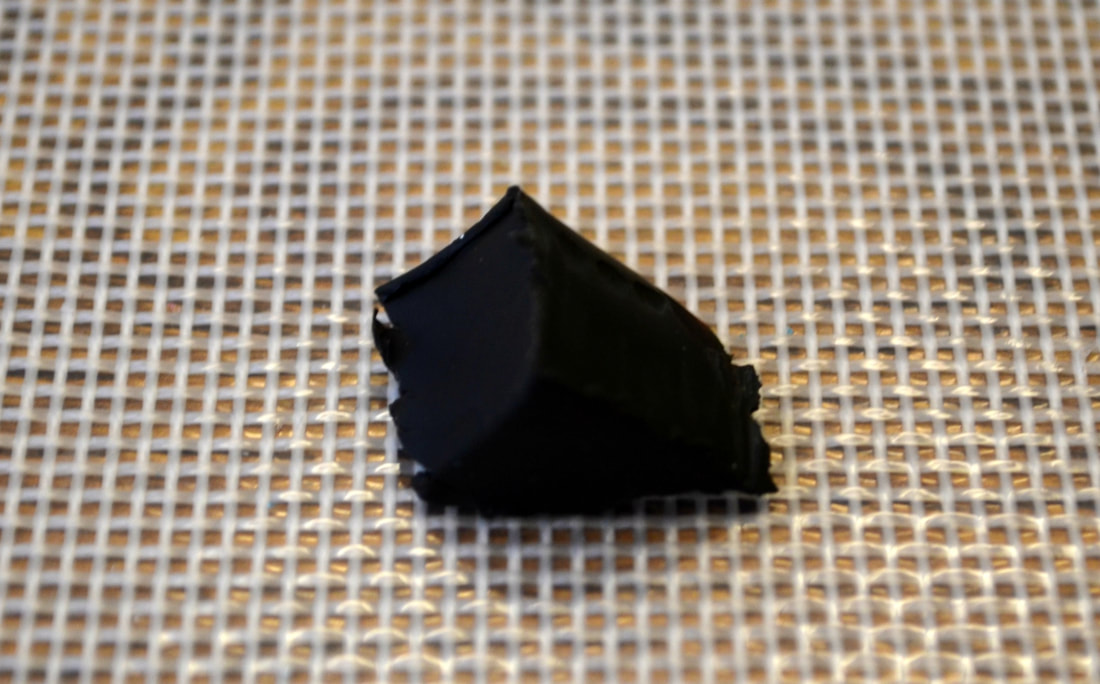  Taking a chunk of white clay make a smaller ball and slightly flatten that as well. You're going to take that and fill the center of the black ball we just made in the above photo.  (Step #3) I also wanted to add some details to my lens so I took a SUPER small ball of black clay and rolling it out with my fingers made a long thin piece of clay. I then took that and bent it, cut some of it off, and then slightly flattened the top. Then I attached it to the white lens we made in the last step.   (Step #4) Going back to the chunk of black polymer clay in (step #2) break off another chunk and create a small rectangle or a triangle to make the flash for your camera. I made a triangle, and then took a small piece of white clay and made a smaller triangle for the center.  (Step #5) Small details are also important to our project. So here's the little details I added. Taking small red clay I created the shutter release and a detail for the front of the camera.   I also took a tiny black ball and created a small circle for the camera mode dial.   (Step #6) Once your set with your polymer project- AND SURE YOUR USB FITS- let's bake it. I use parchment paper and aluminum pans. Placing parchment paper in the bottom of an aluminum pan, set your polymer clay project on top of it. Then taking bulldog clips attach a second pan like so.  This is to help your clay from baking without getting burned. Each brand of polymer clay bakes a little differently- but the directions should be on the container. I have been using Premo so that's 275 degrees for 30 minutes.  (Step #7) Once it's out of the oven and cooled down you can apply a coat of glaze to it. Honestly the glaze makes it look nice and supposedly helps the clay from getting damaged or breaking but I haven't seen any proof of that. So I understand if you're hesitant to spend money on a glaze, especially if you're new to this. But just taking a paintbrush apply the glaze all over. I did not put the glaze inside the indent where the USB is going to go. And if you baked your USB it probably goes without saying that you shouldn't glaze it.  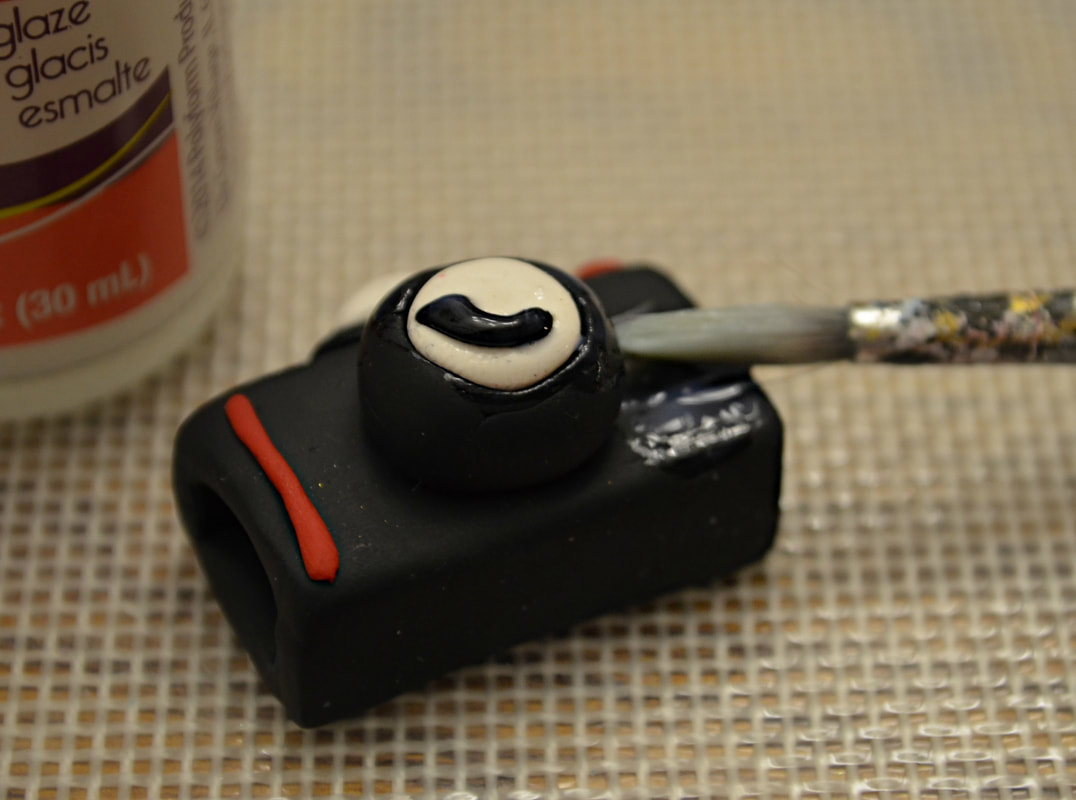 (Step #8) Once your glaze has dried take your tube of E6000 and fill the hole where your USB is going to go. Don't over fill it otherwise the glue will seep out and into the USB itself. Now I forgot to photograph this with the camera zip stick but I took a picture with the book USB. So don't mind the photo change.    (Step #9) Let it dry for 24 hours and then enjoy your new zip sticks!   Now I'm not a professional and I'm still learning. These aren't perfect and I'm sure you can spot a number of mistakes. BUT I think it's important to start somewhere and hopefully give someone else the courage to just try something new. Throw caution to the wind and start creating. Every master was once a beginner, no? Happy crafting ya'll!
I'm a huge fan of personalizing anything I can. If you've followed my page for any amount of time you've probably seen this. Now, I'm honestly not sure what possessed me to do this, but I find that a lot of my art projects an ideas just kind of pop into my head. And then I have such a strong urge to follow through with it. This was one of those moments, my heart was telling me to do it and when the opportunity arrived I went for it. My husband and I have been busy making a small room livable for two people, this meant getting rid of my twin bed for a queen, rearranging furniture, and a lot of stress. I have anxiety problems and change has always been a big issue for me. I had to give up my lamp to be able to keep my desk in the room. So I bought a lamp that mounts to the wall! It's cute and can be extended in either direction, so more light over my desk, or light over the bed if I want to read. The only downside if the lampshade it came with is a beige shade, so it almost looks orange when the lamp is on. Not that this is hideous but it doesn't really LIGHT up the room the way a white lampshade does. So I bought a new shade and that was that. But this little spark went off in my brain that said, "I could paint that" And here I am. A good disclaimer here is to make sure the lampshade you have properly fits your lamp and is of a good quality grade. I have seen many lampshades that have felt ridiculously hot, even though they shouldn't be retaining any heat. If you have a lamp shade that is hot do not do this project on it. I have serious concerns about that. Since this shade was cold to the touch inside and out I knew it was safe to paint on. YOU WILL NEED:
I had a plain lampshade with a smooth surface.  I had so many ideas going through my head! Did I want to paint the inside and see it shine through? Or did I want to paint an ocean scene? I ended up going with my love of literature on this one and spent time sketching out a design around the shade.  With all the time it took me to design this, I wasn't able to paint for several hours. But you know, dinner, dishes, and kid's homework does tend to be more important, lol. The good news is I got to just sit down for the evening, paint, and watch a guilty pleasure of mine. (I'm really into missing person videos, conspiracy theories, etc. And I have to say that if you're looking for some Danelle Hallan and Kendell Rae are two Youtubers who make FANTASTIC videos.) Then I just painted in my sketches.  I actually own a grove snail named Locan so I thought it was super cute to add him to my painting. Last week I made a post about setting up his new home and you can find that here: agirlwhoneedstocraft.weebly.com/pets/pet-garden-snail-home 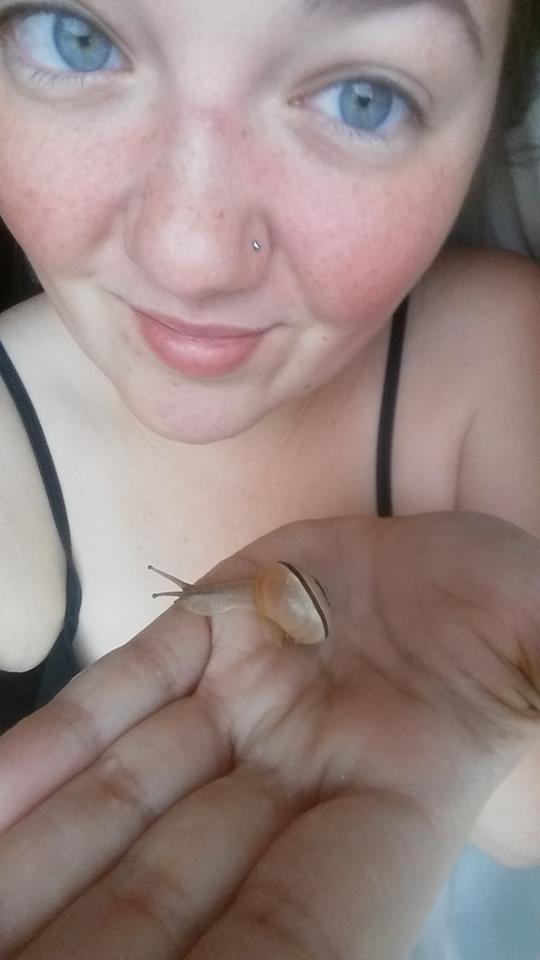  Just taking a moment to show him off, lol. I'm a proud mommy of all my babies. Now getting back to the painting here's how it turned out!   The gold paint used on this project was very metallic and this whole thing just looks gorgeous when spun. Unfortunately, I can't get vidoes to work on this site but maybe check out our Instagram page and I'll try and get one up on there! And as I said earlier in the post the lamp shade had an orangish tint to it when lit. Nothing changed and the paint didn't affect the lighting in the room. It was the same except the light was coming through the paint.  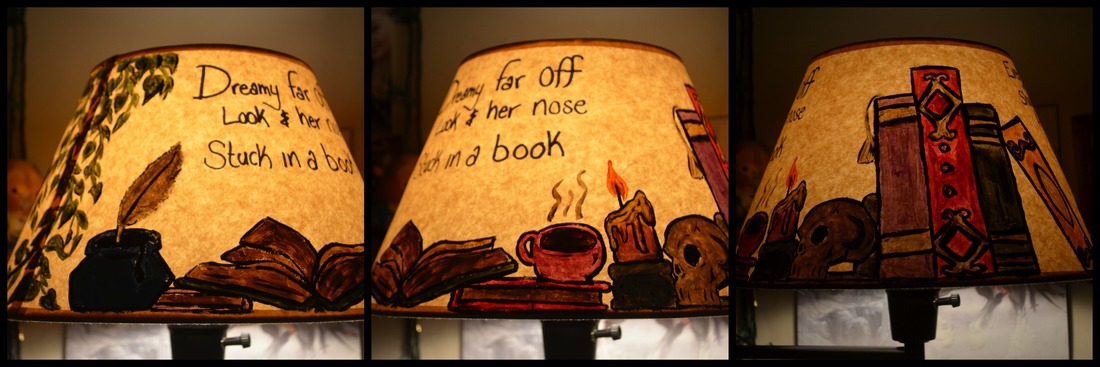 And that's pretty much the jist of it. I personally am going to see if I can find any white lamp shades and see if I can mess with colors shining through the shade. Who knows what else I might try with a lamp shade in the future? The beauty of art is that it opens up lots of possibilities. And maybe this gave you and idea or projects you might be able to do with a boring lamp in your house?
Now, I am very new to using Polymer Clay. I am not an expert in any way and people with more experience with clay should absolutely feel free to let me know if they see anything they think I should do differently. I encourage conversations and sharing our techniques. How else do we learn? With that being said, let's jump into this. YOU WILL NEED:
I specifically mention the brand clay I used because each one cooks differently. I did a bunch of research before starting this project. (Even though there are instructions on the clay package, it doesn't hurt to look into it.) I preheated the oven while I started sculpting it. That is one thing I do know- make sure your oven is preheated to the proper heat before baking your clay. I broke off a wall of the clay and started twisting it and softening it so that I could easily mold it.   I broke a part off the clay and rolled it out using my hand. (ALSO should mention that I am using my trusty Silicon Sheet. The clay didn't stick to it and it kept the table clean.)  In this initial part of the project I am working on making seaweed. Once I had a roll I started sculpting it with my hand to make it looks "wavy". The way seaweed, specially animated seaweed, would look. I placed it up against the container this seaweed was going to be attached to. This way I knew how tall to make it.  Then I took the pointed end of my sculpting tool and used it to make lines in the seaweed. (Honestly, if these various tools have names I do not know them. The packaging only said clay tools.)  I made three strands of seaweed per cluster, and made a small section of clay to wrap around the base of the container they were being stuck to. Now, I know I'm going into a lot of detail for a basic clay tutorial. Well, this is also going to be part one of the next craft tutorial being published on this page. (So come back soon if you're interested in seeing that one!) To go with this project I also needed some smaller things made. A small square and two 'rocks' for some miniature snails to sit on. I'm going to discuss cooking these first. For one, I painted the small square before cooking in hopes that the gold paint would really stick to it. The 'rocks' I painted afterward they were already cooled from the oven. To bake these, like I said, the oven was already preheated to 275 degrees. I took two aluminum pans to bake the clay in. The universal thing I've seen other clay crafters say is that you have to be careful not to burn your polymer. I placed parchment paper on the inside of the pan before placing the items in it. I cooked the smaller items first for a very small amount of time. The consensus is that 6mm tick clay should be baked at 30 minutes. But these were much smaller so I actually baked them for 12 minutes. Before baking the clay in the oven I placed the second aluminum pan on top of the other and used the bulldog clips to hold them together. These are all tips I've heard to keep your clay from being over baked.    When I did bake the seaweed clusters, I wanted them to keep their "L" bend. So I took aluminum foil and rolled it up and then wrapped those in parchment paper. This way the bend in the base of the seaweed would have something to rest on and keep it's shape. I also didn't want it to bake and "fall" so I placed bunches of aluminum foil and parchment paper under the leaves.  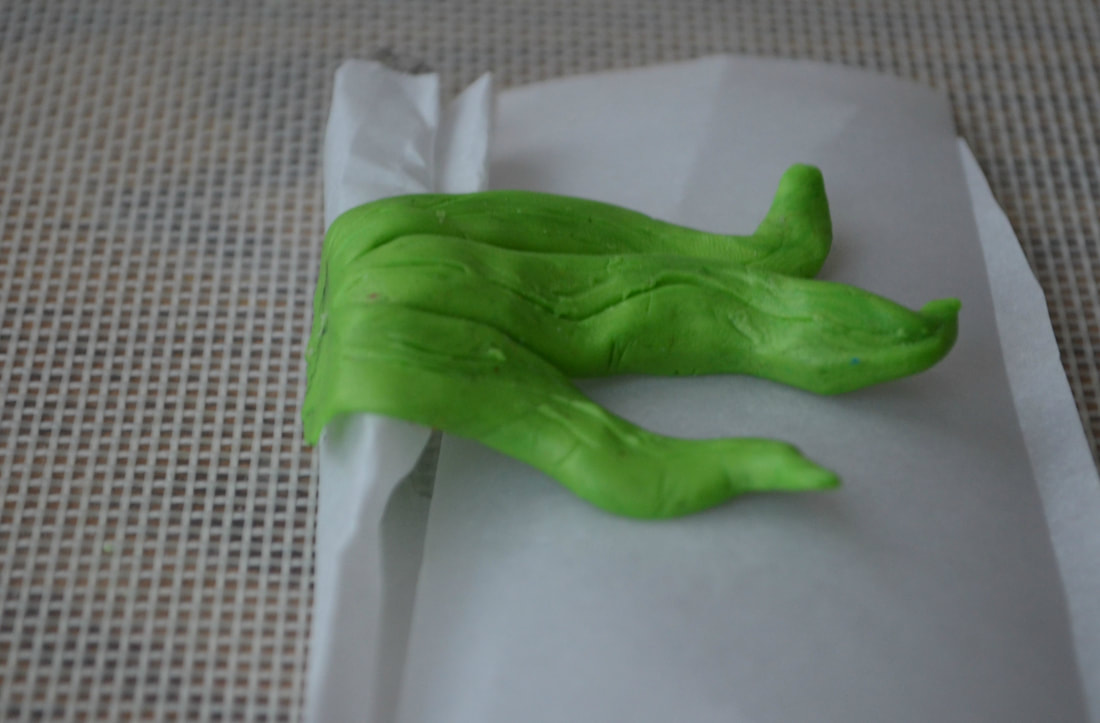 Once again these were placed in the aluminum pans with the bulldog clips, the oven set to 275, but these I did bake for the 30 minutes.  I will be the first to say that this isn't a new idea. In fact lots of people have covered this topic. And yet, you know how often I have had to look for a how to like this? So, I figure it can't hurt to have one more tutorial on the internet. Sorry this isn't as interesting as my usual DIY's but I'm sure it will help someone out there. YOU WILL NEED:
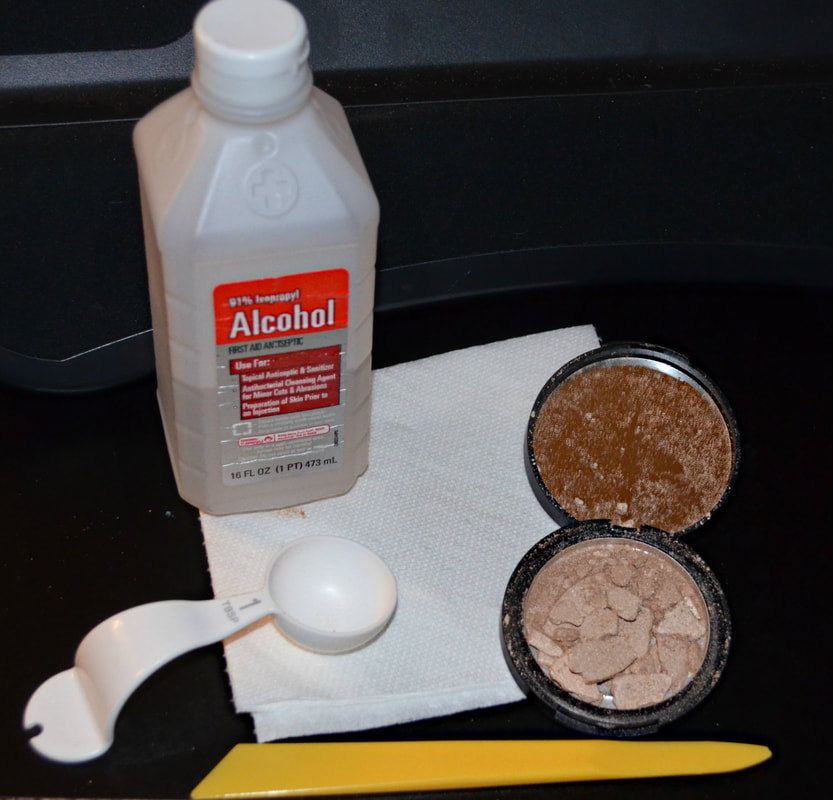 As you can see in the picture above my highlighter was broken. More annoyingly I bought it, opened it, and saw that! It's the first time I've ever bought makeup and it was straight up broken. But I figured why take it back? More than likely this either happened in shipping or while it was being stocked, so there's a good chance the rest of them were broken as well. Instead I just fixed it myself. In the supply list I mentioned that a knife was optional. (And I actually used a sculpting tool). If you want to, use your knife to chop up the broken makeup into finer pieces. This does seem to help more: the alcohol is soaked up better and in general it's just a smoother transaction. BUT I can understand if your makeup broke in large sections that you might not want to chop it all up. 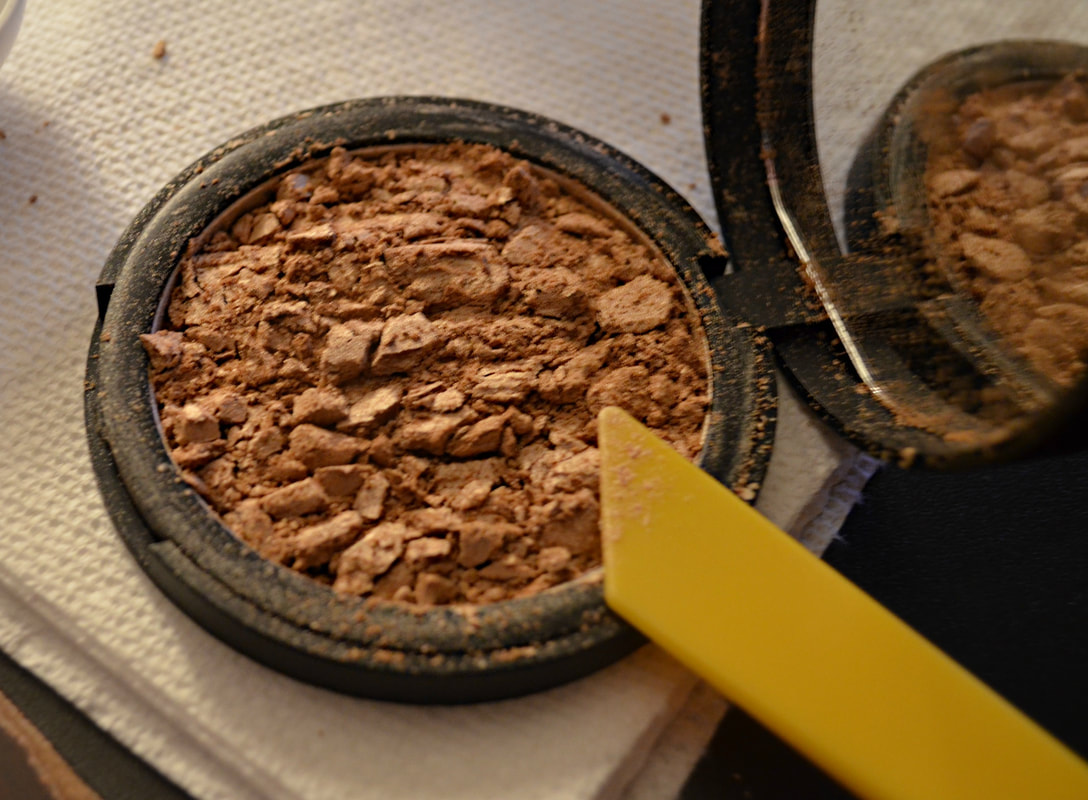 Once you've either skipped that step, or chopped the makeup real fine, you're going to get out your alcohol. I already had some in my cabinet for other projects and mine is the 91% alcohol. Which I will talk about because I want you to know the pros and cons.
But as I said, I already had the 91% in my cabinet, and I wasn't about to run to the store when it wasn't necessary. I was always told to use 1.5 tablespoons of alcohol for fixing makeup. I wasn't sure I was going to need that much so I added it a little at a time. I did end up using about that much, but I'm still glad I added it gradually. 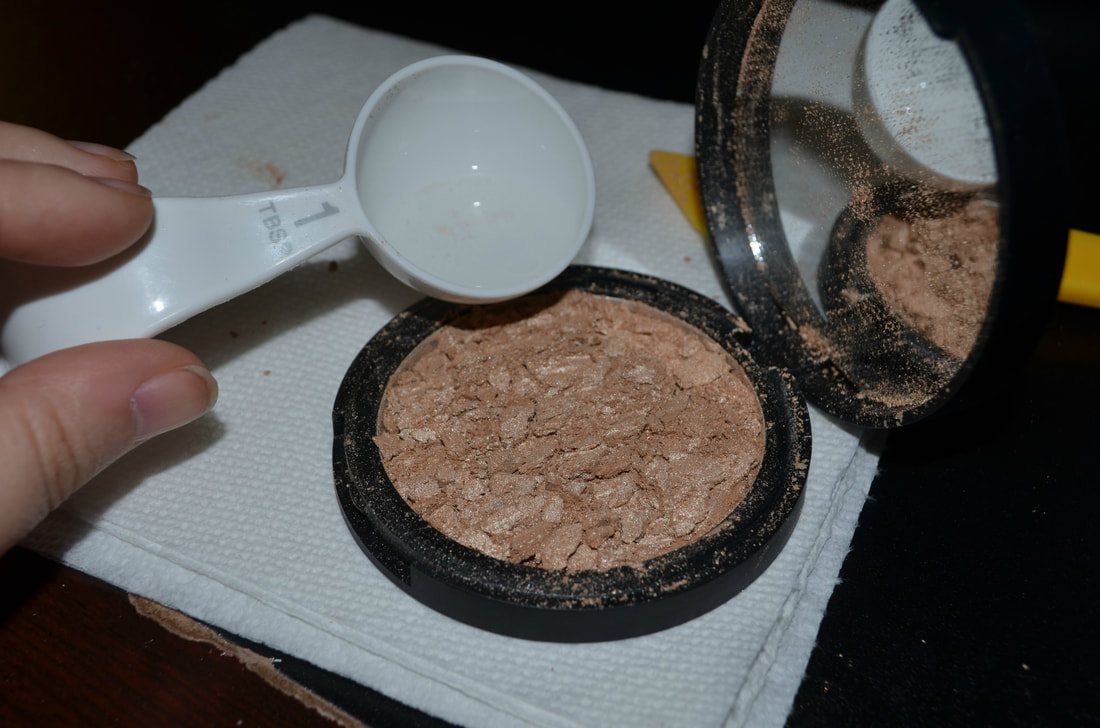 When the alcohol had actually saturated everything and the makeup was dissolving, I used my tool again to help spread the contents out to that it filled the inside of the compact. Technically what you're supposed to do next is let it sit for x-amount of time and THEN dab it with your paper towel. I however felt that there was in fact too much alcohol in the container and dabbed it a little early. But then I set it aside of 15 minutes and really used my paper towel to apply pressure to the makeup. This helps soak up any remaining liquid and helps make sure the makeup is properly back into place and will become powder once more. 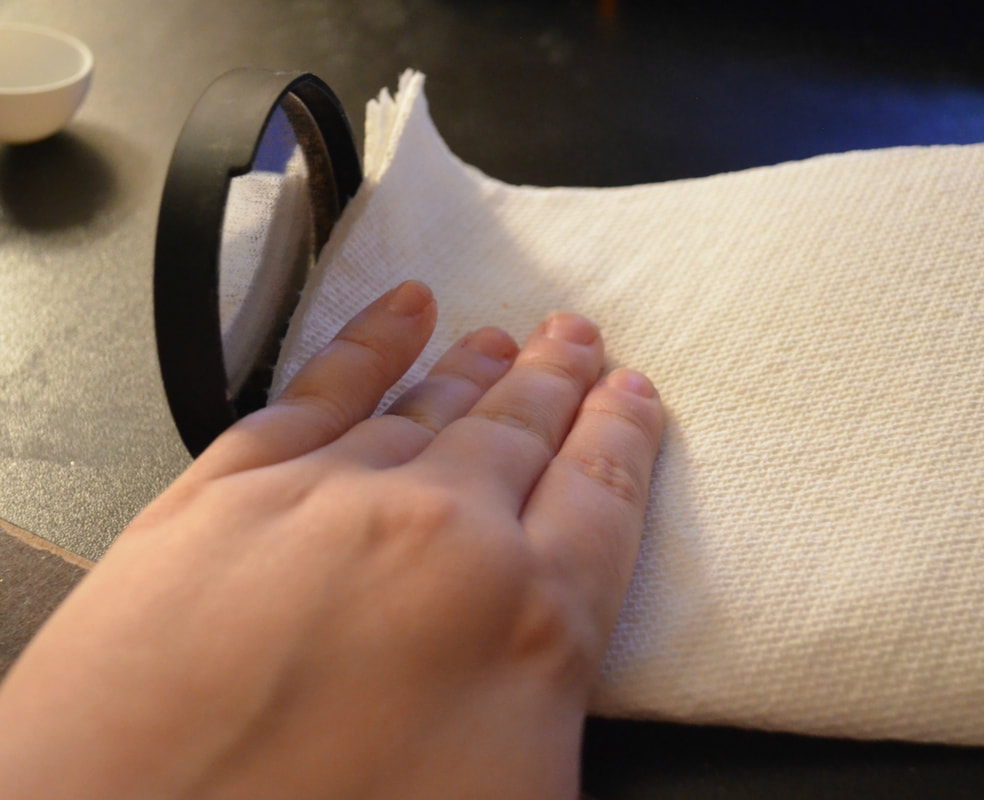 When this was done I used my finger to smooth the makeup (otherwise it had this silly paper towel print). And I used a q-tip to clean up around the edges of the compact. I left the makeup to sit out overnight just to be sure it was dry and now it's good as new. I've used it several times since fixing it and the only thing I will say is that occasionally when I open it I can smell the alcohol. BUT it's fleeting and my face doesn't smell like it after applying makeup so it's really nothing to worry about. 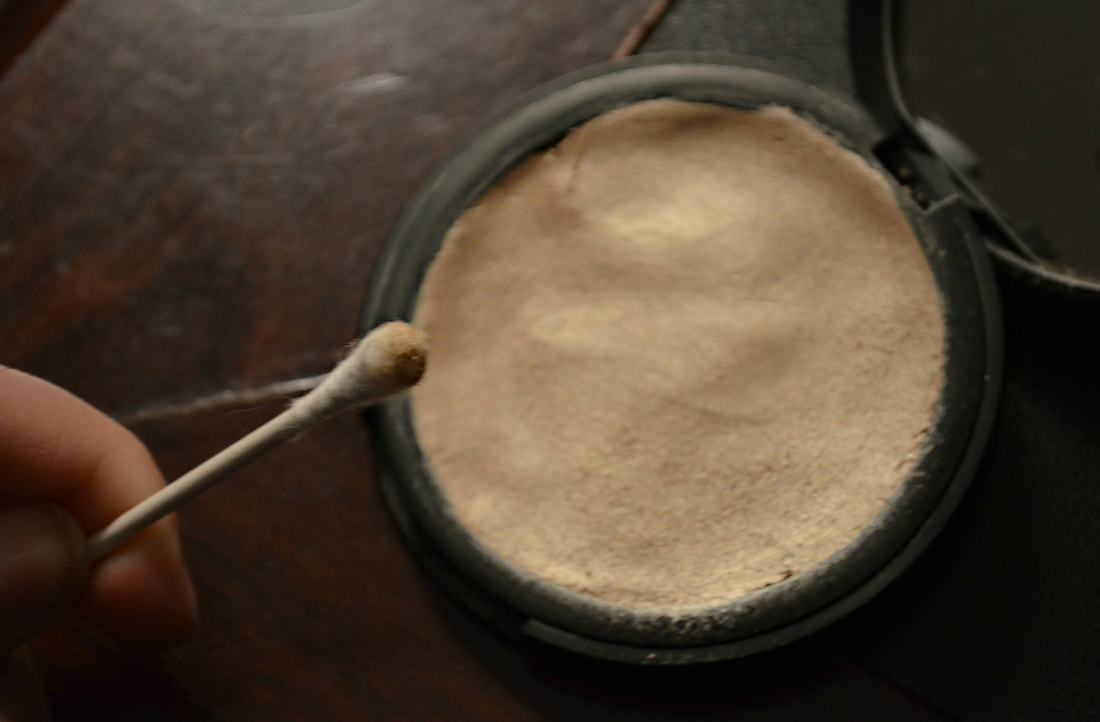 Once again I know this is out of the usual for my DIY's but I hope it is helpful to someone out there! And stay with me because the usual crafty DIY's are coming!
I don't know how many schools do this, but Jenna's school does a 'spirit week' of sorts. They have all kinds of themed days such as crazy hat day, team spirit day, etc. This year they had a Crazy Hair Day! (Although this could also work for anyone whose little one wants to do a Trolls costume for Halloween.) Now, JJ is far more outgoing then I was and she is all in for participating. Being the crafty guardian, all heads turned towards me. I suggested the Trolls since they've become a big deal again. So here we go, my tutorial for a Troll Hair. YOU WILL NEED:
 The trick to this is the water bottle. You will want to place the water bottle on the top of your child's head (or whoever you're doing this for) and pull their hair up over the bottle. This is where the hair brush comes into play. I didn't end up needing it, and with how curly her hair is I'm glad I didn't need to brush her hair up and over the bottle. IF the person's hair isn't long enough simply cut the very bottom of the bottle off. I will note that you should be careful doing this, plastic hurts if it's not properly smoothed. Jenna's hair was a little too short, so I did have to cut an inch off the bottom of the bottle. Once I did that, it was the perfect height to pull her hair up and over the top of the bottle. You're going to use your ponytail holder to attach the hair to the bottle. The hair tie will go around the neck of your water bottle and leave a cute little poof of hair at the top.  You can see that little poof in the picture above. You can also see that she has some small strands of hair that aren't long enough to go all the way up to the top of the water bottle. This is why those bobby pins are suggested. Using those bobby pins you can pull those hairs up and really hold them into place.  Now that you got that hair pinned / tied up you're going to want to hit that hair with some major hair spray! I have thick straight hair and it doesn't believe in staying put, curling, etc. It's a mess, lol. Jenna has thick CURLY hair, and it doesn't believe in behaving either. So I use MEGA HOLD hair spray. I LOVE Aussie, it's the first hair spray that did anything to keep my hair in place, and it smells AMAZING!  I'll be perfectly honest, I applied multiple coats of hairspray. The hole in the ozone? Yeah, it's over my sister's head. (I'm sorry guys.) Once the coats of mega spray have been applied I used the colored hair spray to give her that "Troll" colored appearance. I like to use the colored hair spray you can buy at Party City. I use it on St Patty's Day, but I find that if you just apply a standard color-wheel-color to normal hair, it doesn't really pop. You should first do a coat of white spray. Just a little something I find works best. If you have really light hair or blonde hair, you may be fine, but remember these are cheap dyes and colors and if you want them to look like the cap color you'll really want that first layer of white. (I forgot to mention that I covered her in a towel to make sure the color didn't stain her clothing.)  Give the coat of white hairspray a few minutes to dry and then apply the coat of whatever color you picked. Jenna wanted to have purple Troll hair, so that's what we went with. NOW, I sent someone else to pick up the hair spray. I didn't realize until the next morning (at 6 am) that they had only bought one can of the colored spray. I HIGHLY recommend having at least two cans of the colored spray. Since I only had one it's not a very vibrant purple. It looks kind of lavender in certain lighting, but she was still thrilled with it.  Once the purple hair spray has dried I hit her hair with another coat of Mega Hold. I'm dead serious that this wasn't going anywhere! Now, in the new trolls movie the main girl wears flowers in her hair. I was hoping I had some flower clips but I couldn't find any. Instead I used a flower crown we had from her Moana Party (check the party tab for Moana party crafts and DIY projects). Using those trusty Bobby Pins I attached the crown to her hair. This way it stayed in place the entire day- because she's a hyper kid.   Her hair held the entire day, except for a few strays that had managed to pop out of their bobby pins. I'll post a photo of that below to show you guys. We also made sure she was wearing a button up shirt so that we weren't attempting to pull a school shirt over this volcano of a hair-do, lol. This was relatively simple (I expected her hair to put up a bigger fight) and it only took about a half hour when all was said and done. Very worth it just from her smiles alone. AND for anyone wondering it came out in the shower no problem.  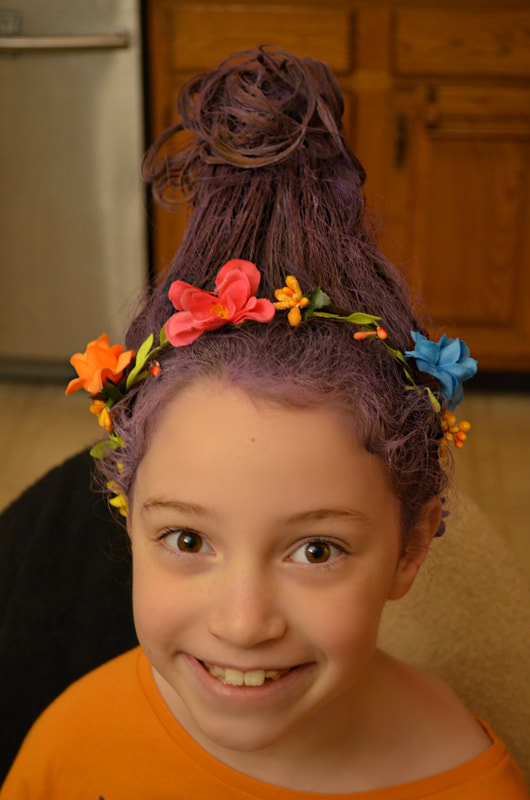 |
Crafty Things?This is a page dedicated to DIY's and miscellaneous projects. Archives
April 2018
Categories |
||
 RSS Feed
